3PL Warehouse Manager

Updated on September 13th, 2023

  • Extensiv Hub
    Popular Articles Getting Started Using Hub Technical Issues & FAQs Extensiv's Ideas Portal
  • 3PL Warehouse Manager
    Receiving Operations Inventory Management Shipping Operations System Configuration Scanning Operations Integrations Content Best Practice Resources Release Notes Popular Articles Troubleshooting Guides
  • Warehouse Management
    Getting Started Admin Console Shipping Order Picking & Packing Receiving Customer Portal Cycle Counting Kit Building Managing Users Barcode Scanner Import/Export Integrations Barcoding Wave Picking Bin Move Mobile Receiving and Picking Settings Popular Articles Reporting
  • Order Management
    Dashboard Orders Inventory Purchase Orders Shipments Customers Products Analytics Settings API API Integrations Accessing and Navigating Order Manager Error Messages Order Manager Popular Articles Accounting Integrations
  • Integration Management
    Getting Started with Integration Manager General Support Troubleshooting Extras & Addons API Documentation Popular Articles Order Sources Order Destinations
  • FAQs
  • Network Manager
    Getting Started Order Routing Management Technical Issues Shopping Carts Settings Settings, Products, and Orders
  • Billing Manager
    Getting Started Using Billing Manager
  • Release Notes
    Extensiv Sandbox Extensiv Extensiv Hub 3PL Warehouse Manager Integration Management Warehouse Management Order Management Billing Manager
  • Fulfillment Marketplace
    Getting Started
  • Sandbox
    Getting Started
+ More
  • Help Center
  • 3PL Warehouse Manager
  • Scanning Operations
  • Outbound Operations
  • Scanning Operations
    • Configuration
        • Setting Up Barcodes
        • Getting Started with GS1 Barcodes
        • Connecting Printers to SmartScan
        • Managing Barcode Definitions
        • Updating Samsung Keyboards
        • Configuring SmartScan on Zebra Enterprise Browser
        • Clearing Enterprise Browser Cache in SmartScan
        • Creating Custom MU Labels
        • Configuring SmartScan on Keyence Devices
        • Capturing Images in SmartScan
    • Inbound Operations
        • Receiving with SmartScan
        • Creating Receipts with SmartScan
        • Receiving Against an ASN
        • Printing MU Labels for Receipts
    • Inventory Management
        • Performing Inventory Audits
        • Moving Inventory with SmartScan
        • Looking Up Inventory with SmartScan
    • Outbound Operations
        • Picking Orders with SmartScan
        • Creating Pick Jobs
        • Multi-User Picking in SmartScan
        • Picking Multiple Orders
        • Bin-Picking
        • Picking for Load-Out
        • Picking for Load-Out FAQs
        • Packing Orders with SmartScan
        • Packing from Shelves
        • Using Outbound Serialization
        • Enabling Pick Paths
        • Picking a Single Order

Picking a Single Order

If you are shipping orders for different customers and with larger items, full pallets, or SKUs that are not similar, we recommend a single-order pick process. If an order has not been assigned a pick job in 3PL Warehouse Manager, the system automatically creates a pick job once it reaches a Complete status and prioritizes jobs based on creation date and transaction number.

If you have multiple users picking one order, please see our article for Multi-User Picking in SmartScan.

 
  1. Login to SmartScan.
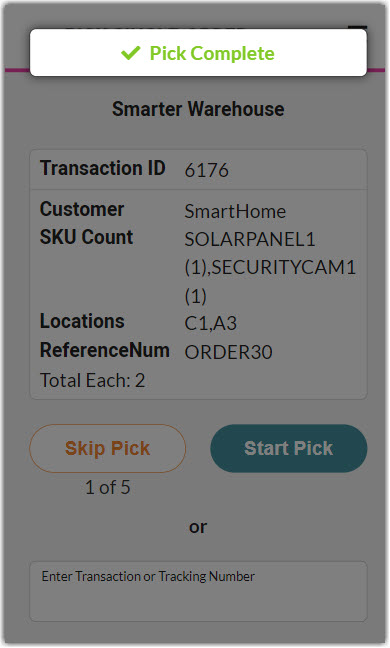
  2. Ensure the appropriate 'Warehouse' is selected from the drop-down list, then tap the Pick module. Note that the number displayed reflects the number of orders available to pick.
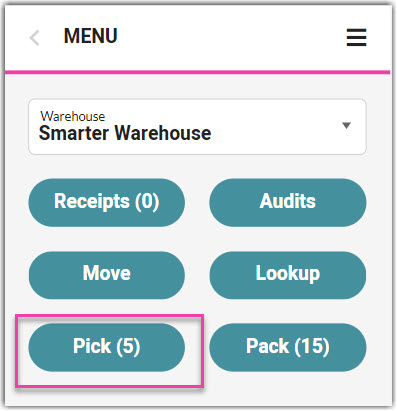
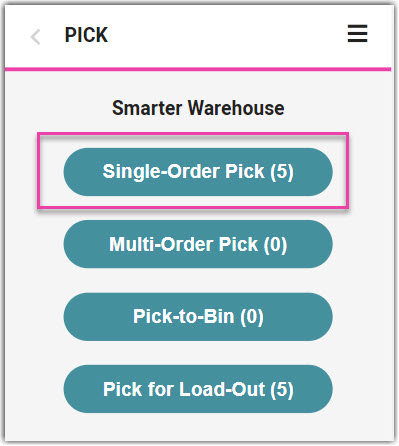
  3. Tap Single-Order Pick Job.

    • To pick a specific order, scan the associated transaction number or tracking number. If you are unable to scan, you can also manually enter the value, then hit < Enter > on your keyboard.
    • To begin the order shown, tap Start Pick.
    • To skip to the next prioritized order, tap Skip Pick. Once all orders are skipped, there is an option to 'Reset Pick' to the beginning of the pick job list.
    • If a specific location is associated with the pick job, SmartScan directs you to proceed to that location.
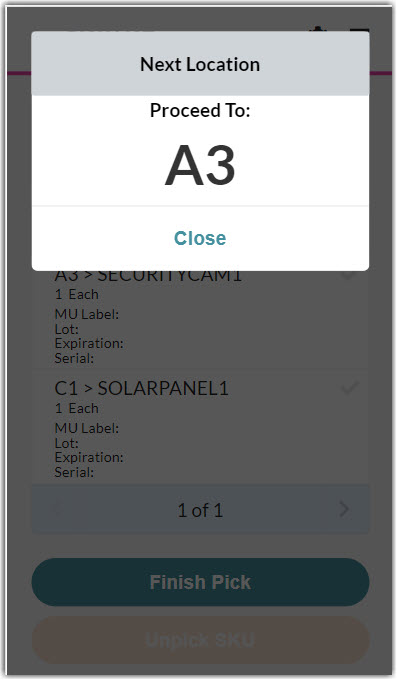
  4. Once the Pick SKU/UPC dialog box opens, scan the 'Location' and 'SKU/UPC' for the first item, as well as any required track-bys, such as Lot Number or Serial Number.

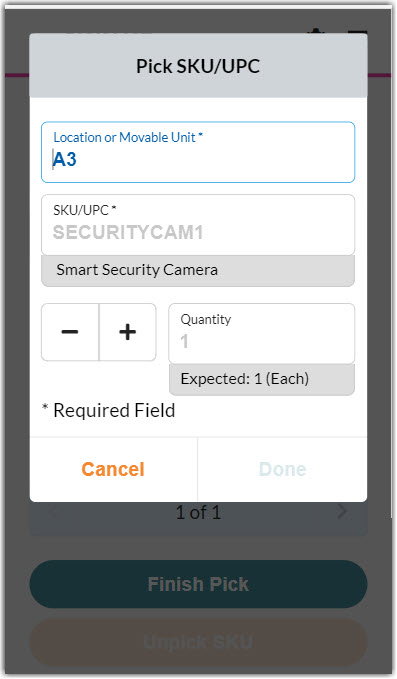
    Smart User Tip: If you click Cancel to return to the pick list, you can search for a specific SKU, UPC, or MU by typing or scanning the respective value. SmartScan will open the first line item that matches the specified value.

     
  5. Enter the SKU 'Quantity', then tap Done. The line item displays a green check to indicate the inventory has been picked.
  6. Repeat Steps 4 and 5 until all items are picked. If you have multiple pages of line items to pick, tap one of the bottom arrows to navigate to the next or previous page of line items.

    To unpick an item, select the appropriate line item, then tap Unpick SKU. Repeat the pick as needed.

     
  7. Once you complete the pick job, tap Finish Pick. A confirmation message appears.

If you were unable to pick all items associated with the pick job and you have the 'Force Pick Complete' permission applied to your user role, the application allows you to pick the partial inventory and prompts you to specify a reason. Once selected, tap Complete to receive the confirmation message.


Now that the pick is complete, the Pick Done Date column populates with the appropriate data in the Find Orders grid and the order populates in the Pack module. For more information about packing see our Packing Orders article.

selection choice

Was this article helpful?

Yes
No
Share additional feedback about this article

Related Articles

  • Batch Order Processing
  • Packing Orders
  • Ignoring SKUs
  • Importing Receipts

Not finding the help you need?

Contact Support
Solutions
  • Solutions for Brands
  • Solutions for 3PLs
  • Solutions for 4PLs
  • Solutions for B2B
Products
  • Extensiv 3PL Warehouse Manager
  • Extensiv Warehouse Manager
  • Extensiv Order Manager
  • Extensiv Integration Manager
  • Extensiv Network Manager
Products
  • Customer Success
  • Implementation
  • Consulting
Ecosystem
  • Fulfillment Marketplace
  • Integrations
  • Partners
  • Become a Partner
Resources
  • Resource Library
  • Blog
  • Market Insights
  • What is a 3PL?
  • What is a 4PL?
  • What is a WMS?
  • Why a Cloud-based WMS?
  • Glossary
Help
  • Help Center
  • API Documentation
  • Extensiv Univerisity
  • Community
  • System Status
  • Extensiv Logo
  • 100 N Pacific Coast Hwy, Suite 1100, El Segundo, CA 90245
  • |
  • Contact Us:
  • 83-EXTENSIV 888.375.2368 (main)
  • |
  • 310.844.7570 (local)
  • Copyright © 2023 Extensiv
  • |
  • All rights reserved.
  • Privacy Policy
  • |
  • Terms of Service
  • Follow Us:
Expand