Receiving Against an ASN
4.6 min read
|If you or your customer is creating a receipt before the expected inventory has arrived at your facility, that receipt is considered to be an Advanced Shipping Notice (ASN). Once the inventory arrives at your warehouse, you can receive against the ASN to compare the items that you expect to arrive versus the items that actually arrive. If you don't receive the expected inventory or if you receive damaged products, you can forward a variance report to the sender.
This article reviews how to receive against an ASN using SmartScan.
Please take note of the following requirements before proceeding with the steps below:
- Expected line items and quantities must be captured in 3PL Warehouse Manager prior to capturing the actual quantities in SmartScan.
- The following permission must be assigned to your user role: Mobile Scanner > Mobile Receipts.
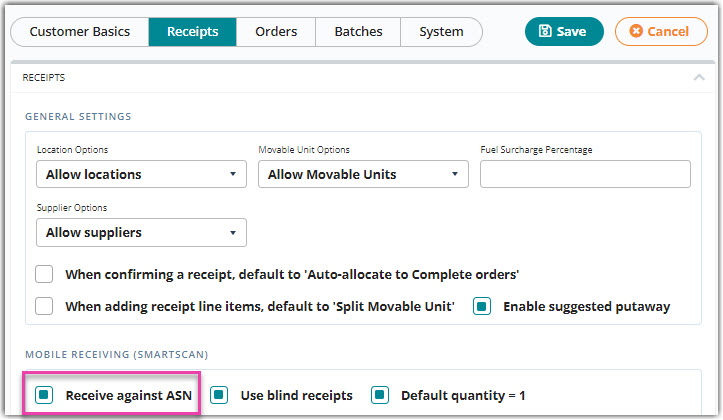
- The Receive Against ASN (RAASN) feature must be enabled for your account via Admin > Settings and turned on in each of your customer's setups.
- To enable this for a customer, navigate to Customers > Manage Customers, select the relevant customer from the grid, then click Edit to open the customer record. Next, select the Receipts tab, click the selection box for Receive Against ASN, then click Save.
- To enable this for a customer, navigate to Customers > Manage Customers, select the relevant customer from the grid, then click Edit to open the customer record. Next, select the Receipts tab, click the selection box for Receive Against ASN, then click Save.
If you want to add an extra step of quality control to your receiving process, we recommend utilizing our Blind Receipts feature by enabling "Use blind receipts" in a customer's setup. The difference between blind receipts and the standard RAASN feature is that the expected and actual quantities will not populate until you verify the received items by scanning or manually entering the SKU, track-by values, and quantity. Once those items are verified, the rest of the receiving process remains the same.
Guidelines
Receiving against an ASN is very similar to the standard receiving process. With the RAASN feature enabled, once the receipt is marked as complete and ready to be verified, the "actual quantity" data is transferred as the "expected quantity." This transfer of quantity data is what sets you up to receive against the ASN.
Before you get started, it is helpful to understand the following SmartScan logic:
- When you identify a SKU by its barcode, SmartScan looks for the the first line item that matches the barcode and does not have an actual quantity specified.
- If the application cannot find a matching SKU with no actual quantity specified, SmartScan adds a new line item.
- Once added, you cannot delete a new line item.
- SmartScan auto-populates all track-by values expected on the ASN.
- If the ASN is received without track-by values and you provide these values during the receiving process, SmartScan will not mark this as a variance.
- Track-by variances will only occur if you modify an expected track-by value.
Once you understand the logic SmartScan uses for RAASN, use the following steps to get started:
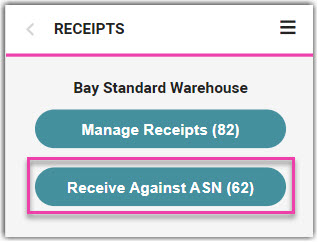
- Log in to SmartScan, and ensure the appropriate warehouse is selected.
- Tap the Receipts module, then select Receive Against ASN. Note that the number displayed reflects the total number of ASNs (receipts) in a Complete status for customers using RAASN within the selected warehouse. Only receipts marked as Complete after enabling RAASN for a customer will populate in this section.
- The grid populates all Complete ASNs for the specified customer—the oldest transactions populating first. Ensure the relevant customer is selected, then open the relevant ASN using one of the following methods:
- Scan or type a transaction ID or reference number.
- Select a line from the grid.
- Select a transaction ID from the grid to view ASN details, then tap Start.
- Confirm the ASN details are correct.
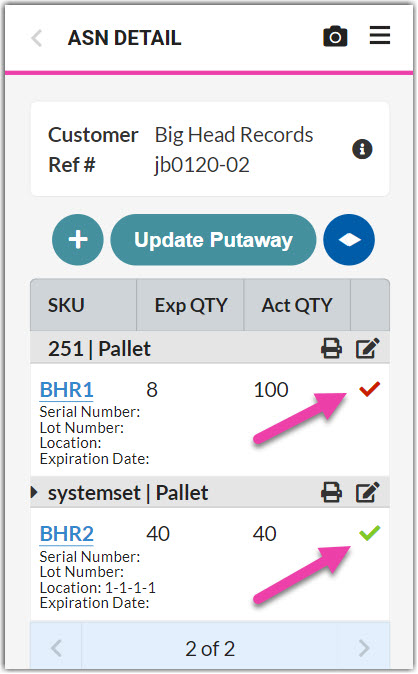
Tap the info icon to the right of the customer and reference number to view the associated PO number and creation date.
-
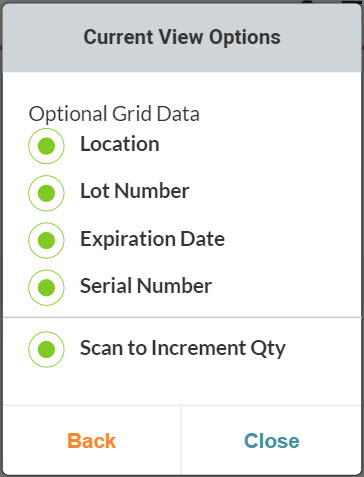
Optional: Tap the hamburger menu in the top-right corner of the application, then select Settings > Current View and enable each setting as needed. Once complete, tap Close.
- Optional Grid Data: Allows you to select which track-by values you wish to display in the line item grid
-
Scan to Increment Qty: Once enabled, allows you to scan any UPC value configured for an item to increment the quantity value—once the scanned quantity equals the expected quantity, SmartScan automatically moves forward to the next open field in the form so you can verify track-by values
- Identify the first item using one of the following methods:
- Scan or enter a SKU, UPC, or MU label (if supplied on the ASN).
- Select a line item from the grid.
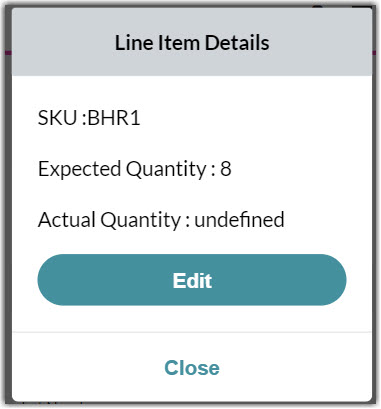
If you cannot read the full SKU name in the grid, tap the SKU name to open the Line Item Details dialog. This view shows you the full SKU name, expected quantity, and actual quantity, and it offers the option to Open the line item or Close the dialog to return to the line item grid.
- Next, specify the movable unit (MU) details.
- If the item is placed on a movable unit (MU) that has a unique license plate assigned, scan or enter the MU label now.
- If you need the system to assign a license plate, tap the 'Movable Unit' field, then select System-Assigned.
- If the item is not placed on a movable unit, leave this field empty or select No Movable Unit.
- Adjust the 'Quantity' to represent the actual quantity received for this SKU, and edit the 'UOM' as needed.
- Scan any associated track-by's to verify accuracy (or manually enter any values that need to be modified), then scan or enter a location.
- Tap Next. If the actual quantity received differs from the expected quantity, a red check is displayed in the grid next to the corresponding line item. If not, a green check displays.
If you only record a partial quantity when you received the full quantity of an item, you can re-select the SKU from the grid and add the remaining quantity.
- Repeat Steps 6–10 for each SKU received. If you need to add an unexpected SKU to the receipt, scan the SKU barcode or tap +, then specify the relevant information.
Please note that, once added, you cannot delete a new line item.
- If using directed putaway, tap Update Putaway, then confirm if you want to override the current putaway location(s).
- No Override: Preserves existing locations and assigns locations based on directed putaway rules to line items without a location
- Override All: Assigns locations to all line items based on directed putaway rules
- Once you have verified and stored all items, it's time to confirm the receipt.
- If there were no variances between the expected and actual quantity, tap Accept.
- If there were variances between the expected and actually received inventory, tap Review ASN to open the Receipt Variance Report. Review the differences to ensure they are accurate, then tap Make Changes to return to the ASN details or tap Next to view any associated charges.
To view the total charge amount, you must have the following permission assigned to your user role: Receipts Module > Receipt Charges > Manage Charges. The customer must also have predefined manual charges configured for the Charges page to display.
- To specify or modify the number of units on a billing charge, tap the appropriate grid row, enter the '# of Units' associated with the charge, then tap Save to populate the value in the 'NumUnits' grid column. Repeat for each charge as needed.
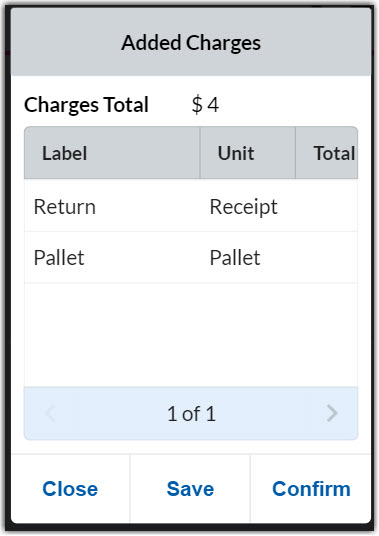
- Ensure all charges are correct, then tap Confirm. Once confirmed, the receipt is removed from SmartScan, the associated inventory is available for order allocation, and you are redirected to the list of ASNs to repeat these steps as needed.
- To confirm the receipt and move it to a Closed status, you must have the following permission assigned to your user role: Receipts Module > Confirm Receipts.
- If you do not have access to the 'Confirm' button, another warehouse user must close the receipt. To continue your workflow, tap Save to save the charges and return to the list of ASNs to repeat Steps 3–15 as needed.
To generate an Overage/Shortage & Damaged report, proceed to 3PL Warehouse Manager and navigate to Reports > Transactions > Overage/Shortage & Damaged.