• Help Center
  • 3PL Warehouse Manager
  • Integrations Content
  • QuickBooks Desktop
  • Integrations Content
    • API Shopping Cart Integrations
        • Getting Started with Shopping Cart Integrations
        • ShipStation Integration
        • Shopify Shopping Cart Connection
        • WooCommerce Shopping Cart Connection
        • Amazon Shopping Cart Connection
        • Magento 2.x Shopping Cart Connection
        • Volusion Shopping Cart Connection
        • eBay Shopping Cart Connection
    • EDI Processes
        • Getting Started with an EDI Integration
        • Extensiv UCC Carton Label Library
        • EDI Processing
        • Setting Up FTP Email Notifications
        • Sending Receipt Advice
        • Printing UCC Labels
        • Sending an ASN
        • Troubleshooting ASN Errors
        • Using the Customer Error Log
        • Understanding Common EDI Errors
    • DataDocks
        • Understanding DataDocks
        • Using the 3PL Warehouse Manager and DataDocks Integration
    • General Information
        • Whitelisting IP Addresses
    • QuickBooks Desktop
        • Connecting a QuickBooks Desktop Account
        • Connecting Customers to QuickBooks Desktop
        • Understanding Class Tracking
        • Understanding QuickBooks Desktop Billing Setup
    • QuickBooks Online
        • Connecting a QuickBooks Online Account
        • Connecting Customers to QuickBooks Online
        • Configuring Invoice Settings
        • Defining International Tax Codes
        • Understanding QuickBooks Online Billing Setup
    • REST API
        • Getting Started with Credential Management
        • Providing REST API Access
        • Webhooks FAQs
        • Configuring Webhooks
        • Implementing Webhooks
    • Shopify
        • Changing your fulfillment settings in the Shopify app
        • Shopify App Write Fulfillment Permissions

Understanding Class Tracking

If you want to organize your billing by warehouse or include billing item charge details on your invoices, you can utilize class tracking in QuickBooks Desktop. This article reviews how to set up classes in 3PL Warehouse Manager.

Feel free to review the guidelines below to get a better understanding of class tracking before enabling. However, before class values in 3PL Warehouse Manager can map to QuickBooks, please ensure the following requirements have been met:

  • Classes are enabled and class values are defined in QuickBooks.
    • See Intuit's guidelines here.
    • Note that class values are case-sensitive and must match the WMS values exactly.
  • Classes are enabled in 3PL Warehouse Manager.
    • Must contact Technical Support and specify what you'd like enabled and for which customers. 

Warehouse class

If you have multiple facilities, you can use the warehouse class to organize your invoices by warehouse in QuickBooks.

  1. Ensure all warehouse class values are set up correctly in QuickBooks.
  2. In 3PL Warehouse Manager, navigate to Warehouse > Manage Warehouse.
  3. Select a warehouse from the grid, then click Edit.
  4. Enter a value for 'Warehouse Code', then click Save.

    This value is case-sensitive and must match the class value in QuickBooks exactly.


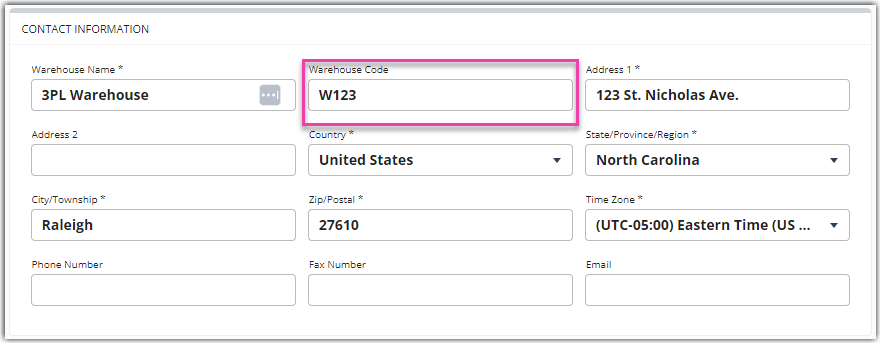
  5. Repeat Steps 3 and 4 for each warehouse.

Once saved, all future invoices exported to QuickBooks will include the specified warehouse code in the 'Class' field.

Line item class

If you specify an 'Item Description' value in your billing charge setup, you can include these charge details on your QuickBooks invoices.

Once enabled for a customer, all billing scripts for that customer must include an item description.

 
  1. Ensure all line item class values are set up correctly in QuickBooks.
  2. In 3PL Warehouse Manager, navigate to Customers > Billing Wizard > Per Transaction Billing Setup.
  3. Select a customer, then create a new or open an existing billing script.
  4. Enter a value for 'Item Description', then click Next.

    This value is case-sensitive and must match the class value in QuickBooks exactly.


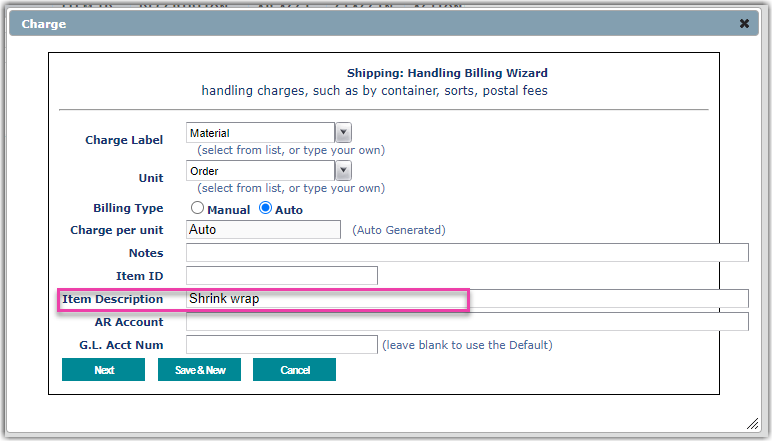
  5. Select the appropriate billing script, then click Select.
  6. Enter or modify charge value(s) as needed, then click Save.
  7. Repeat Steps 3–6 for each billing charge per customer.

Once class values have been added to each charge, all future invoices exported to QuickBooks will include the specified item descriptions in the 'Class' column.

comprehending class tracking

Was this article helpful?

Yes
No
Share additional feedback about this article

Related Articles

  • Creating Items
  • March 18, 2020 – Minor Release Notes
  • Managing Ship Method Mappings
  • Connecting Customers to QuickBooks Desktop

Not finding the help you need?

Contact Support
Solutions
  • Solutions for Brands
  • Solutions for 3PLs
  • Solutions for 4PLs
  • Solutions for B2B
Products
  • Extensiv 3PL Warehouse Manager
  • Extensiv Warehouse Manager
  • Extensiv Order Manager
  • Extensiv Integration Manager
  • Extensiv Network Manager
Products
  • Customer Success
  • Implementation
  • Consulting
Ecosystem
  • Fulfillment Marketplace
  • Integrations
  • Partners
  • Become a Partner
Resources
  • Resource Library
  • Blog
  • Market Insights
  • What is a 3PL?
  • What is a 4PL?
  • What is a WMS?
  • Why a Cloud-based WMS?
  • Glossary
Help
  • Help Center
  • API Documentation
  • Extensiv Univerisity
  • Community
  • System Status
  • Extensiv Logo
  • 100 N Pacific Coast Hwy, Suite 1100, El Segundo, CA 90245
  • |
  • Contact Us:
  • 83-EXTENSIV 888.375.2368 (main)
  • |
  • 310.844.7570 (local)
  • Copyright © 2023 Extensiv
  • |
  • All rights reserved.
  • Privacy Policy
  • |
  • Terms of Service
  • Follow Us:
Expand