Billing Manager

Updated on January 23rd, 2025

  • Extensiv Hub
    Popular Articles Getting Started Using Hub Technical Issues & FAQs Extensiv's Ideas Portal
  • 3PL Warehouse Manager
    Receiving Operations Inventory Management Shipping Operations System Configuration Scanning Operations Integrations Content Best Practice Resources Release Notes Popular Articles Troubleshooting Guides
  • Warehouse Management
    Getting Started Admin Console Shipping Order Picking & Packing Receiving Customer Portal Cycle Counting Kit Building Managing Users Barcode Scanner Import/Export Integrations Barcoding Wave Picking Bin Move Mobile Receiving and Picking Settings Popular Articles Reporting
  • Order Management
    Dashboard Orders Inventory Purchase Orders Shipments Customers Products Analytics Settings API API Integrations Accessing and Navigating Order Manager Error Messages Order Manager Popular Articles Accounting Integrations
  • Integration Management
    Getting Started with Integration Manager General Support Troubleshooting Extras & Addons API Documentation Popular Articles Order Sources Order Destinations
  • FAQs
  • Network Manager
    Getting Started Order Routing Management Technical Issues Shopping Carts Settings Settings, Products, and Orders
  • Billing Manager
    Getting Started Using Billing Manager
  • Release Notes
    Extensiv Sandbox Extensiv Extensiv Hub 3PL Warehouse Manager Integration Management Warehouse Management Order Management Billing Manager
  • Fulfillment Marketplace
    Getting Started
  • Sandbox
    Getting Started
+ More
  • Help Center
  • Billing Manager
  • Using Billing Manager
  • Rates
  • Transaction Minimum / Markup Rates
  • Rates
    • Understanding Rates
        • Understanding Global Rates vs Custom Rates
        • Creating, Duplicating, and Deleting a Rate
        • Understanding Default Assigned Rate vs Assigning Rate per Warehouse Facility
        • Assigning Rates and Rate Sheets to a Customer
        • Understanding Standard vs Volume Tiering
        • Understanding Count vs Count Less Other UOMs
        • Creating a Rate Sheet
        • Count Less Other UOMs (Unit of Measures) Pre-Condition
        • Understanding the Use of Movable Units as Counting Units in Rate Creation
        • Common Terminologies in Rate Creation
        • Reassigning Rate Sheet from Customer Settings
        • Understanding Units of Measure (UOM) Count Rate
        • Unassigning a Rate From a Customer
        • Duplicating a Rate Sheet
    • Return Transaction Rates
        • Creating a Rate for Return Fee
        • Creating a Rate for Returned Primary Units on a Tiered Unit Basis
        • Creating a Custom Rate for a Return Process of a Specific Customer
        • Creating a Rate for Returning Packages
        • Creating Rates to Charge for a Partial Pallet Based on Movable Unit Type
    • Receiving Transaction Rates
        • Creating a Rate for After-Hours Receipt of Devan Inbound 20' Containers
        • Creating Rates for Inbound Devanning: 20', 40', and 45' High Cube Containers (Multiple Conditions)
        • Creating a Rate for Inbound Receiving Excess Weight Fee
        • Creating a Rate Based on Unique Lot IDs
        • Creating a Rate Based on Unique SKUs Shipped
        • Creating a Rate Based on Unique Location
        • Creating Rate Based on Quantity of Lot with Volume Tiered Rate
        • Creating a Rate Based on Quantity of Location with Standard Tiered Rate
        • Creating a Rate for Storage Upon Receipt per Carton Using a Split Rate
        • Creating a Smart Rate for Devan Inbound 20’ Container
        • Creating a Standard Warehouse Inbound Receipt Rate
        • Creating a Weekend Receipt Charge Rate
        • Creating a Rate for Inbound Pallet Fee Based on the Number of Pallets
        • Creating a Rate to Charge for a Partial Pallet Based on Movable Unit Types
        • Creating a Rate for Primary Unit vs Packaging Unit vs Pallet
        • Creating a Rate for Inbound Pallets with Multiple Movable Unit Types: Rounding Up Movable Units by Quantity
        • Creating a Rate for Movable Units Based on the Number of Pallets
        • Creating a Rate for Storage Upon Receipt by Movable Units Using a Split Rate
        • Creating a Rate Based on Total Weight
        • Creating a Rate for an Inbound 20' and 40' Floor Loaded Containers Based on Carton Count
        • Creating a Standard Tiered Rate for Each Pick
        • Creating a Rate for Inbound Pallet Fee based on Unique Movable Unit
        • Creating a UOM Count Rate for a Receipt or Shipment
    • Shipping Transaction Rates
      • Special Charges
          • Creating a Custom Rate to Implement Unique SKU-Based Promotional Insert Fees for Your Customers
          • Creating Customized FBA Prep Fees for Customers Including Carton Labeling
          • Creating a Special Charge for Will Call Fees
        • Creating a Rate for Order Processing Fee
        • Creating a Package Materials Fee and Small Parcel Shipping Label Fee
        • Creating a Handling Oversized Shipment Surcharge Rate (Over 40 lbs)
        • Creating a Shipping Oversized Pick Surcharge Fee (Over 20lbs)
        • Creating an FBA Prep Carton Label with Standard Tiered Fee
        • Creating a Rate for Pick-and-Pack Fee with Amazon Item Classification
        • Creating a Fragile Package Handling Rate
        • Creating a Promotional Rate Based on SKU for a Specific Customer
        • Creating a Rate for an Outbound Pick Fee with a Minimum Base Charge
        • Creating a Pick Fee Rate Based on Business to Business Order
        • Creating a Minimum Order Charge Rate Based on Total Weight
        • Creating an Inner Case Pick Rate Using Standard Tiering
        • Creating a Base Charge Rate for Less Than Truckload (LTL) Orders Going to Various Retailers
        • Creating a Base Charge Rate for Orders That Exceed 5 Cartons Shipped
        • Creating a Case Picking Rate Using Volume Tiered Fee
        • Creating a Rate for an Outbound Picking Fee Based on Individual Units
        • Creating a Rush Fee Rate
        • Creating a UOM Count Rate for a Receipt or Shipment
        • Creating a Rate Based on Shipping Destination
    • Transaction Minimum / Markup Rates
        • Creating a Transaction Minimum Receiving Rate
        • Creating a Transaction Markup Rate
        • Creating a Category Markup Rate for Handling Based on Item Classification (Smart Rate)
        • Creating a Category Minimum Receiving Handling Rate
    • Storage Rates
        • Confirming Recurring Storage and Reviewing in Billing Manager
    • Warehousing Services / Adjustments / Assemblies Rates
        • Creating a Tiered Rate for Adjustments per SKU
        • Creating a Tiered Rate for Adjustments Counting Total Quantity
        • Creating a Tiered Rate for Assembly Kitting Component Fee (Total Count)
        • Creating a Rate for Adjustment by Unique Location
        • Creating a Rate for an Adjustment Based on Total Volume
        • Creating a Rate for Assembly Kitting Component Fee by SKU
        • Creating a Custom Rate for Adjustments per Unique SKU
        • Creating a Tiered Rate for Assemblies (Total Kits Fee)
        • Creating a Rate for Total Kits Created in an Assembly Using Volume Tiering
        • Creating a Rate for Total Kits Created in an Assembly Using Standard Tiering
        • Creating an Assembly Per Kit Fee Rate with a Minimum Charge
      • List of How-to Guides for Creating Rates

Creating a Transaction Minimum Receiving Rate

This article is about the Billing Manager app, not the Billing Wizard in 3PL Warehouse Manager. To learn about the Billing Wizard, please refer to the articles in the Billing Setup.


Sample scenario: Create a transaction minimum type of rate using a simple rate.

  1. Navigate to Rates > Rate List. 
  2. Click + Create Rate in the upper right corner. 
  3. Select the following options as shown below on the Create New Rate window. Then, click Continue. 

    Transaction Minimum > Simple Rate


  4. Provide some basic details such as Rate Name, Rate Description, and Charge Label.
  5. Select Receiving for the Transaction Type and anything for the Charge Category. Then, click Continue.
  6. Select between Transaction Minimum or Category Minimum.

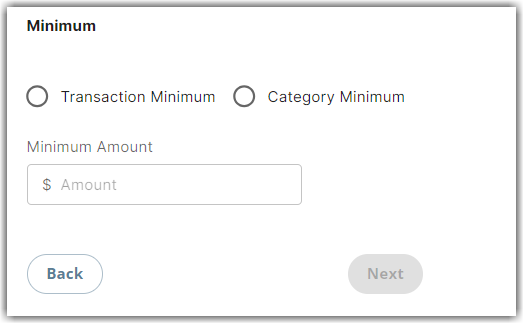
    This refers to the type for which we want to apply the markup rate. In the image below, if you select Transaction Minimum, it pertains to shipping transactions. Alternatively, if you choose Category Minimum, it applies to the combination of transaction and category. In the example below, this applies to Receiving and Handling. 
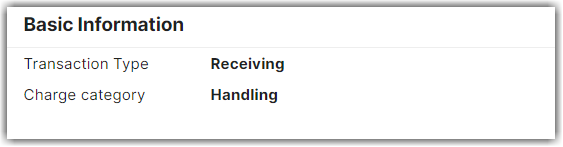
  7. Specify the minimum amount you want to charge for each inbound receiving transaction.
  8. Click Next. Then, click Save. 
  9. Optionally, you can skip adding it to a rate sheet.

Applying the Transaction Minimum Receiving Rate to a Customer

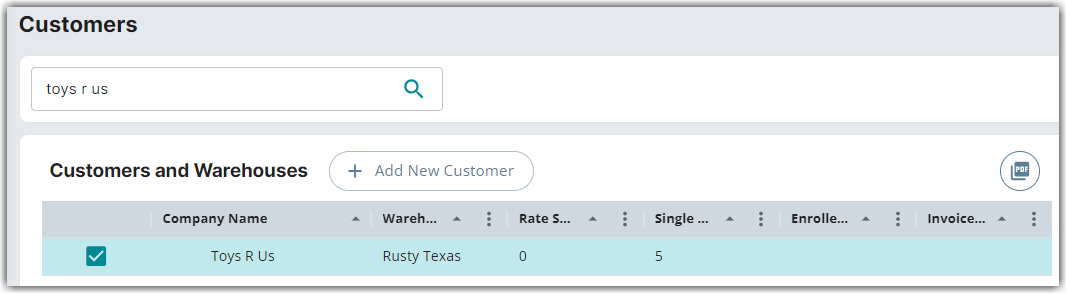
  1. Apply this Transaction Minimum Receiving rate to a customer by clicking Customers on the left navigation menu.
  2. Select the customer from the list or use the Search function. In the below example, let's select the company name, Toys R Us.
  3. Click Edit on the right-hand side of the page. Click Yes, Continue to modify the customer settings. 
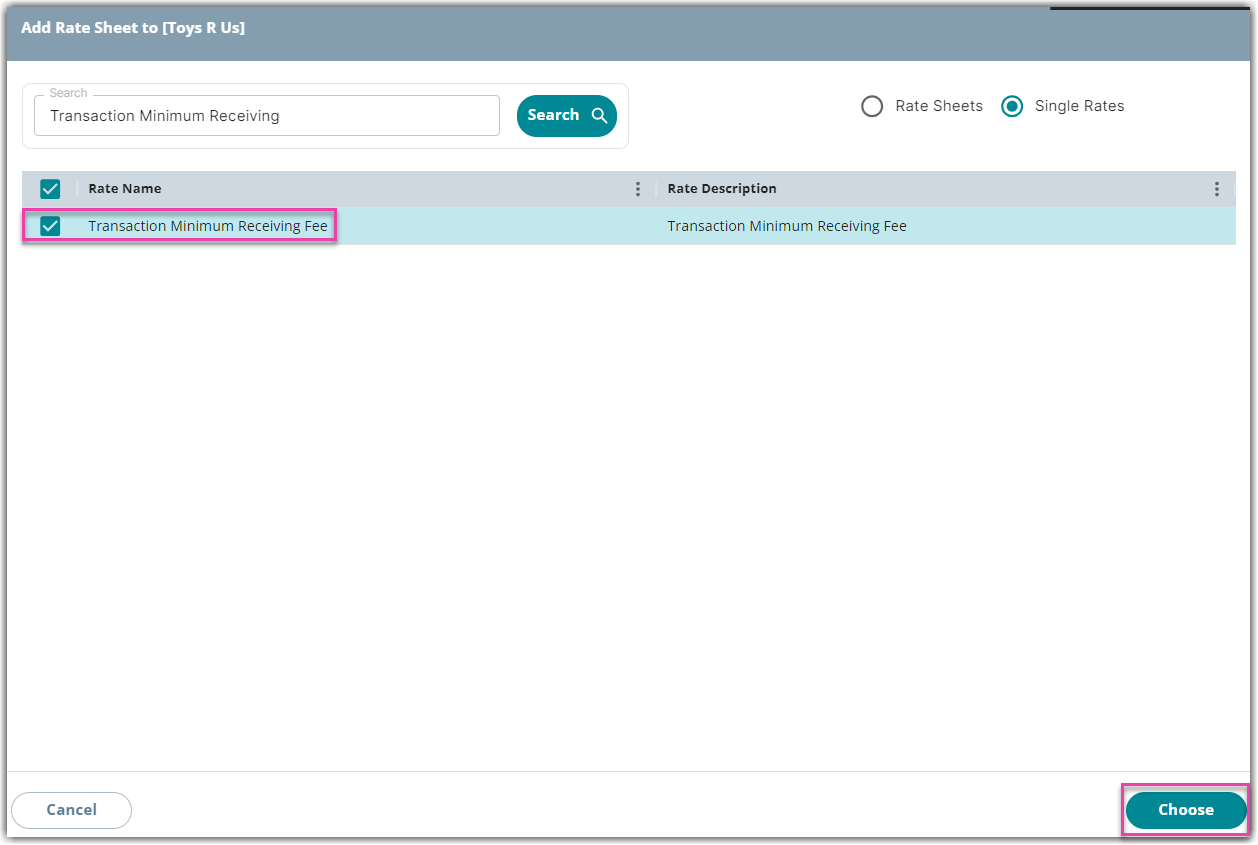
  4.  Click the add icon next to Single Rates. 
  5. Search for the Transaction Minimum Receiving Rate you just created. Then, click Choose. 


    In the Receiving Rates section of Customer Settings, you will find this rate added, along with all other rates applied to this customer with a transaction type of Receiving. You can also click on each rate to open the rate summary, providing additional details and information.

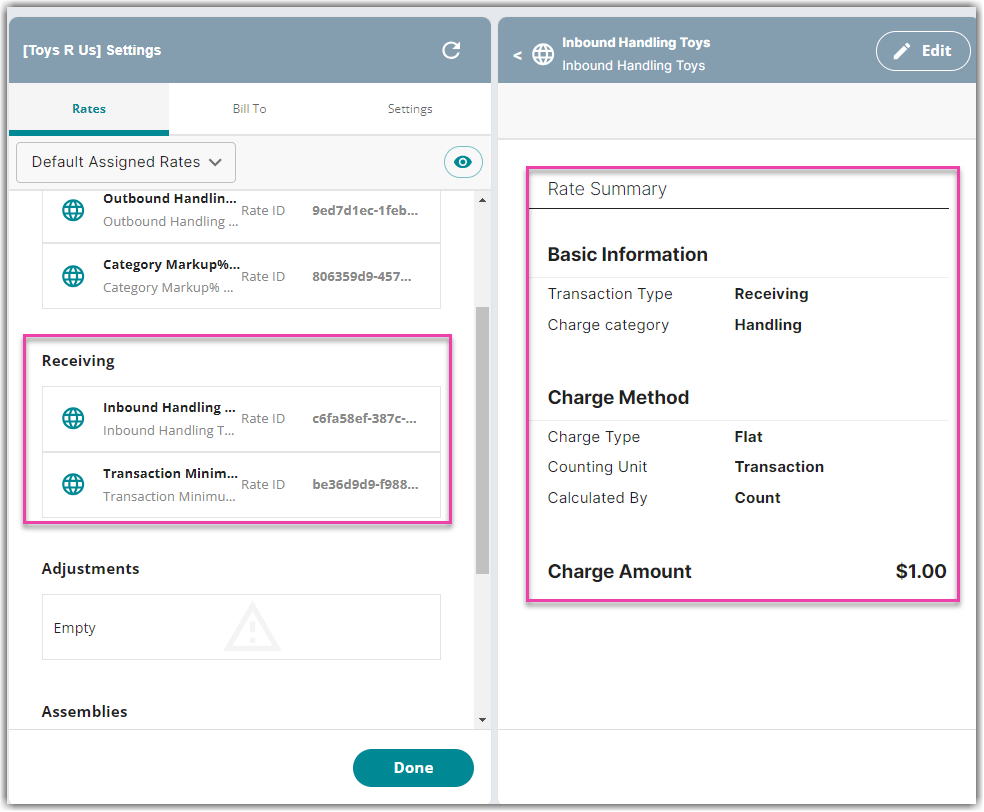
    In the above example, there are two rates in conjunction. The first one is the Inbound transaction type of rate, which is a receiving type of rate based on a flat transactional fee of $1.00, and the other one is the transaction minimum mark-up rate we just added.

    This will result in two charges. One charge will be the actual transactional charge for one dollar, and the second charge will be the result of the minimum of $10.00.

    In the above image, you will notice that we have included a supplemental $9.00 markup fee to meet the $10 minimum in total.
freight fees shipping costs

Was this article helpful?

Yes
No
Share additional feedback about this article

Related Articles

  • Creating a Category Minimum Receiving Handling Rate
  • Creating a Transaction Markup Rate
  • Creating a Category Markup Rate for Handling Based on Item Classification (Smart Rate)

Not finding the help you need?

Contact Support
Solutions
  • Solutions for Brands
  • Solutions for 3PLs
  • Solutions for 4PLs
  • Solutions for B2B
Products
  • Extensiv 3PL Warehouse Manager
  • Extensiv Warehouse Manager
  • Extensiv Order Manager
  • Extensiv Integration Manager
  • Extensiv Network Manager
Products
  • Customer Success
  • Implementation
  • Consulting
Ecosystem
  • Fulfillment Marketplace
  • Integrations
  • Partners
  • Become a Partner
Resources
  • Resource Library
  • Blog
  • Market Insights
  • What is a 3PL?
  • What is a 4PL?
  • What is a WMS?
  • Why a Cloud-based WMS?
  • Glossary
Help
  • Help Center
  • API Documentation
  • Extensiv Univerisity
  • Community
  • System Status
  • Extensiv Logo
  • 100 N Pacific Coast Hwy, Suite 1100, El Segundo, CA 90245
  • |
  • Contact Us:
  • 83-EXTENSIV 888.375.2368 (main)
  • |
  • 310.844.7570 (local)
  • Copyright © 2023 Extensiv
  • |
  • All rights reserved.
  • Privacy Policy
  • |
  • Terms of Service
  • Follow Us:
Expand