3PL Warehouse Manager

Updated on November 8th, 2023

  • Extensiv Hub
    Popular Articles Getting Started Using Hub Technical Issues & FAQs Extensiv's Ideas Portal
  • 3PL Warehouse Manager
    Receiving Operations Inventory Management Shipping Operations System Configuration Scanning Operations Integrations Content Best Practice Resources Release Notes Popular Articles Troubleshooting Guides
  • Warehouse Management
    Getting Started Admin Console Shipping Order Picking & Packing Receiving Customer Portal Cycle Counting Kit Building Managing Users Barcode Scanner Import/Export Integrations Barcoding Wave Picking Bin Move Mobile Receiving and Picking Settings Popular Articles Reporting
  • Order Management
    Dashboard Orders Inventory Purchase Orders Shipments Customers Products Analytics Settings API API Integrations Accessing and Navigating Order Manager Error Messages Order Manager Popular Articles Accounting Integrations
  • Integration Management
    Getting Started with Integration Manager General Support Troubleshooting Extras & Addons API Documentation Popular Articles Order Sources Order Destinations
  • FAQs
  • Network Manager
    Getting Started Order Routing Management Technical Issues Shopping Carts Settings Settings, Products, and Orders
  • Billing Manager
    Getting Started Using Billing Manager
  • Release Notes
    Extensiv Sandbox Extensiv Extensiv Hub 3PL Warehouse Manager Integration Management Warehouse Management Order Management Billing Manager
  • Fulfillment Marketplace
    Getting Started
  • Sandbox
    Getting Started
+ More
  • Help Center
  • 3PL Warehouse Manager
  • Inventory Management
  • Item Control
  • Inventory Management
    • Item Creation
        • Creating Items
        • Understanding Units of Measure
        • Entering Basic Item Details
        • Defining Units of Measure
        • Creating Item Assemblies
        • Configuring Item-Level Recurring Storage Charges
        • Configuring Item-Level Storage and Handling Charges
    • Inventory Management
        • Using the Manage Inventory Page
        • Understanding Allocation Logic
        • Making Adjustments
        • Transferring Inventory
        • Editing Track-By Values
        • Getting Started with Directed Putaway
        • Understanding Directed Putaway Logic
        • Understanding Replenishments
        • Counting Inventory
        • Performing Item-Based Audits
    • Movable Units
        • Understanding Movable Units
        • Enabling Movable Units for Customers
        • Defining Movable Unit Types
        • Specifying an Item's Movable Unit Type
        • Receiving Movable Units
        • Moving Movable Units
        • Reconfiguring Movable Units
    • Item Control
        • Managing Assembly Transactions
        • Moving Items
        • Batch-Updating Items
        • Managing Item Aliases
        • Managing Commodities
        • Managing Classifications
        • Managing Pricing
        • Managing Item Images
        • Managing Storage Rates
        • Uploading Import Templates
        • Understanding Item Alias

Managing Commodities

For most LTL/FTL carriers, it is imperative to accurately determine the National Motor Freight Classification (NMFC) of the items being shipped to avoid costly adjustments. Carriers use the NMFC as a common standard when setting shipping rates.

More information about LTL class and NMFC Codes can be found on the NMFTA website.

The Manage Commodities page helps create and manage your important and frequently used NMFC codes for easy reference when routing shipments. This article reviews how to create, edit, and delete a commodity list.

To access the Manage Commodities page, you must have the following permission assigned to your user role: Customer Module > Customer Items > Manage Item Categories.


Guidelines

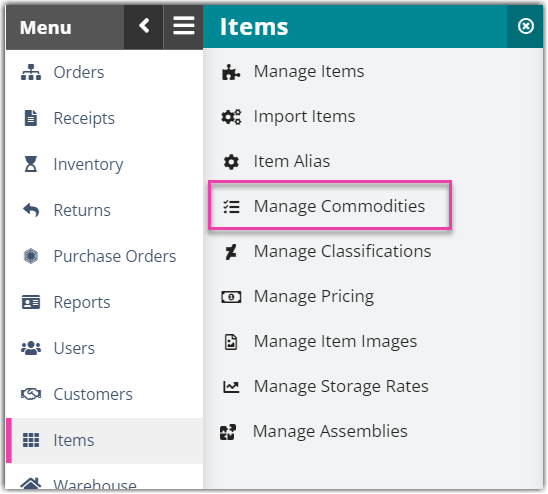
Navigate to Items > Manage Commodities in 3PL Warehouse Manager.

To create a new commodity, click Add.

  • Enter the 'NMFC' code number and 'Class' number for the commodity—these numbers can be found on the NMFTA website.
  • Enter the Commodity Description, which can be anything from the SKU to a detailed product description that will help associate the commodity data with inventory items.
  • Click Save.

If you need to edit or delete an existing commodity, select the commodity from the grid, then click Edit or Delete.


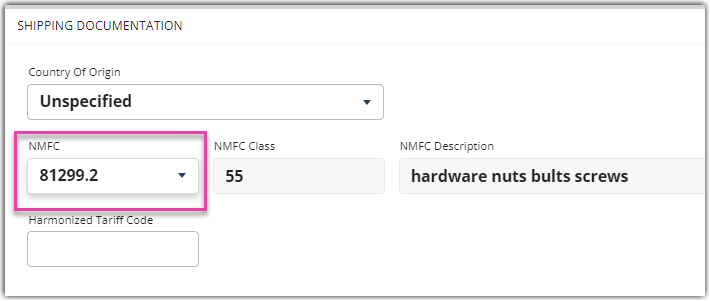
Once you create a commodity, you can assign it to an item under  Items > Manage Items. Select an item, click Edit, locate the Shipping Documentation sub-section, then select a NMFC Class from the associated drop-down menu.

commodities nmfc nmfta ltl ftl managing commodities

Was this article helpful?

Yes
No
Share additional feedback about this article

Related Articles

  • Entering Order Charges
  • Adjusting Order Charges
  • Release Information

Not finding the help you need?

Contact Support
Solutions
  • Solutions for Brands
  • Solutions for 3PLs
  • Solutions for 4PLs
  • Solutions for B2B
Products
  • Extensiv 3PL Warehouse Manager
  • Extensiv Warehouse Manager
  • Extensiv Order Manager
  • Extensiv Integration Manager
  • Extensiv Network Manager
Products
  • Customer Success
  • Implementation
  • Consulting
Ecosystem
  • Fulfillment Marketplace
  • Integrations
  • Partners
  • Become a Partner
Resources
  • Resource Library
  • Blog
  • Market Insights
  • What is a 3PL?
  • What is a 4PL?
  • What is a WMS?
  • Why a Cloud-based WMS?
  • Glossary
Help
  • Help Center
  • API Documentation
  • Extensiv Univerisity
  • Community
  • System Status
  • Extensiv Logo
  • 100 N Pacific Coast Hwy, Suite 1100, El Segundo, CA 90245
  • |
  • Contact Us:
  • 83-EXTENSIV 888.375.2368 (main)
  • |
  • 310.844.7570 (local)
  • Copyright © 2023 Extensiv
  • |
  • All rights reserved.
  • Privacy Policy
  • |
  • Terms of Service
  • Follow Us:
Expand