Using the Manage Inventory Page
3.6 min read
|Once you confirm a receipt, you can view the associated inventory on the Manage Inventory page. This page allows you to view available inventory levels for each of your customers and facilities, place and release items on hold, and perform customer-to-customer inventory transfers.
This article reviews the basic components of the Manage Inventory page.
To access the Manage Inventory page, you must have the following permission assigned to your user role: Inventory Module > Manage Inventory.
If you're interested in learning about how 3PL Warehouse Manager handles inventory allocation, please see Understanding Allocation Logic.
Manage Inventory Components
Navigate to Inventory > Manage Inventory in 3PL Warehouse Manager, then continue reading below to learn about each main component of the Manage Inventory page.
Search Filters
In the left pane on the Manage Inventory page, you can find various search filters to help you quickly find what you're looking for in the Manage Inventory grid.
- You can search for specific inventory items based on the relevant Transaction, Item Detail, Track-By's, Date Range, or Placement in the warehouse.
- Once you find the search filters that work best for you, you can minimize the filters that take up space, as well as drag-and-drop the filter containers to your preference.
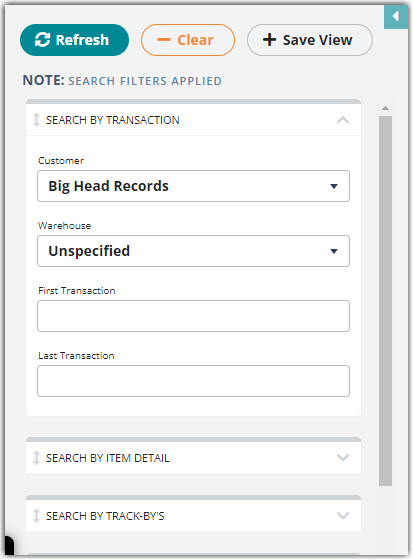
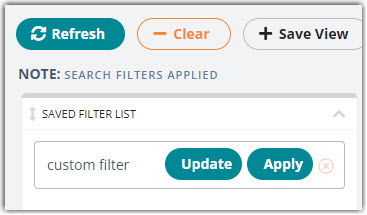
- You can easily Clear your applied search filters, as well as Save [your customized] View to quickly apply those specific search criteria the next time you access this page. If you make changes to an applied view, click Update to save your changes.
- You can also click the collapse icon in the top-right corner to hide the search filters and maximize viewing space for the data grid.
Data grid
In the main pane, you can find the customizable Manage Inventory grid.
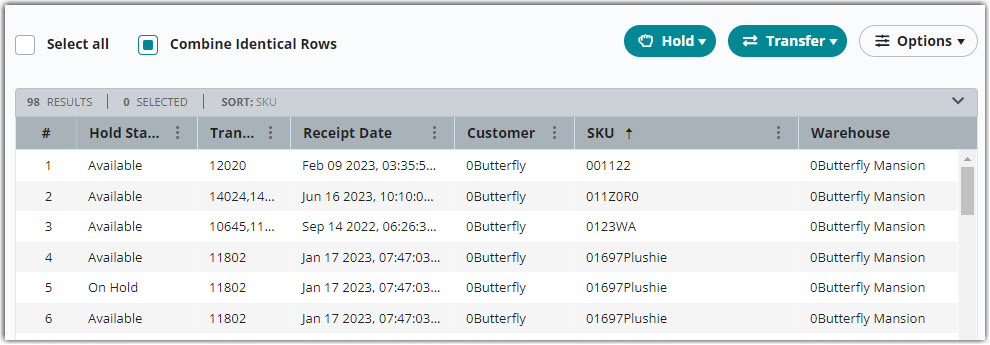
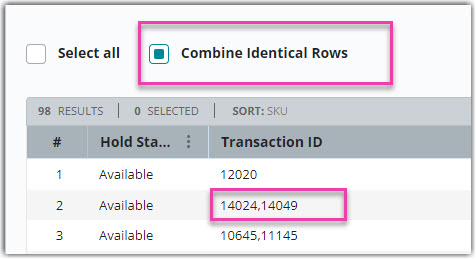
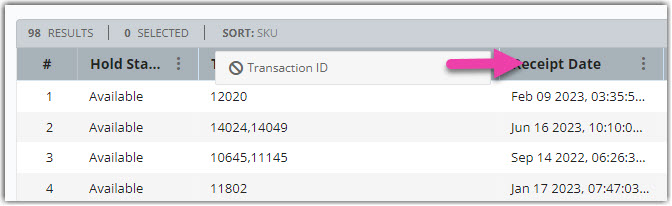
- Want enhanced visibility? Select Combine Identical Rows at the top of the grid to combine all "identical" items into a single row to allow for better visibility. Items are considered identical if they have the same Customer, SKU, Qualifier, Lot, and Expiration Date. You can tell rows are combined when they have multiple values separated by commas, such as in the Transaction ID column below.
- Wish the grid was sorted differently? You can sort columns to your preference by dragging/dropping them, as well as sort your data by a specific column header, with the click of a button.
Smart User Tip:
Use < Ctrl > on your keyboard as you click on the column headers to sort by two headers at once.
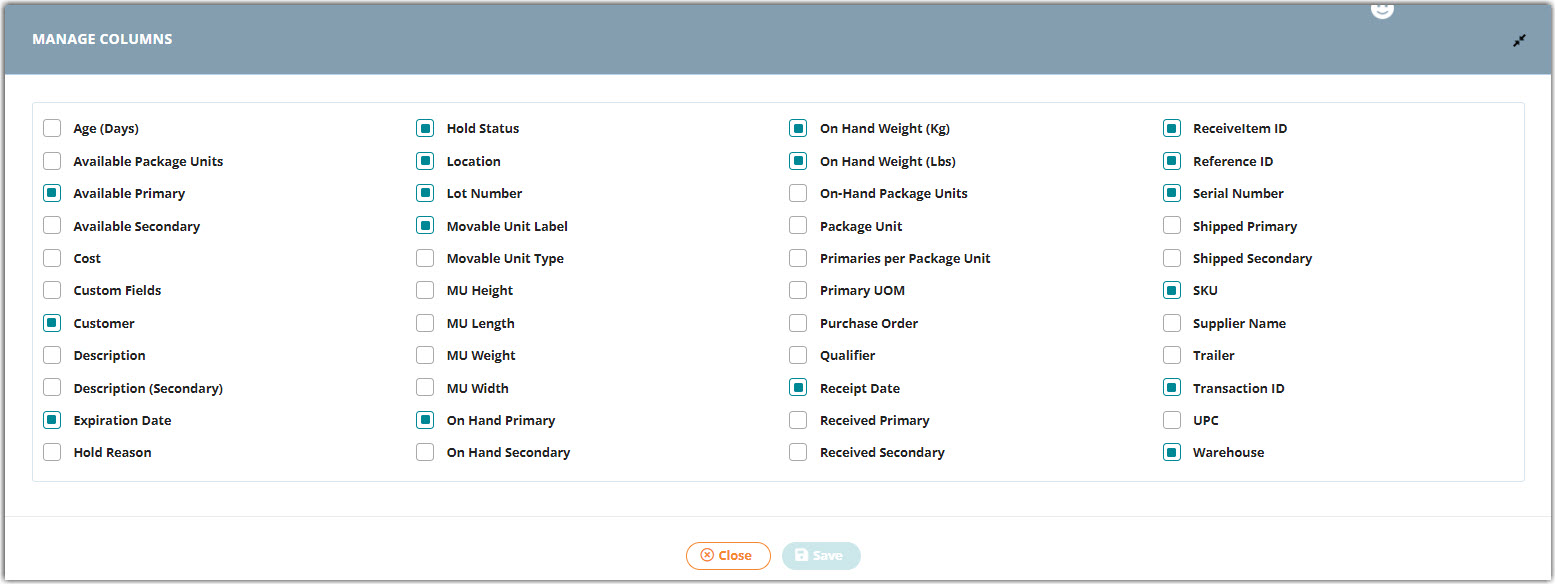
- By selecting Options > Columns, you can select which columns you’d like to display in the grid.
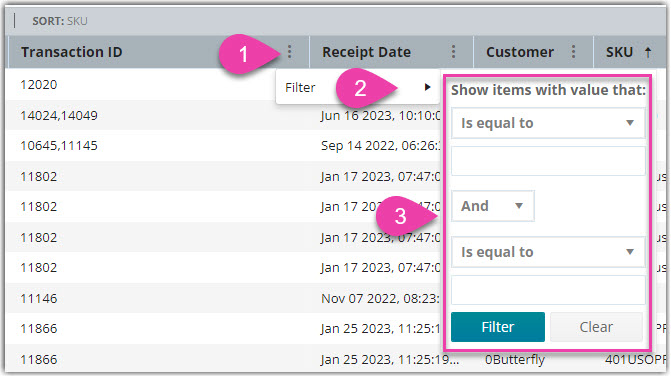
- Need more search filters than what's provided in the left pane? Click the ellipsis next to a column header to filter the data in that column.
- Just like the ability to save your search filter configurations, you can Save [the] View of your grid customizations from the left pane, as well as revert to the default column data by clicking Options and selecting one of the Reset/Clear options.
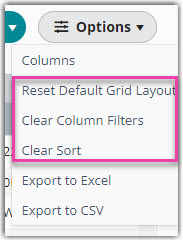
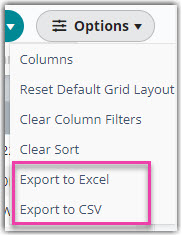
- Do you need to use this data elsewhere? You can export all data displayed in the grid to an Excel or CSV file by clicking Options and selecting one of the Export options.
Exporting from our system normally gives a 1-to-1 representation of the data from the grid. However, when numerical values contain leading zeroes or exceed 11 characters, those values automatically convert to scientific notation upon opening the file.
One method of avoiding this in Excel is saving the file, converting it to a .txt file, then importing into Excel. To do this, open a blank worksheet, select the Data tab, then specify to import 'From Text/CSV'. For further guidance on this, please refer to Microsoft's help article here.
Action options
You also have several options to take action on your inventory items. Once you select one or more inventory lines from the grid, you can take any of the actions outlined below.
Use < Ctrl > or < Shift > on your keyboard to select multiple inventory items. If an option is disabled, you can hover over the option to populate a message at the top of the page that explains why it is unavailable for selection.
The Hold drop-down menu allows you to manage the hold status of your inventory. You can also access hold actions by right-clicking on an inventory line.
To utilize the hold functionality, you must have the following permission assigned to your user role: Inventory Module > Manage Item-based Hold.

-
Place on hold: Allows you to place one or more inventory items on "hold" and select a 'Reason for Hold'—this action prevents order allocation
Inventory placed in a Quarantine location is automatically placed on hold and must be moved to a storage location to release that inventory from hold.
- Release from hold: Allows you to release one or more inventory items from "hold"—this action allows orders to be placed against the inventory
The Transfer drop-down menu allows you to transfer inventory to another customer. To learn more about C2C transfers, please see Transferring Inventory.
![]()
Attaching and Managing Files
You can attach files and images to receive items to track what your inventory looks like by uploading files from your desktop or taking pictures of your inventory using SmartScan.
- Click on the Attach Files button above the inventory grid or right-click on a receive item and select Attach Files from the menu. The Attach Files window will open, displaying a grid for file management.
- Click the Add File button or drag and drop an image file onto the window to upload the relevant image. The uploaded image will appear in the grid with details such as file name, size, upload timestamp, and uploader.
Selecting an image file from the grid pulls up a preview of the image on the right-hand side of the window. Hovering your cursor over the image preview will pull up a zoomed-in view of where your cursor is pointed, giving you a more detailed view of your image.
Clicking Remove File will delete the selected file and update the grid to show when and who removed the file from the receive item.
You can download the attached file by clicking on the file name in the Attach Files grid. You cannot download files that have been removed.
