
Entering Basic Item Details
6.9 min read
|When creating or editing an item, you use the Items section to identify basic information about the item. This article reviews how to enter basic details for an item.

If one or more of the below sections are not available options in your database, it is likely mapped to a setting that is not enabled for your account under Admin > Settings.
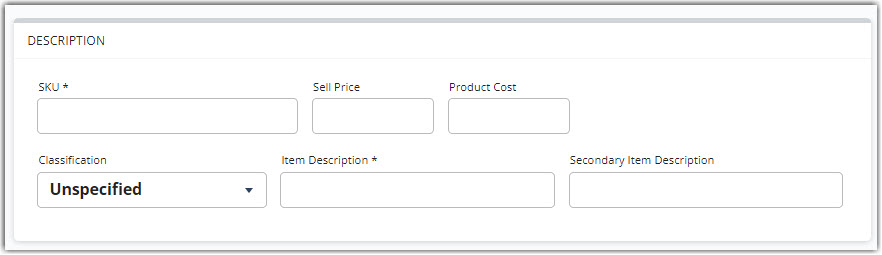
Description
The Description sub-section establishes the SKU name and other essential values.
-
SKU: The main item identifier, referred to throughout the inventory process
Please note that special characters are not recommended in SKU names, as they can cause issues when importing orders, sending orders electronically (e.g., via EDI), or searching for SKUs.
- Sell Price: The sell value of the item (required for fulfillment invoicing)
- Product Cost: The price value of the item (required for international SmartParcel shipments)
- Classification: Labeling mechanism used to group similar items (configured under Items > Manage Classifications)
- Item Description: Basic description of the item
- Secondary Item Description: Optional secondary description of the item
Tags
Item tags let you assign short descriptive labels to item definitions in 3PL Warehouse Manager. You can use tags to organize items in a flexible way and make them easier to find later. For example, you might tag items as fragile, allergen, promo, or cold-chain.
Tags appear as pill-style labels on the item details page, making them easy to review at a glance.

The Manage Items grid includes a Tags column. Hover over the +N indicator to view all tags for an item.
Add tags on an item
You must have the Item Edit permission to add or remove tags.
- Go to Items > Manage Items.
- Select the item you want to edit. Click Edit.
- Locate the Tags section on the item details page.
- Click + Add tag, enter the tag value in the text field, and confirm the entry.
- Click Save.
Tag rules and limitations
| Rule | Details |
| Case sensitivity | Tags are not case-sensitive. Values that differ only by capitalization are treated as the same tag. |
| Maximum length | Each tag can be up to 32 characters long. |
| Duplicates | You cannot add the same tag more than once to the same item. |
| Number of Tags | You can assign multiple tags to the same item. |
| Supported characters | Tags support the same characters allowed in SKU names. |
Search using tags
You can use item search to find items by tag value.
Item Export / Update Items
To update or export item data, go to Items > Manage Items, select an item, then click Manage.
You can add multiple tags by separating them with commas. The exported file uses this same comma-separated format.
Inventory Options
The Inventory Options sub-section defines several fields related to inventory allocation and counting.
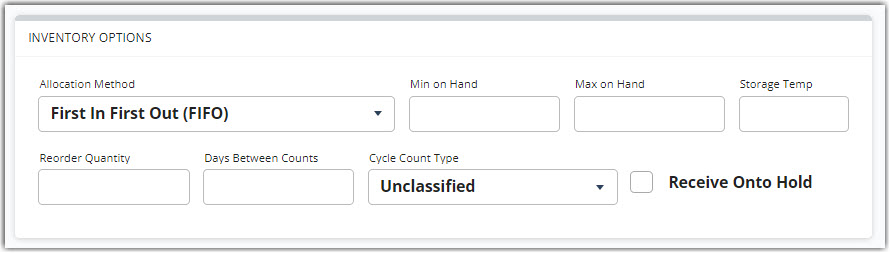
- Allocation Method: Defines allocation logic based on item attributes (FIFO/FEFO/LIFO)
- Min on Hand: Specifies the minimum on-hand quantity for the item, used for notification alerts to report available quantities
- Max on Hand: Specifies the maximum on-hand quantity for the item, used for informational purposes
- Storage Temp: The recommended or required storage temperature for the item
- Reorder Quantity: The quantity recommended when reordering the item via a receipt or purchase order
- Days Between Counts: The number of days recommended for recounts when generating a Cycle Count Report
- Cycle Count Type: A grouping mechanism used to assign cycle count types (used for reference purposes—see Counting Inventory for more information)
-
Receive Onto Hold: When checked, automatically place this item on hold upon receiving.
You can also update this field through Items > Manage Items: select an item, then click Manage. The column is named AutoHoldOnReceive.
Tracking Options
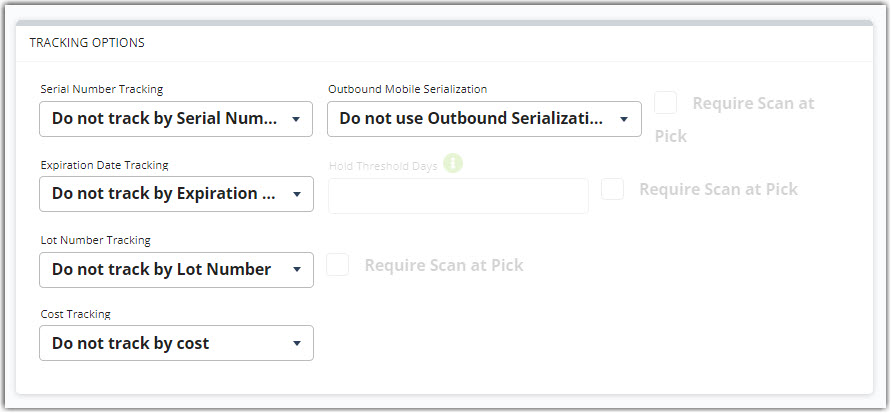
The Tracking Options fields allow you to enable, disable, or require specific track-by's for an item.
Track-by's allow you to associate a specific value with a SKU when it's received into your warehouse so that you can use that value to trace it within the warehouse or identify that particular value during the pick/pack process. If you configure a track-by as required, that means you cannot receive, move, pick, or pack the item without scanning or entering the associated track-by value.
-
Serial Number Tracking: Options to track item by serial number value
- Outbound Mobile Serialization: Options to capture serial numbers during the packing process instead of the receiving process
- Require Scan at Pick: When checked, requires user to specify a serial number when the item is received.
-
Expiration Date Tracking: Options to track item by expiration date value
-
Hold Threshold Days: Specifies the number of days before the expiration date to automatically place the item on hold and prevent it from being allocated to orders
Once you enter a value for this field and save the item, the system looks for any received items that, based on their expiration date and the threshold value, fall into that threshold window and does four things:- Places the received item on hold
- If configured, sends a notification that the received item has been put on hold
- Unallocates the contents of that received item from any orders it’s allocated to
- Attempts to reallocate an item that isn’t within that expiration threshold
-
Hold Threshold Days: Specifies the number of days before the expiration date to automatically place the item on hold and prevent it from being allocated to orders
- Require Scan at Pick: When checked, requires the user to specify a serial number when the item is picked.
-
Lot Number Tracking: Options to track item by lot number(a batch, set quantity of goods, or raw materials from a single manufacturer is assigned) value.
- Require Scan at Pick: When checked, requires the users to specify a lot number when the item is picked.
- Cost Tracking: Options to track item by cost per unit (defined for the item under Description > Product Cost)
If you need to modify an existing track-by value for an item, you can do so under Inventory > Edit Track-By's. To learn more, please see Editing Track-By Values.
Validate at Pack
The Validate at Pack feature is currently in closed beta. Small Parcel Suite does not yet support this functionality. It's only available for SmartScan Pack.
The Tracking Options allow you to enable, disable, or require specific track-by's for an item.
Track-by's allow you to associate a specific value — such as a Lot Number, Serial Number, Expiration Date, or Cost — with a SKU when it's received into your warehouse. These values can then be used to trace inventory within the warehouse and validate it during the pick and pack processes.

Each track-by offers the following configuration options:
Required at Receipt: When enabled, the track-by value must be entered when receiving inventory. The receipt cannot be completed without it. If not enabled, the value is optional during receiving.
Validate at Pick: When enabled, SmartScan Pick requires the picker to scan or confirm the track-by value during picking. The scanned value is checked against the allocated inventory. If it doesn't match, an error is returned and the pick is rejected.
Validate at Pack: When enabled, SmartScan Pack requires the packer to scan or confirm the track-by value during packing. The scanned value is checked against the allocated inventory. If it doesn't match, an error is returned and the pack is rejected.
How These Options Work Together
| Required at Receipt | Validate at Pick | Validate at Pack | What Happens |
| ✅ | ✅ | ✅ | Track-by value must be entered at receipt and validated at both pick and pack |
| ✅ | ✅ | ❌ | Track-by value must be entered at receipt and validated at pick only |
| ✅ | ❌ | ✅ | Track-by value must be entered at receipt and validated at pack only |
| ✅ | ❌ | ❌ | Track-by value must be entered at receipt but not validated during pick or pack |
| ❌ | ✅ | ✅ | Track-by value is optional at receipt. You must scan the track-by at pick or pack if a value is present on the allocated inventory. |
Default Behaviors by Track-By Type
When you enable a track-by on an item, the following defaults are applied. These defaults only apply when newly enabling a track-by — existing item configurations are not affected.
Lot Number: Options to track item by lot number
| Option | Default |
| Required at Receipt | Selected |
| Validate at Pick | Selected |
| Validate at Pack | Not Selected |
Serial Number: Options to track item by serial number value
Inbound and outbound serialization cannot both be enabled on the same item. If your goal is to confirm track-by values at packing, use Validate at Pack with inbound serialization instead of enabling outbound serialization.
Inbound
| Option | Default |
| Required at Receipt | Selected |
| Validate at Pick | Selected |
| Validate at Pack | Not Selected |
| Searila number must be unique | Selected |
Outbound
| Option | Default |
| One S/N per primary unit | Selected |
| At least one S/N per line item | Not Selected |
Expiration Date: Options to track item by expiration date value
| Option | Default |
| Required at Receipt | Selected |
| Validate at Pick | Selected |
| Validate at Pack | Not Selected |
Hold Threshold Days: Specifies the number of days before the expiration date to automatically place the item on hold and prevent it from being allocated to orders
Once you enter a value for this field and save the item, the system looks for any received items that, based on their expiration date and the threshold value, fall into that threshold window and does four things:
- Places the received item on hold
- If configured, sends a notification that the received item has been put on hold
- Unallocates the contents of that received item from any orders it’s allocated to
- Attempts to reallocate an item that isn’t within that expiration threshold
Cost
| Option | Default |
| Required at Receipt | Selected |
Clearing Required at Receipt on any track-by type automatically clears both Validate at Pick and Validate at Pack.
If you need to modify an existing track-by value for an item, you can do so under Inventory > Edit Track-By's. To learn more, please see Editing Track-By Values.
Shipping Documentation
The Shipping Documentation fields are used if you plan on shipping this item internationally.
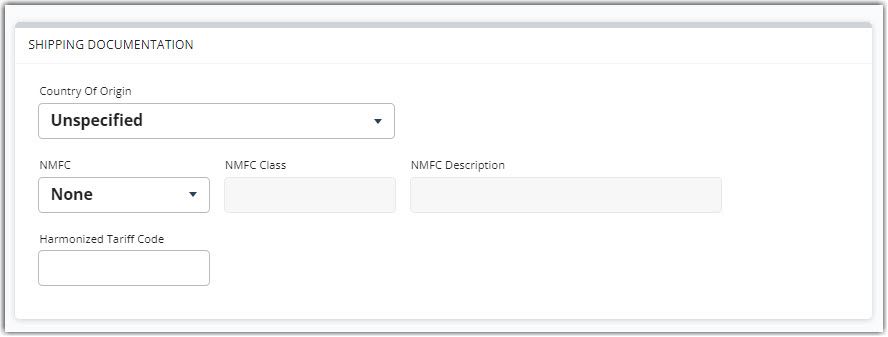
- Country of Origin: The documented manufacturer location
-
NMFC: The National Motor Freight Classification grouping ID used for freight costs (configured under Items > Manage Commodities)
- NMFC Class: The associated commodity class, auto-populated based on NMFC selection
- NMFC Description: The associated commodity description, auto-populated based on NMFC selection
- Harmonized Tariff Code: Standard number to recognize and classify globally traded products
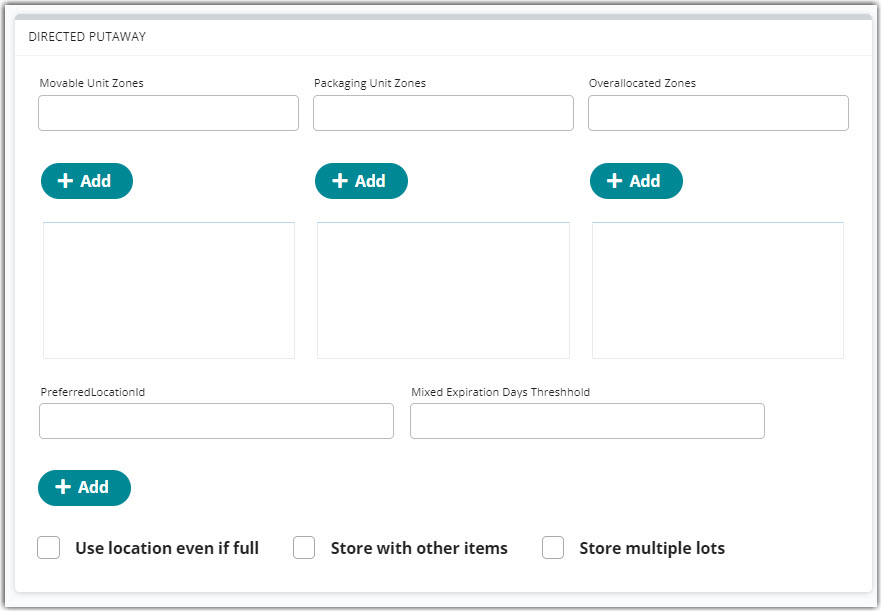
Directed Putaway
The Directed Putaway fields are used to configure this item for directed putaway. For more information, please see Getting Started with Directed Putaway.
Hazardous Material
The Hazardous Material fields are used if an item poses health or safety risk when transported. This sub-section does not display if you do not have HazMat enabled for your account.
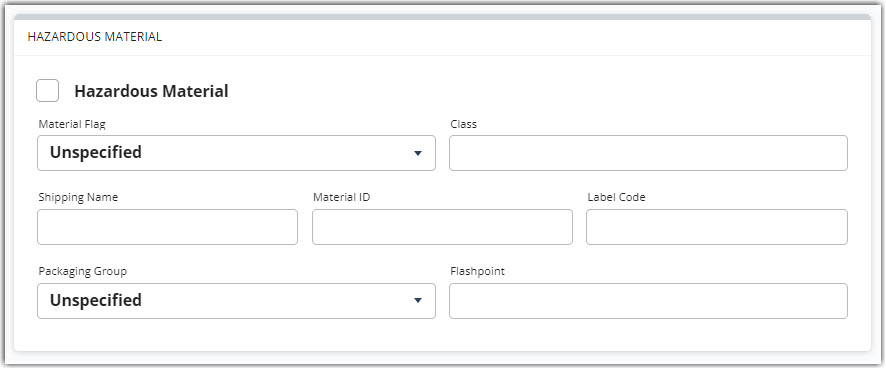
- Hazardous Material: When checked, enables a HazMat flag
- Material Flag: Label affixed to shipping form, used to identify hazardous materials
- Class: Number that defines the hazard class for hazardous materials
- Shipping Name: Standard technical name that describes the hazard properties of the material
- Material ID: Standard identification number for hazardous substances (begins with UN or NA and contains 2 or 4 digits)
- Label Code: Number required to display on the hazard warning label required when packaging HazMat products
- Packaging Group: Grouping that indicates the level of danger presented by hazardous materials
- Flashpoint: The temperature or condition in which the item is considered dangerous
Item Qualifiers
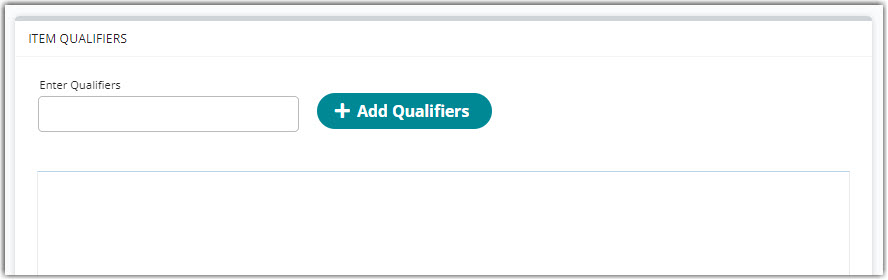
The Item Qualifiers sub-section is used to identify qualifiers for an item. Qualifiers function as SKU separations and are useful when you want to specify size, color, or other distinguishing characteristics for an item.
Once differing qualifiers are added to items, 3PL Warehouse Manager will view these as completely different items. With this possibly impacting multiple functions, please consider carefully whether or not these should be used in your unique situation. Please reach out to our Support team with any questions regarding impacted functionality.
Please note that once you configure one or more qualifiers for an item, the system requires you to specify a qualifier value each time the item is received into your warehouse. Once received, you cannot remove that qualifier from the item's configuration.
To specify a qualifier, enter a value in the 'Enter Qualifiers' field, then click Add Qualifiers. Repeat for each qualifier associated with the item.
Once you've entered basic details for an item, you can continue to the next configuration section—Defining Units of Measure. If you'd like to come back and edit the item at a later time, don't forget to click Save.
Was this article helpful?
Share additional feedback about this article