3PL Warehouse Manager

Updated on July 16th, 2023

  • Extensiv Hub
    Popular Articles Getting Started Using Hub Technical Issues & FAQs Extensiv's Ideas Portal
  • 3PL Warehouse Manager
    Receiving Operations Inventory Management Shipping Operations System Configuration Scanning Operations Integrations Content Best Practice Resources Release Notes Popular Articles Troubleshooting Guides
  • Warehouse Management
    Getting Started Admin Console Shipping Order Picking & Packing Receiving Customer Portal Cycle Counting Kit Building Managing Users Barcode Scanner Import/Export Integrations Barcoding Wave Picking Bin Move Mobile Receiving and Picking Settings Popular Articles Reporting
  • Order Management
    Dashboard Orders Inventory Purchase Orders Shipments Customers Products Analytics Settings API API Integrations Accessing and Navigating Order Manager Error Messages Order Manager Popular Articles Accounting Integrations
  • Integration Management
    Getting Started with Integration Manager General Support Troubleshooting Extras & Addons API Documentation Popular Articles Order Sources Order Destinations
  • FAQs
  • Network Manager
    Getting Started Order Routing Management Technical Issues Shopping Carts Settings Settings, Products, and Orders
  • Billing Manager
    Getting Started Using Billing Manager
  • Release Notes
    Extensiv Sandbox Extensiv Extensiv Hub 3PL Warehouse Manager Integration Management Warehouse Management Order Management Billing Manager
  • Fulfillment Marketplace
    Getting Started
  • Sandbox
    Getting Started
+ More
  • Help Center
  • 3PL Warehouse Manager
  • Inventory Management
  • Item Creation
  • Inventory Management
    • Item Creation
        • Creating Items
        • Understanding Units of Measure
        • Entering Basic Item Details
        • Defining Units of Measure
        • Creating Item Assemblies
        • Configuring Item-Level Recurring Storage Charges
        • Configuring Item-Level Storage and Handling Charges
    • Inventory Management
        • Using the Manage Inventory Page
        • Understanding Allocation Logic
        • Making Adjustments
        • Transferring Inventory
        • Editing Track-By Values
        • Getting Started with Directed Putaway
        • Understanding Directed Putaway Logic
        • Understanding Replenishments
        • Counting Inventory
        • Performing Item-Based Audits
    • Movable Units
        • Understanding Movable Units
        • Enabling Movable Units for Customers
        • Defining Movable Unit Types
        • Specifying an Item's Movable Unit Type
        • Receiving Movable Units
        • Moving Movable Units
        • Reconfiguring Movable Units
    • Item Control
        • Managing Assembly Transactions
        • Moving Items
        • Batch-Updating Items
        • Managing Item Aliases
        • Managing Commodities
        • Managing Classifications
        • Managing Pricing
        • Managing Item Images
        • Managing Storage Rates
        • Uploading Import Templates
        • Understanding Item Alias

Creating Items

Items are the backbone of 3PL Warehouse Manager. Correctly setting up inventory items is the key to reporting and warehouse management, as proper item setup increases productivity and limits potential discrepancies throughout the system.

This article reviews how to create an item in 3PL Warehouse Manager—you can manually input individual items into the system, or you can import items using a spreadsheet.

To create and manage items, you must have the following permission assigned to your user role: Customer Module > Customer Items > Manage Items.


Create items manually

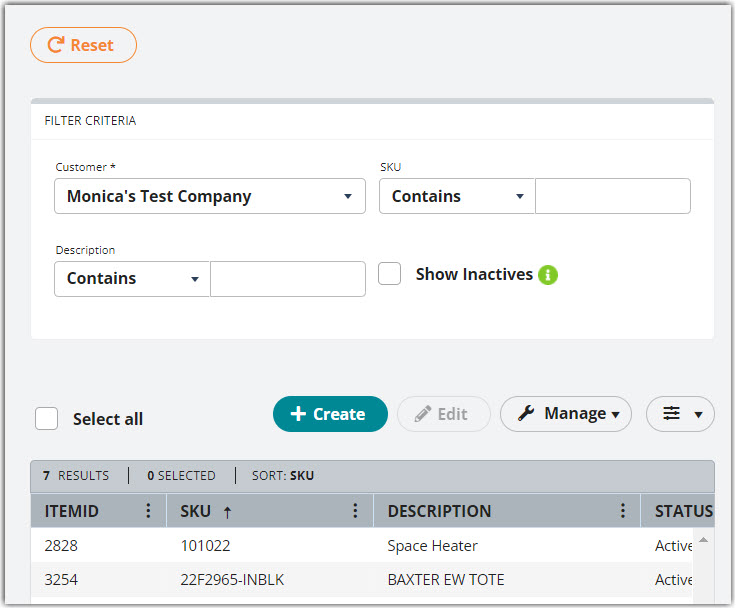
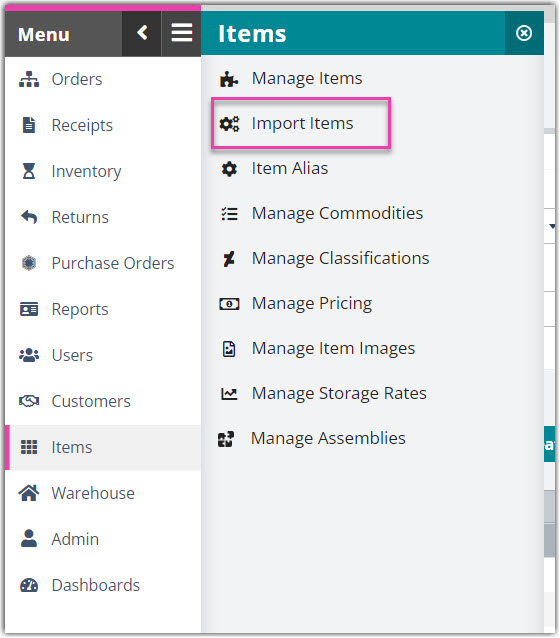
The first option of entering items in the system is via manual entry. Navigate to Items > Manage Items, select a customer from the drop-down menu, then click Create.

The right pane populates with a new form that contains four sections. Each section is fully outlined in the articles on your left and listed below. As you complete each section, be sure to click Save as needed.

  • Entering Basic Item Details
  • Defining Units of Measure
  • Creating Item Assemblies
  • Configuring Item-Level Recurring Storage
  • Configuring Item-Level Storage and Handling Charges

Import items

If you have a large number of items to create or you already have a spreadsheet that contains the item information, we recommend adding these items into the system via import file.

To successfully import items, you must have the following permission assigned to your user role: Customer Module > Customer Items > Import Item Definitions.


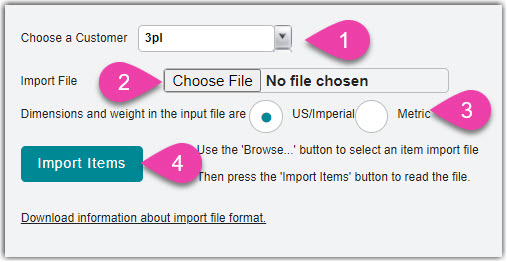
  1. Follow the instructions on the Item Import Template, then navigate to Items > Import Items and select a Customer from the drop-down menu.
  2. Click Browse, then double-click the import file.
  3. Specify what the 'Dimensions and weight in the input file are'.
  4. Click Import Items. A preview of the item data displays in the 'Items To Be Created' grid and the bottom two text boxes.
  5. Once you verify for accuracy, click Create Items to finalize the import. If successful, you can view each item on the Manage Items page.

Extensiv University

Gain deeper insights and learn more about 3PL Warehouse Manager with our online course at Extensiv University.
manufacturing crafting

Was this article helpful?

Yes
No
Share additional feedback about this article

Related Articles

  • Moving Inventory with SmartScan
  • Picking Multiple Orders
  • Transactions Reports
  • Creating Pick Jobs

Not finding the help you need?

Contact Support
Solutions
  • Solutions for Brands
  • Solutions for 3PLs
  • Solutions for 4PLs
  • Solutions for B2B
Products
  • Extensiv 3PL Warehouse Manager
  • Extensiv Warehouse Manager
  • Extensiv Order Manager
  • Extensiv Integration Manager
  • Extensiv Network Manager
Products
  • Customer Success
  • Implementation
  • Consulting
Ecosystem
  • Fulfillment Marketplace
  • Integrations
  • Partners
  • Become a Partner
Resources
  • Resource Library
  • Blog
  • Market Insights
  • What is a 3PL?
  • What is a 4PL?
  • What is a WMS?
  • Why a Cloud-based WMS?
  • Glossary
Help
  • Help Center
  • API Documentation
  • Extensiv Univerisity
  • Community
  • System Status
  • Extensiv Logo
  • 100 N Pacific Coast Hwy, Suite 1100, El Segundo, CA 90245
  • |
  • Contact Us:
  • 83-EXTENSIV 888.375.2368 (main)
  • |
  • 310.844.7570 (local)
  • Copyright © 2023 Extensiv
  • |
  • All rights reserved.
  • Privacy Policy
  • |
  • Terms of Service
  • Follow Us:
Expand