Understanding Allocation Logic
6.0 min read
|
Allocation is the logic in which 3PL Warehouse Manager assigns received inventory to an open order. The system automatically allocates available inventory to an order upon import or individual line item entry (unless you have the Order Queue enabled in a customer's setup).
This article reviews how to view available and allocated inventory, how the system allocates inventory to an order, and how to modify an item's allocation.
Allocation visibility
Before we get into allocation logic, it's important to understand your options for viewing available and allocated inventory.
Order allocation statuses
There are three different order allocation statuses:
- Fully Allocated: This means that inventory is allocated to all line item quantities on the order.
- Partially Allocated: This means that not all line item quantities on the order contain allocated inventory.
- Unallocated: This means that no inventory is allocated to the order.
There are several methods of viewing an order's allocation status on the Find Orders page.
-
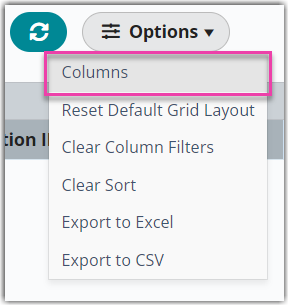
Allocation Status grid column. This column shows whether an order has No Line Items, is Unallocated, is Partially Allocated, or is Fully Allocated. To add the Allocation Status grid column, navigate to Orders > Find Orders, then select Options > Columns.
Click on this column header to sort the grid by descending allocation status, then click it again to sort by ascending allocation status. (Click a third time to unsort by this column.)
-
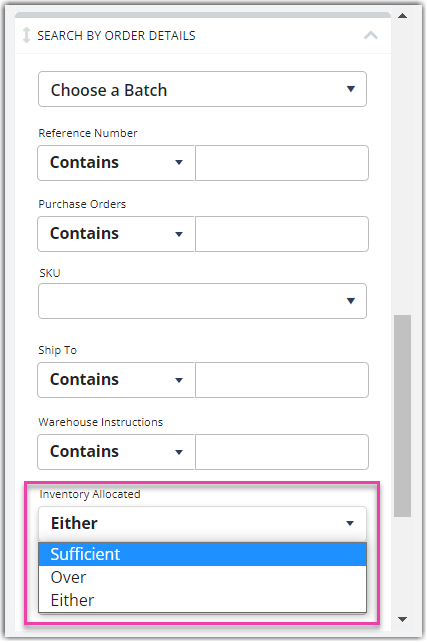
Inventory Allocated search filter. This search filter can adjust the orders that display in the grid based on whether they have Sufficient inventory allocated to each line item, have at least one line item that is Overallocated, or Either.
-
Allocation color scheme. You can instantly identify an order's allocation status by an order's color in the grid. (If an order is fully allocated, no color displays.) The informational icon in the top-right of the grid displays the color scheme legend.

You can also view an order's allocation status by hovering your mouse over an order.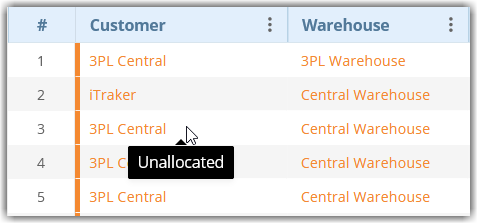
Inventory allocation totals
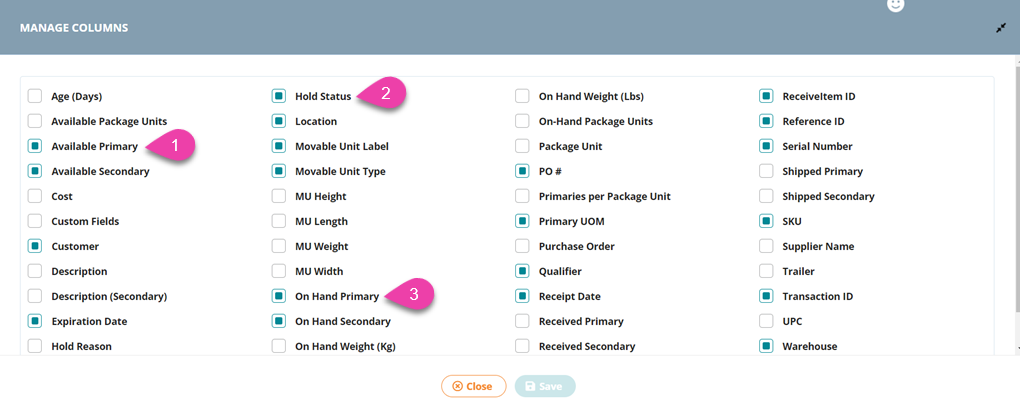
The Manage Inventory grid displays all current inventory levels in your facilities and has several available columns that are relevant to allocation.
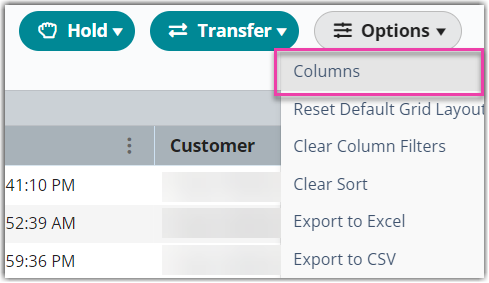
To add each relevant grid column, navigate to Inventory > Manage Inventory, then select Options > Columns.
Once the Manage Columns dialog opens, select your desired grid columns, then click Save. Each column related to allocation is further explained below.
-
Available Primary: displays the number of primary units that are currently in the warehouse, have not been allocated to an order, and are available for allocation to new orders
- Available Secondary is also available for items configured with a secondary UoM
- Available Secondary is also available for items configured with a secondary UoM
-
Hold Status: denotes whether inventory is Available or On Hold
- Available is defined above; On Hold means that the product is in the warehouse but unavailable for shipping (usually due to damage, quality control, being held for a specific order, or simply being stored in a Quarantine location)
- Available is defined above; On Hold means that the product is in the warehouse but unavailable for shipping (usually due to damage, quality control, being held for a specific order, or simply being stored in a Quarantine location)
-
On-Hand Primary: displays the number of primary units that are currently in the warehouse
- On-Hand Secondary is also available for items configured with a secondary UoM
- On-Hand Secondary is also available for items configured with a secondary UoM
Use the following calculation to determine the total amount of inventory allocated: Allocated = On-Hand – Available.
Once you 'Ship and close' an order, the associated inventory is no longer on-hand because it is considered to be with the carrier.
Allocation logic
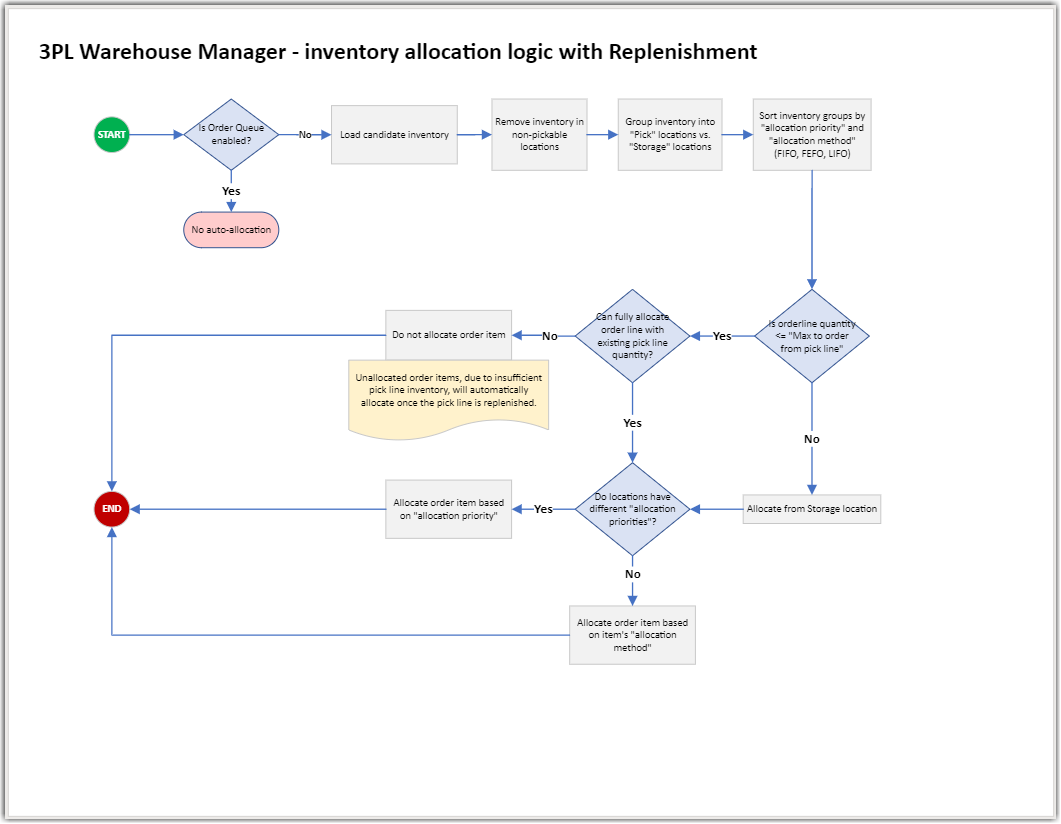
There are several factors that determine which available inventory is allocated to an order, reviewed in the flowchart and sections below.
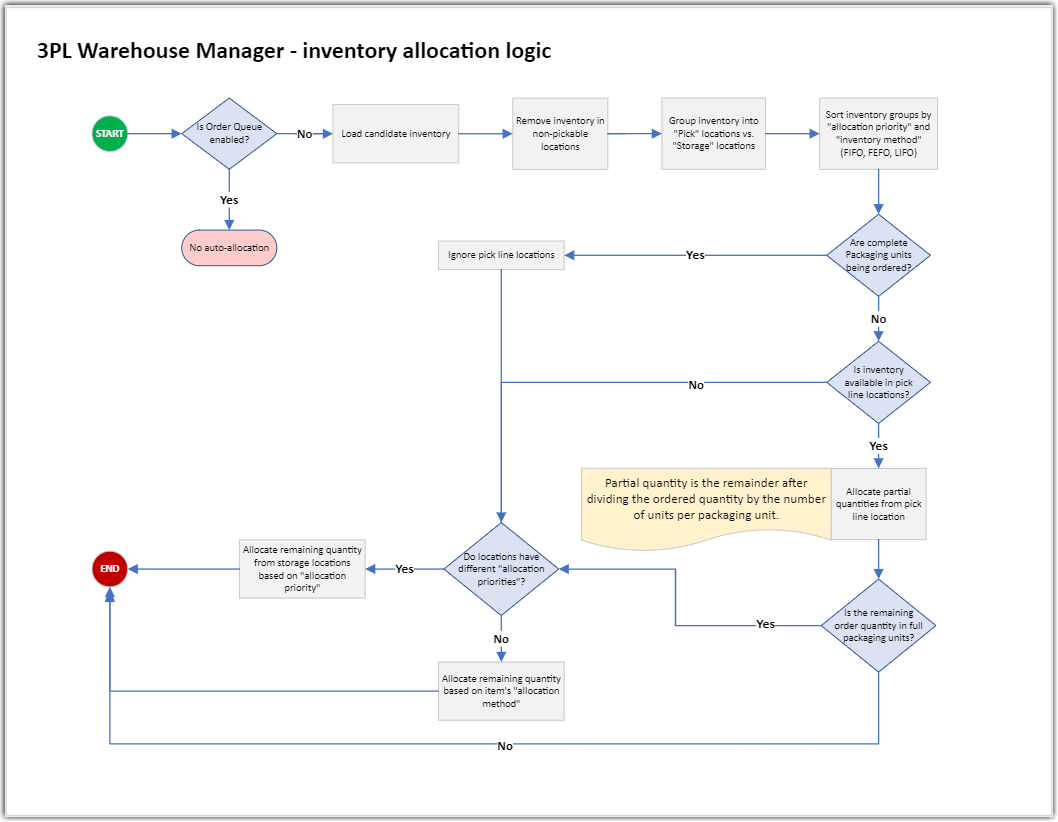
To enlarge, right-click the image and select "View image" or "Open image in new tab"—the verbiage depends on your web browser.
Let's first review a few definitions that help you better understand the allocation logic explained below:
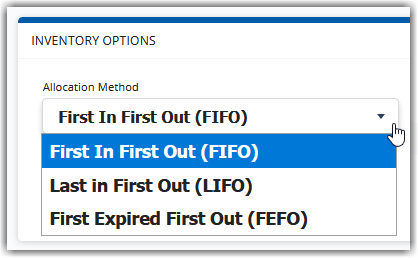
- Allocation method: This is the type of inventory control method you select for an item—First In First Out (FIFO), First Expired First Out (FEFO), or Last In First Out (LIFO). When none of the other allocation factors are configured to take priority, the system falls back on an item's allocation method to decide which inventory line is allocated.
- Location type: Each location is categorized by the 'Location Type Identifier' defined in its setup options, which can directly affect the allocation logic.
- Location priority: This is a way of specifying that one location takes precedence over another. If all of your locations have equal priority, this is not a factor in the system's allocation logic.
-
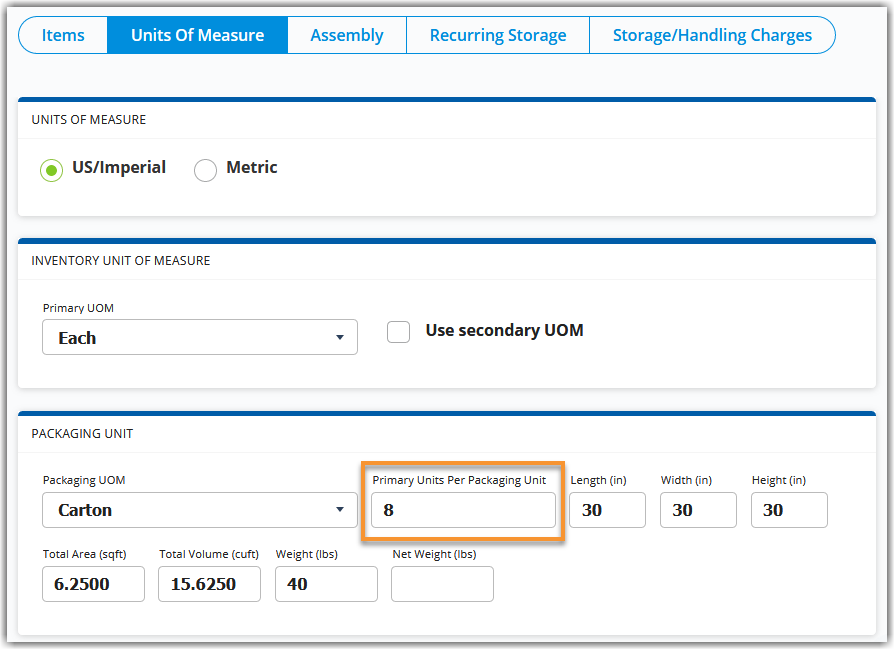
Partial packaging unit: If an order line quantity is not equal to a multiple of the defined packaging unit, that means it contains a partial packaging unit. Depending on your configured location types, partial packaging units can be allocated differently than complete packaging units.
For example, if an item is configured with 10 primary units per packaging unit and an order asks for 34 units, that means there are 3 complete packaging units (10 units per package) and 1 partial packaging unit that contains the remaining 4 units.
Now that you understand these terms, let's review each allocation factor.
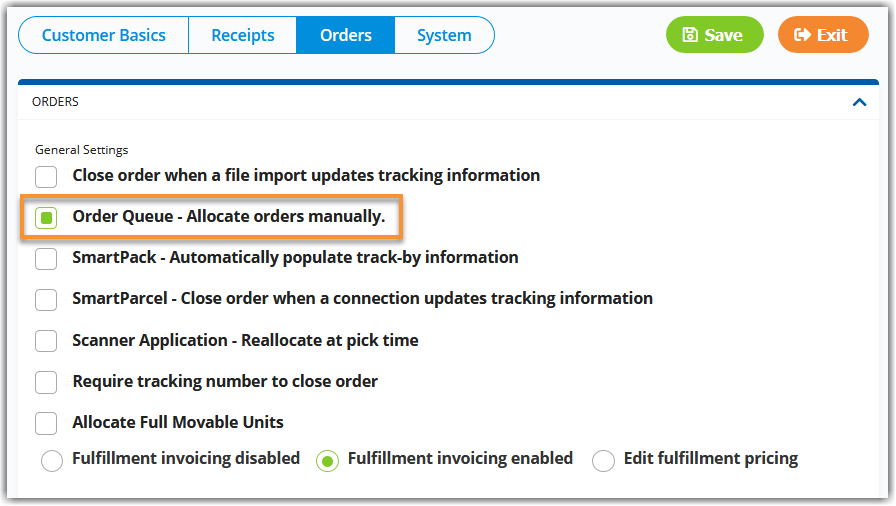
Order Queue
The Order Queue is a feature that prevents automatic allocation from occurring. If you have this option enabled for your database under Admin > Settings and enabled in a customer's setup options, a warehouse user must manually allocate inventory to each of this customer's orders and none of the logic below applies.
Location type
If the Order Queue is disabled, the first variable relevant to automatic allocation logic is location type. All locations are defined as one of the five following types, and the system allocates inventory differently depending on the location type in which an item is stored.
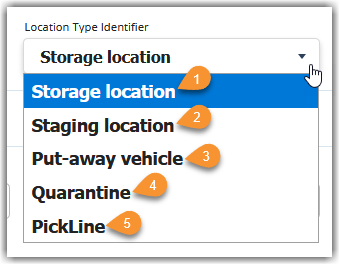
1–3. Storage location, Staging location, Put-away vehicle: These locations are all treated the same way when it comes to allocation—meaning that if these locations have equal priorities, the system allocates based on an item's allocation method.
4. Quarantine: Items placed here are considered 'On Hold', so inventory never allocates from a Quarantine location.
5. PickLine: If a partial packaging unit is contained on a line item, the partial quantity automatically allocates from a PickLine location if there is available inventory.
Because PickLine locations are used for partial units (when quantity equals less than the full packaging UoM), when an item's primary and packaging UoM are the same (e.g., both = 1), allocation for that item will always bypass a PickLine location regardless of other settings.
An item's defined quantity for 'Primary Units Per Package' is crucial in allocation accuracy—confirm that this value is accurate in each item's setup under Units of Measure > Packaging Unit
For more information on location types, please see Creating Locations.
Location priority
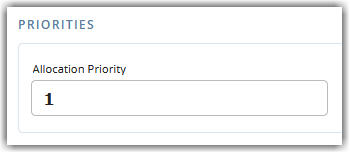
Location priority determines how the system automatically allocates items stored in a specific location. A location's priority is automatically set to 1 by default, which denotes the highest priority—99999 indicates the lowest priority of allocation.
To define a location's priority, open the warehouse under Warehouse > Manage Locations, locate the 'Priorities' header, then enter a number in the 'Allocation Priority' field.
If you're using varying location priorities, please be aware that you're running the risk of not following the item's specified allocation method.
Allocation method
When locations have equal priorities, the system checks an item's allocation method to determine which inventory is allocated to the order. When locations have varying priorities, the system runs against the logic set up under an item's specified allocation method.
By default, an item's allocation method is identified as FIFO, so if you need to change this to a different allocation method, edit the item under Items > Manage Items, then locate the 'Inventory Options' header in the Items section. Under 'Allocation Method', select an option from the drop-down menu.
Allocation logic with Replenishments turned on
3PL Warehouse Manager's Replenishments feature changes how allocation logic works. This diagram shows the logic that the Replenishments feature uses. See our Replenishments article to learn more about this feature.
Allocation modifications
If all of the above allocation variables are configured to your desire and you need to modify allocation on an ad-hoc basis, there are several ways to do so.
To manually modify order allocations, you must have the following permission assigned to your user role: Orders Module > Order Allocation.
Edit allocations directly on an order
You can specify allocations when you are adding a line item via the Mass Add tool or editing an existing line item. For more information, please reference our instructions on how to Allocate specific inventory to an order and Edit the allocation of a line item.
Reallocate at pick time
You can also change inventory allocation while picking an order with SmartScan by using our "Reallocate at Pick Time" feature, which allows you to override the system's allocation logic after scanning a picked item. This feature must be activated for your account under Admin > Settings and enabled in each customer's setup options.
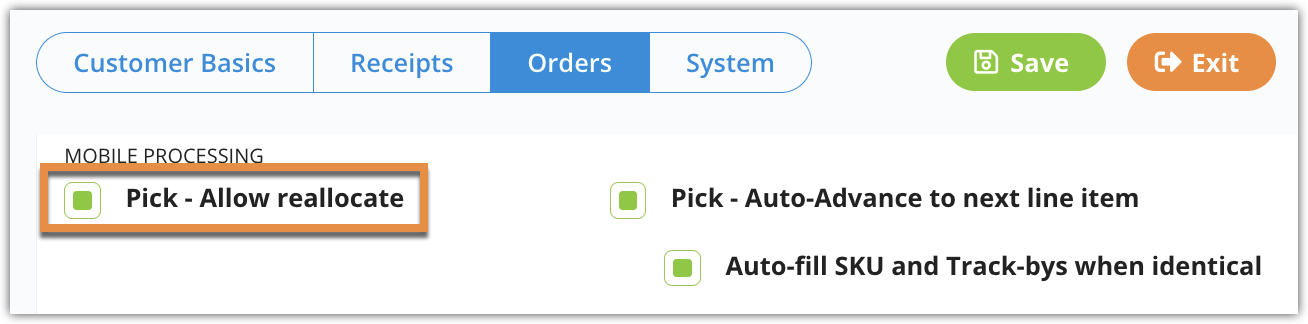
In addition to the 'Order Allocation' permission mentioned above, the user performing the pick job must also have the following permission assigned to their role: Mobile Scanner > Pick Job > Mobile Picking.
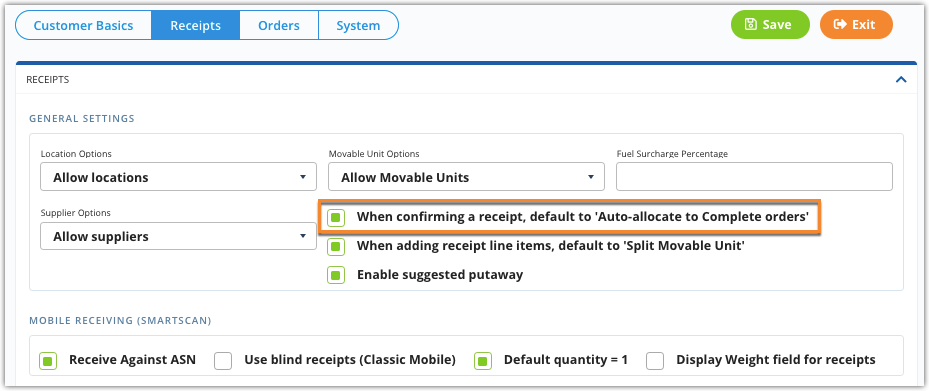
Auto-allocate to Complete orders
When selecting 'Confirm Receipt' directly on a receipt, you can specify whether you want the associated inventory from that receipt to auto-allocate to Complete orders that are currently unallocated or partially allocated. When auto-allocating inventory, the system will prioritize line items that have a location assigned to them.

If you do not select this option, you must manually allocate the inventory to any current orders or the inventory automatically allocates to the next relevant order that is created in the system.
You can also choose to enable this option by default in a customer's setup.
Allocate menu
The Find Orders page contains an 'Allocate' menu that gives you several options to modify order allocation.
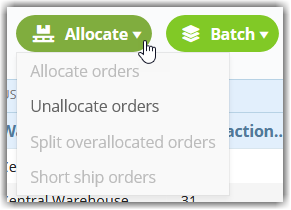
-
Allocate orders: If one or more of the selected orders contain unallocated line items, this selection allocates inventory to those line items.
Using the Automatic Allocation functions on the Find Orders page will mark the Order as Complete.
-
Unallocate orders: If one or more of the selected orders contain allocated line items, this selection unallocates inventory from those line items.
-
Split overallocated orders: If one or more of the selected orders contain overallocated line items, this selection creates a new open order and back-orders those line items so that you can ship what's available in the selected order.
- Short ship orders: If one or more of the selected orders contain overallocated line items, this selection cancels the overallocated inventory and removes the line items from the order.
To learn more, access the Directed Putaway course at Extensiv U.