Getting Started with Directed Putaway
4.8 min read
|Directed Putaway identifies the optimal location to store incoming stock at the time of its receipt based on rules that you design for your specific operations.
3PL Warehouse Manager leverages your rules to compare specific location and item settings, which effectively defines your preferred putaway strategy and determines the best storage location for each line item on an incoming receipt.
This article reviews how to manually configure locations and items for directed putaway, as well as explains how 3PL Warehouse Manager evaluates these settings to implement your putaway strategy.
Directed Putaway configuration requires assistance from the Extensiv Professional Services team. To get started, contact your Customer Success Manager (CSM) to arrange a Professional Services engagement.
Prerequisites
Before you can set up directed putaway, you must meet the following requirements:
- Directed Putaway feature is enabled for your account under Admin > Settings
- Relevant locations and items are fully defined
- Have a fundamental understanding of the operational flow in your warehouse and what you want to accomplish with directed putaway—such as the types of locations you have in your warehouse, the rules you want for those locations, and the overall flow of goods in and out of your warehouse
Barcoded locations and mobile barcoded scanning are recommended but not necessary for directed putaway.
Warehouse Layout Example
If you note the depiction of the warehouse layout below, you can identify areas of more efficient putaway. We’ll reference this simple warehouse layout in our examples within this article.

This image is not a scale warehouse but a sample being used to explain the directed putaway process.
In the layout above, the ideal pick location would be the areas shaded in orange since they are closest to the outbound bay. The pink area would be ideal for storing seasonal products or long-term inventory since they are furthest away from the outbound area. It is important to consider your individual warehouse configuration, as well as the products that you store, before determining directed putaway rules.
Guidelines
Step 1: Configure a location
Before you can configure directed putaway, you must create or edit locations to add to a specific zone. A zone is an arbitrary grouping of locations that we want to consider as equals when processing directed putaway rules.
- Navigate to Warehouse > Manage Locations, then select the relevant Warehouse.

2. Select a location, then click Edit.
3. Ensure that your location capabilities are set up and accurate. If you need to make changes, do so now, then click Save.
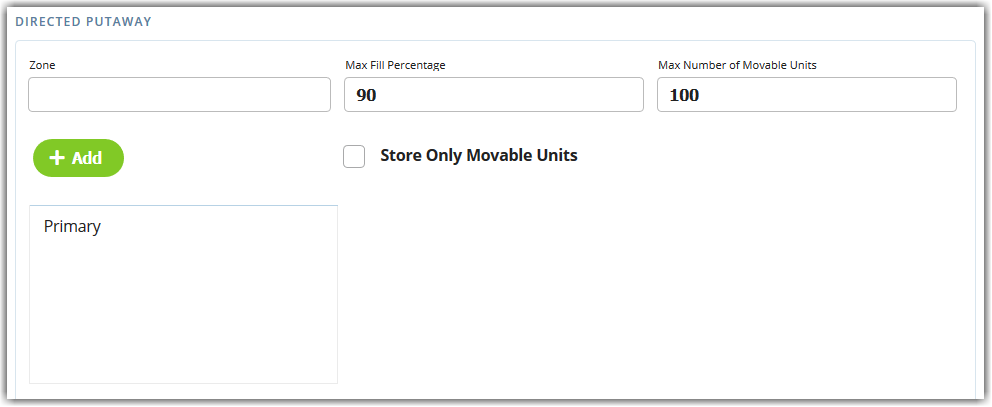
4. Under the 'Directed Putaway' section, enter the following information:
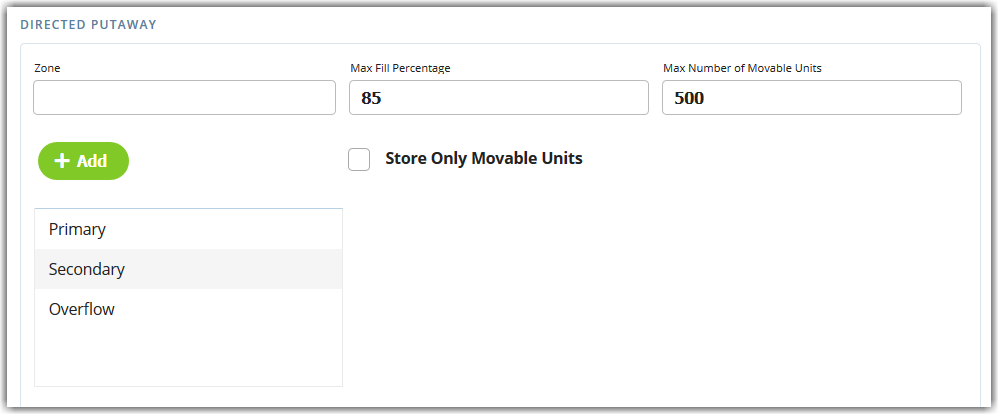
- Enter a Zone: Enter a descriptive name for this zone in your warehouse. In our example below, we’ve created a zone called Primary. The newly created zone appears in the list of available zones. Note that you can use any label that you feel best describes your warehouse zones. We use Primary, Secondary, and Overflow for our second example.
- Define Max Fill Percentage: This percentage flags at the designated capacity. When you reach the percentage, the location is considered full. The remaining space can be used for overflow or manual putaway.
- Specify Max Number of Movable Units: This number is the maximum number of MUs that can be stored in the location.
- Restrict to Store Only Movable Units: This option sets the location for MU use only. Partials cannot be stored here.
5. Click Add.
6. Once all the information has been entered, click Save to complete.
7. Repeat Steps 2–5 for each location that needs to be configured to allow for directed putaway.
Example 1
The following example assigns a location to a zone called Primary, which corresponds to the orange area in our warehouse layout example.

Example 2
In the example below, Rack 8 is configured as a multi-zone location. To do this, simply add multiple zones to the location’s zone list. In this case, items directed to Overflow, Primary, and Secondary zones can be stored on Rack 8.

Step 2: Configure an item
The next step is to configure the items to reflect the zones we just created in Step 1.
- Navigate to Items > Manage Items, then select the relevant Customer.

2. Select an item from the grid, then click Edit.
3. Ensure that your item is completely set up and accurate. If you need to make changes, do so, then click Save.
4. In the 'Directed Putaway' section under the Items tab, complete each field as needed:
- Enter Movable Unit Zones: These zones are for defined movable units (MU). This could be a pallet, box, gaylord, or any other system defined MU.
- Enter Packaging Unit Zones: These zones let you create a putaway strategy for those items that are not on a movable unit when you receive them. These types of items likely go to locations specially designed for them, rather than standard pallet racking. For example, small racks or storage cabinets that hold individual items.
- Enter Overallocated Zones: These zones direct incoming items to a special location if you are currently waiting on those items to fill overallocated orders. The overallocated zone assigned should direct items to a place where it's quick and easy to pack and ship those orders, such as a taped off floor space close to the packing area.
Directed putaway directs all incoming items to the overallocated zone when there are overallocated orders, so it's best to close out those orders as quickly as possible to avoid directing too much stock to this zone.
- Specify a PreferredLocationId: This is where you want the system to store an item if it is possible. When available, a preferred location overrides all other directed putaway settings, except the Overallocated Zone.
- Specify Mixed Expiration Days Threshold: This option limits the ability to store items with different expiration dates in the same location, based on the number of days between item expiration dates.
Example: Inventory Item 1000 has an expiration date of July 15th. You set Mixed Expiration Days Threshold to 5, which means if you receive a new product and its expiration is August 15th, these products will not be placed next to each other. However, if a new product is received with an expiration date of July 20th, it can be stored next to the July 15th product because it falls within the 5-day threshold.
- Specify whether to Use location even if full: This option disregards any indications that a preferred location might be full, and always assigns this item to the preferred location. Perhaps there is extra space in front or behind the location, you can double-stack inventory, or you want to stack inventory in the aisles temporarily.
- Allow Store with other items: This option allows the system to store this item together with other items in the same location.
- Allow Store multiple lots: This option allows the storage of multiple lots in the same location.
- Once all the information has been entered, click Save to complete.
- Repeat Steps 2–5 for each item that need to be configured to allow for directed putaway.
Example 1
In this example, we are setting this item to use zone Primary. When received, the 3PL Warehouse Manager stores this item in Racks 3–7 and Floor 3.
Example 2
This is an example of a multiple zone setup. When received, the system first attempts to store this item in the Primary zone, then in the Secondary zone. However, since we also selected a Preferred Location, this setting overrides any zone options if there is room to store the item there.
If we receive this item, 3PL Warehouse Manager attempts to store it in location Rack 3. If Rack 3 is full, the system then searches the Primary zone for a suitable location. If there are no suitable location in Primary, it then searches the Secondary zone.
Step 3: Use directed putaway with a receipt
After you configure an item, you can allow directed putaway for that item.
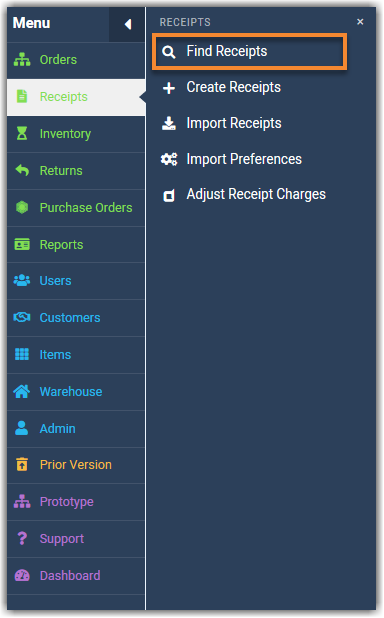
- Navigate to Receipts > Create Receipts.
- Select a receipt from the grid, then click Manage > Edit Receipt.
- Select the Receipt Line Items tab, then select a Directed Putaway option:
- Include lines without locations: Calculates locations only for those line items that do not already have an assigned location
-
Include all lines (replace locations): Calculates locations for all line items on the receipt and replaces any locations that might have been previously assigned.
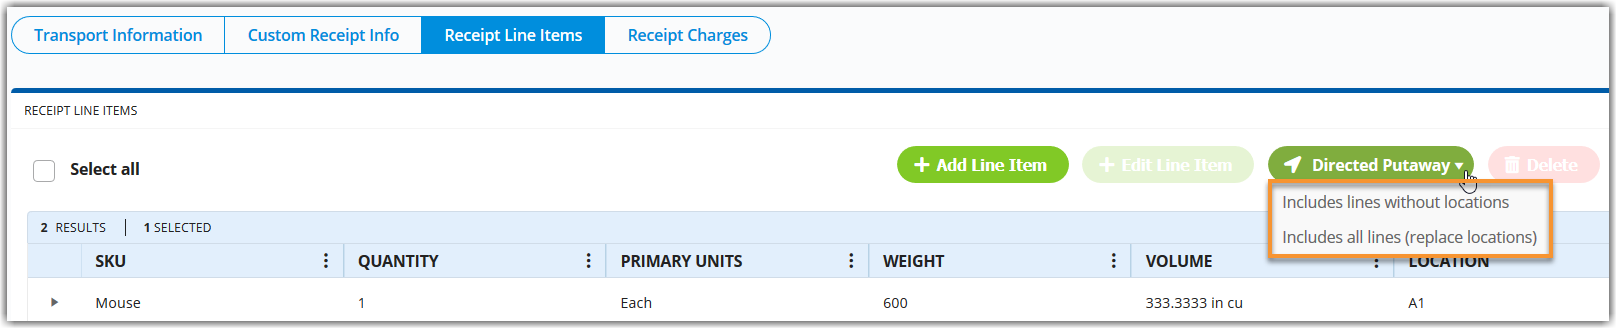
- Once selected, your directed putaway locations are allocated.
- If you need to leave your receipt open, click Save. If you are ready to close the receipt, click Confirm Receipt.
