Network Manager

Updated on March 19th, 2024

  • Extensiv Hub
    Popular Articles Getting Started Using Hub Technical Issues & FAQs Extensiv's Ideas Portal
  • 3PL Warehouse Manager
    Receiving Operations Inventory Management Shipping Operations System Configuration Scanning Operations Integrations Content Best Practice Resources Release Notes Popular Articles Troubleshooting Guides
  • Warehouse Management
    Getting Started Admin Console Shipping Order Picking & Packing Receiving Customer Portal Cycle Counting Kit Building Managing Users Barcode Scanner Import/Export Integrations Barcoding Wave Picking Bin Move Mobile Receiving and Picking Settings Popular Articles Reporting
  • Order Management
    Dashboard Orders Inventory Purchase Orders Shipments Customers Products Analytics Settings API API Integrations Accessing and Navigating Order Manager Error Messages Order Manager Popular Articles Accounting Integrations
  • Integration Management
    Getting Started with Integration Manager General Support Troubleshooting Extras & Addons API Documentation Popular Articles Order Sources Order Destinations
  • FAQs
  • Network Manager
    Getting Started Order Routing Management Technical Issues Shopping Carts Settings Settings, Products, and Orders
  • Billing Manager
    Getting Started Using Billing Manager
  • Release Notes
    Extensiv Sandbox Extensiv Extensiv Hub 3PL Warehouse Manager Integration Management Warehouse Management Order Management Billing Manager
  • Fulfillment Marketplace
    Getting Started
  • Sandbox
    Getting Started
+ More
  • Help Center
  • Network Manager
  • Order Routing Management
  • Orders
  • Order Routing Management
    • Orders
        • Apply Actions to Existing Orders in Bulk
        • Custom Fields for Orders (Custom Columns)
        • Duplicate or Clone an Order
        • Customizing the organization of Columns in the Orders Module
        • Resolving an Order in Missing Product Information Status
        • Restoring a Canceled Order
        • Cancel an Order
        • Restore an On-Hold Order
        • Creating a Manual Order
        • Out of Stock Orders
        • Creating a Manual Order - Single or Bulk
        • Manually Mark an Order as Shipped - Individually or in Bulk
        • Export an Order to a 3PL
        • Validating Shipping Addresses
        • Missing Order Info
        • Importing Orders Via Spreadsheet (In Bulk)
        • Resolving an Awaiting Payment Order
        • Merging Orders in Network Manager
        • Exporting Orders
        • Filtering Orders
        • Resolving Missing Product Info Orders
        • How to Add an item to an existing order
        • Missing Fulfillment Source
    • Products
        • Exporting Products
        • Associating and Creating a Listing SKU
        • How to Manage Products
        • Reassign a Listing SKU to Another Product
        • Creating Products
        • Creating Listing SKUs in Bulk (via Spreadsheet)
        • How to Disable Inventory Updates for a Specific Sales Channel
        • How does Extensiv Order Manager handle variations of the same product?
        • Creating Products via Spreadsheet
        • Adjusting Master SKUs
        • Custom Bundle/Kit Export
    • Inventory
        • Viewing Stock Edit History
        • Inventory - How Extensiv Network Manager Presents Bundle Inventory
        • Exporting Stock Details
        • Exporting Inventory
        • Searching for SKUs in the Inventory Module
        • Inventory Module Overview
        • How to Filter Inventory by Warehouse
    • Settings
      • Sales Channel
          • Shopify Locations
          • Shopify Tags
          • Enable or Disable Extensiv Network Manager Email Notifications to Your Customers
          • Deactivating a Sales Channel
          • Adding Shopify as a Sales Channel
          • Viewing a Sales Channel's Edit History
          • Adding Amazon as a Sales Channel
          • Adding eBay as a Sales Channel
          • Adding Walmart as a Sales Channel
          • Editing Sales Channels
          • Adding a Manual Sales Channel
          • How to Exclude a Warehouse From Pushing Inventory to a Sales Channel
          • Adding Sales Channels
          • Reactivating Sales Channels
          • How to Enable Out of Stock Control for eBay Sales Channels
      • Webhooks
          • Order Payment Webhook
          • Shopify Auto-Subscribing Webhooks
          • Shopify Product Update / Product Edit Webhook
          • Order Creation Webhook
          • Shopify Cancellation Webhook
          • Shopify Fulfillment Webhook
          • Shopify Refund Webhook - POS Orders
          • Shopify Product Deletion Webhook
          • BigCommerce Webhook
      • Warehouses
          • Setting Up a Warehouse's International Rank
          • Set Up Field Mappings of Import/Export Files
          • FTP Inventory Import for a 3PL
          • Setting Up Domestic Backup Warehouses
          • Creating and Configuring Warehouses in Extensiv Network Manager
          • Deactivating a Warehouse in Extensiv Network Manager
          • Updating the Address/Return Address for Your Warehouse
          • Enabling Use Component Inventory Setting for Bundles and Kits
      • Orderbots
          • Creating an Orderbot
          • Deactivating an Orderbot in Extensiv Network Manager
          • Editing an Orderbot
          • Automate Orders to Fulfill from a Specific Warehouse
          • Postal Zones in Extensiv Network Manager
          • Orderbots filtered by zip code range
          • Support for Shopify's Additional Details
        • Reverify Shopify Connection
      • Reverify Shopify Connection
      • Understanding Order, Shipment and Inventory Sync Times in Network Manager

Custom Fields for Orders (Custom Columns)

What you need to know

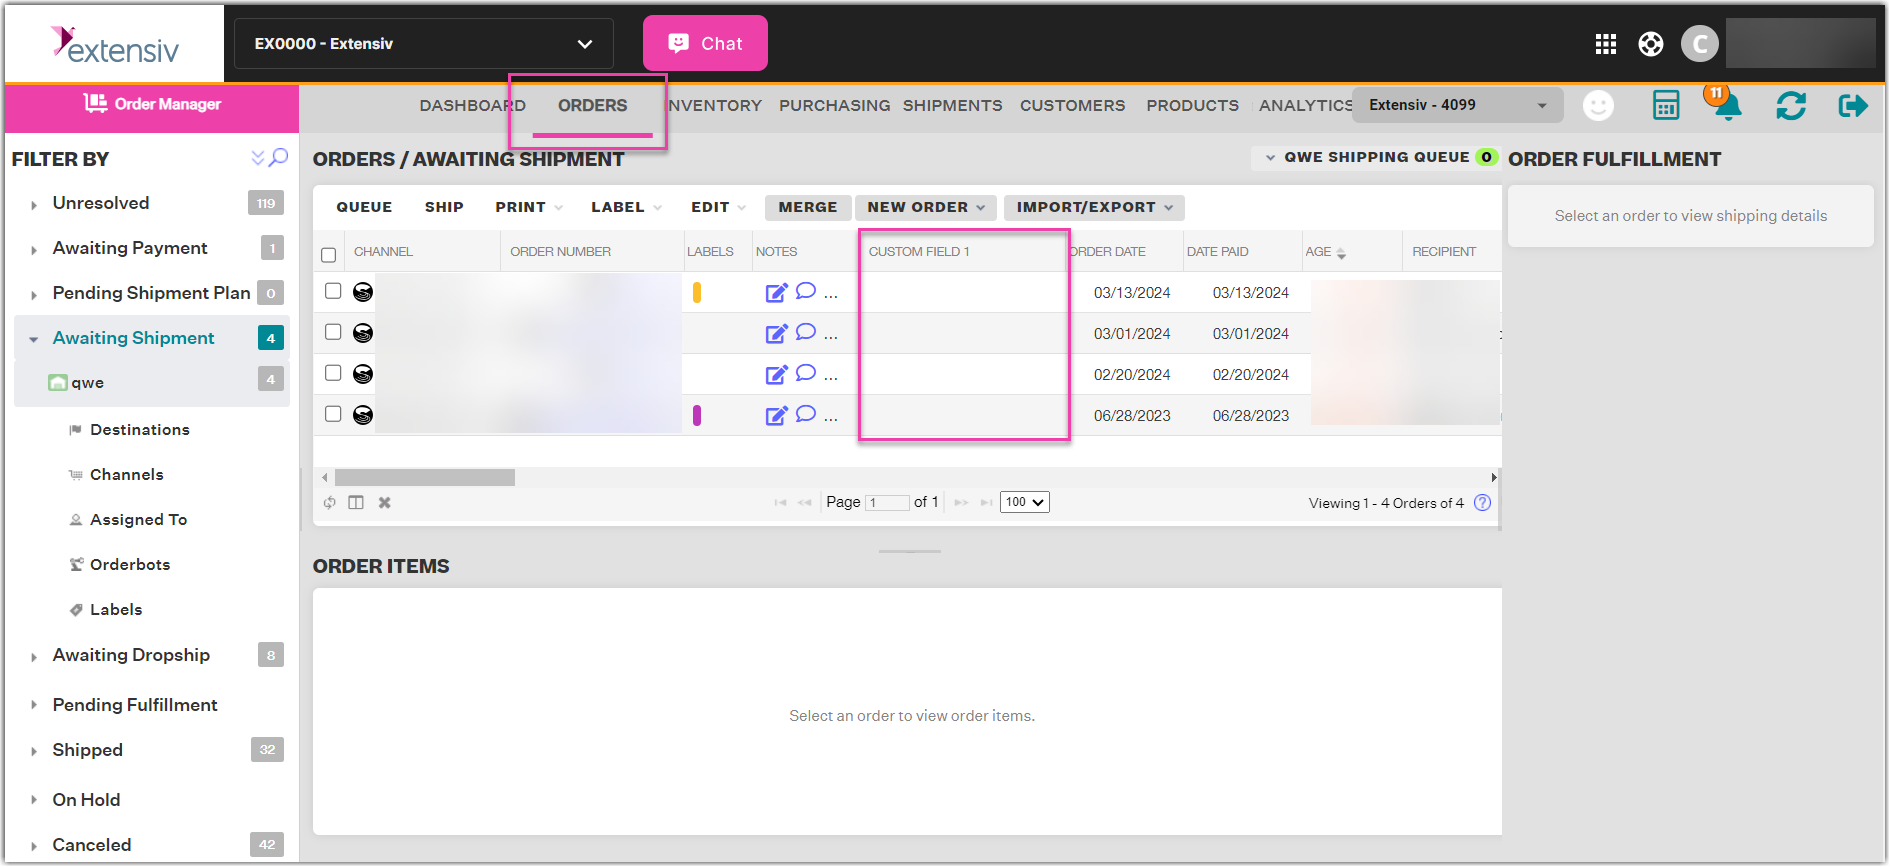
  • This feature allows Extensiv Network Manager users to create Order Field "Types" and "Values" which give users the ability to create new columns in the Orders Module for the first time.
     
  • A Field Type is basically a Column Name, while a Field Value is the text that falls under that column.
     
  • Custom Fields can be configured for orders after they are created (not during the creation process).
     
  • New Custom Field Types will show in the Orders grid after refreshing the page.
     
  • You can also include custom fields in order imports and exports, as well as automate them via orderbot actions.


How to add a custom field to an order

1. Navigate to Order Routing > Orders  and open any unshipped order by clicking on an order number.

2. In the order edit window, select the Fields tab. By default, this will be empty.

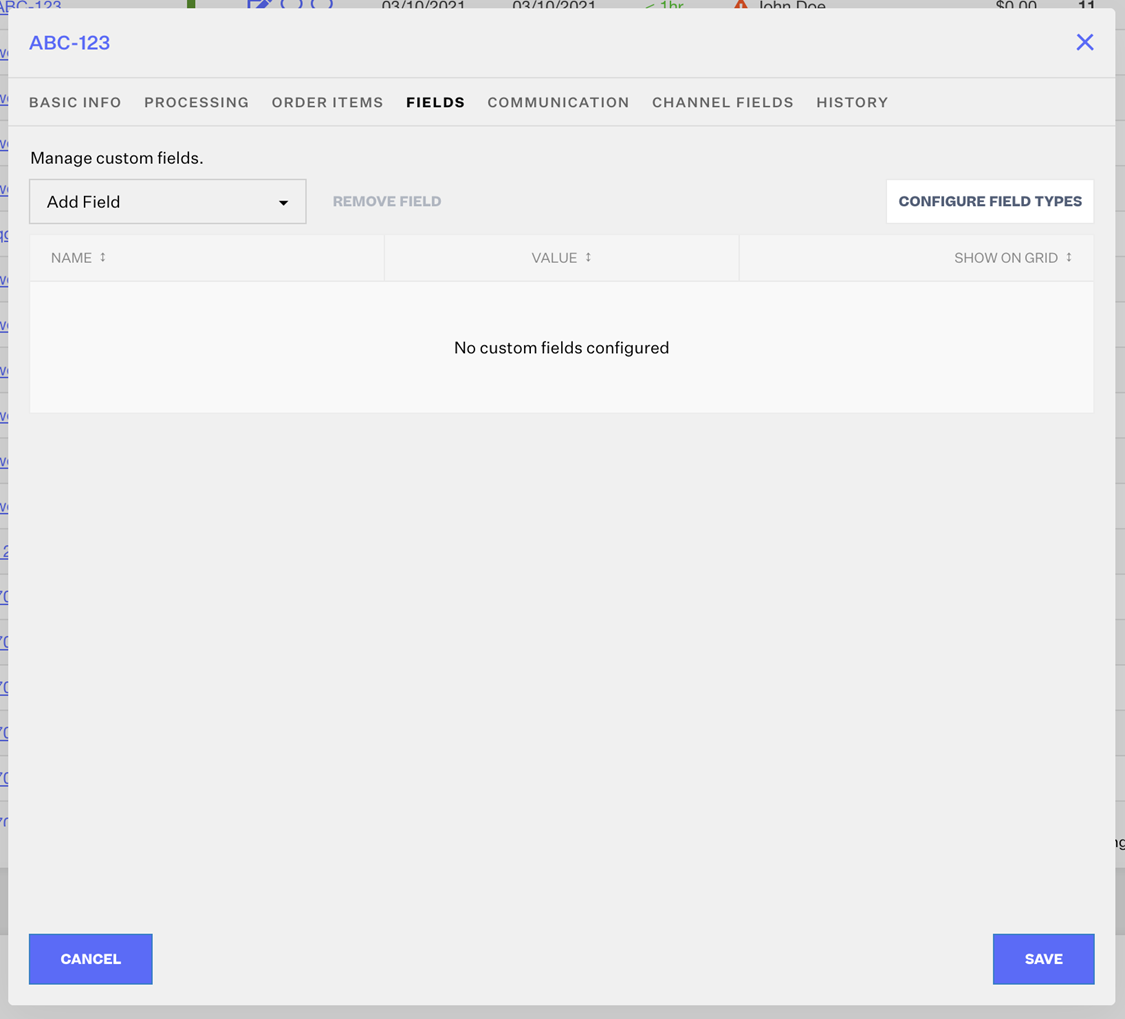
3. If this is your first time using Field Types, or if you want to create a new Field Type that doesn't already exist, click the Configure Field Types button in the upper-right corner of the edit window.

4. In the Configure Field Definitions pop-up window, you can click New Field Type to configure as many new field types as you want.

To configure a Field Type, give it a Name, brief Description, and indicate whether or not you want this Field Type to "Show On Grid", meaning that you want it to show up as a new column in the Orders module, shown amongst the default columns, like Order Number, Labels, Notes, Order Date, Recipient, etc. The Orders module column will be titled with the value you set in the Name column and new columns will appear after refreshing the Orders Module after saving all of your edits.
Once a Field Type is configured here, it will be available as a Field Type that can be added to any of your orders going forward.

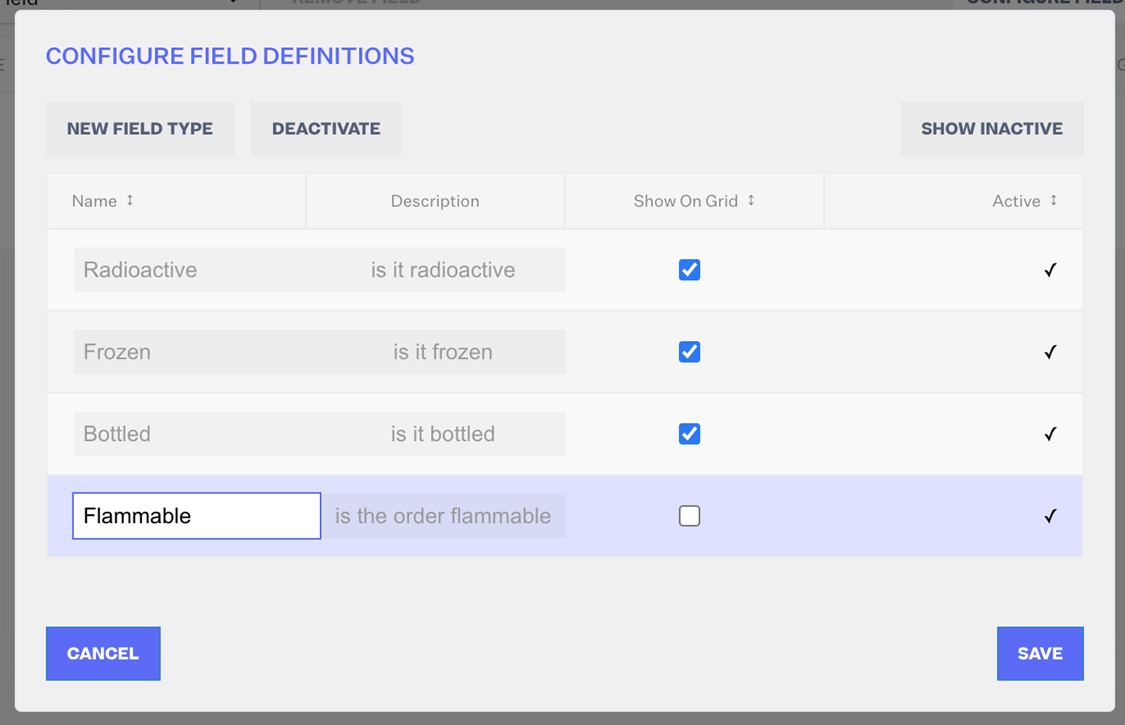
You can also click Deactivate after selecting any Field Types you don't need anymore. After deactivating and saving at least one Field Type, clicking Show Inactive will show all Field Type configurations, active and deactivated.
 

If you deactivate any Field Type, it will be removed from:


• orderbot filter dropdown
• orderbot action dropdown
• order custom field value dropdown
• order import field dropdown
• order export field dropdown
• order grid

It will remain visible (if your team already configured it) in:


• order import field grid
• order export field grid
• orderbot action
• orderbot filter
• order with a Field Value

5. Click Save.

6. Click Add Field dropdown menu to add Custom Field(s) to your order. You can also use the search option to find the specific Field Type you want to add. Once you select a Field Type, it will be added as a row. At that point, fill in the Value field, then click Save.
 

custom columns order fields

Was this article helpful?

Yes
No
Share additional feedback about this article

Related Articles

  • Apply Actions to Existing Orders in Bulk
  • Merging Orders in Network Manager
  • Cancel an Order
  • Missing Order Info

Not finding the help you need?

Contact Support
Solutions
  • Solutions for Brands
  • Solutions for 3PLs
  • Solutions for 4PLs
  • Solutions for B2B
Products
  • Extensiv 3PL Warehouse Manager
  • Extensiv Warehouse Manager
  • Extensiv Order Manager
  • Extensiv Integration Manager
  • Extensiv Network Manager
Products
  • Customer Success
  • Implementation
  • Consulting
Ecosystem
  • Fulfillment Marketplace
  • Integrations
  • Partners
  • Become a Partner
Resources
  • Resource Library
  • Blog
  • Market Insights
  • What is a 3PL?
  • What is a 4PL?
  • What is a WMS?
  • Why a Cloud-based WMS?
  • Glossary
Help
  • Help Center
  • API Documentation
  • Extensiv Univerisity
  • Community
  • System Status
  • Extensiv Logo
  • 100 N Pacific Coast Hwy, Suite 1100, El Segundo, CA 90245
  • |
  • Contact Us:
  • 83-EXTENSIV 888.375.2368 (main)
  • |
  • 310.844.7570 (local)
  • Copyright © 2023 Extensiv
  • |
  • All rights reserved.
  • Privacy Policy
  • |
  • Terms of Service
  • Follow Us:
Expand