Network Manager

Updated on September 14th, 2023

  • Extensiv Hub
    Popular Articles Getting Started Using Hub Technical Issues & FAQs Extensiv's Ideas Portal
  • 3PL Warehouse Manager
    Receiving Operations Inventory Management Shipping Operations System Configuration Scanning Operations Integrations Content Best Practice Resources Release Notes Popular Articles Troubleshooting Guides
  • Warehouse Management
    Getting Started Admin Console Shipping Order Picking & Packing Receiving Customer Portal Cycle Counting Kit Building Managing Users Barcode Scanner Import/Export Integrations Barcoding Wave Picking Bin Move Mobile Receiving and Picking Settings Popular Articles Reporting
  • Order Management
    Dashboard Orders Inventory Purchase Orders Shipments Customers Products Analytics Settings API API Integrations Accessing and Navigating Order Manager Error Messages Order Manager Popular Articles Accounting Integrations
  • Integration Management
    Getting Started with Integration Manager General Support Troubleshooting Extras & Addons API Documentation Popular Articles Order Sources Order Destinations
  • FAQs
  • Network Manager
    Getting Started Order Routing Management Technical Issues Shopping Carts Settings Settings, Products, and Orders
  • Billing Manager
    Getting Started Using Billing Manager
  • Release Notes
    Extensiv Sandbox Extensiv Extensiv Hub 3PL Warehouse Manager Integration Management Warehouse Management Order Management Billing Manager
  • Fulfillment Marketplace
    Getting Started
  • Sandbox
    Getting Started
+ More
  • Help Center
  • Network Manager
  • Order Routing Management
  • Orders
  • Order Routing Management
    • Orders
        • Apply Actions to Existing Orders in Bulk
        • Custom Fields for Orders (Custom Columns)
        • Duplicate or Clone an Order
        • Customizing the organization of Columns in the Orders Module
        • Resolving an Order in Missing Product Information Status
        • Restoring a Canceled Order
        • Cancel an Order
        • Restore an On-Hold Order
        • Creating a Manual Order
        • Out of Stock Orders
        • Creating a Manual Order - Single or Bulk
        • Manually Mark an Order as Shipped - Individually or in Bulk
        • Export an Order to a 3PL
        • Validating Shipping Addresses
        • Missing Order Info
        • Importing Orders Via Spreadsheet (In Bulk)
        • Resolving an Awaiting Payment Order
        • Merging Orders in Network Manager
        • Exporting Orders
        • Filtering Orders
        • Resolving Missing Product Info Orders
        • How to Add an item to an existing order
        • Missing Fulfillment Source
    • Products
        • Exporting Products
        • Associating and Creating a Listing SKU
        • How to Manage Products
        • Reassign a Listing SKU to Another Product
        • Creating Products
        • Creating Listing SKUs in Bulk (via Spreadsheet)
        • How to Disable Inventory Updates for a Specific Sales Channel
        • How does Extensiv Order Manager handle variations of the same product?
        • Creating Products via Spreadsheet
        • Adjusting Master SKUs
        • Custom Bundle/Kit Export
    • Inventory
        • Viewing Stock Edit History
        • Inventory - How Extensiv Network Manager Presents Bundle Inventory
        • Exporting Stock Details
        • Exporting Inventory
        • Searching for SKUs in the Inventory Module
        • Inventory Module Overview
        • How to Filter Inventory by Warehouse
    • Settings
      • Sales Channel
          • Shopify Locations
          • Shopify Tags
          • Enable or Disable Extensiv Network Manager Email Notifications to Your Customers
          • Deactivating a Sales Channel
          • Adding Shopify as a Sales Channel
          • Viewing a Sales Channel's Edit History
          • Adding Amazon as a Sales Channel
          • Adding eBay as a Sales Channel
          • Adding Walmart as a Sales Channel
          • Editing Sales Channels
          • Adding a Manual Sales Channel
          • How to Exclude a Warehouse From Pushing Inventory to a Sales Channel
          • Adding Sales Channels
          • Reactivating Sales Channels
          • How to Enable Out of Stock Control for eBay Sales Channels
      • Webhooks
          • Order Payment Webhook
          • Shopify Auto-Subscribing Webhooks
          • Shopify Product Update / Product Edit Webhook
          • Order Creation Webhook
          • Shopify Cancellation Webhook
          • Shopify Fulfillment Webhook
          • Shopify Refund Webhook - POS Orders
          • Shopify Product Deletion Webhook
          • BigCommerce Webhook
      • Warehouses
          • Setting Up a Warehouse's International Rank
          • Set Up Field Mappings of Import/Export Files
          • FTP Inventory Import for a 3PL
          • Setting Up Domestic Backup Warehouses
          • Creating and Configuring Warehouses in Extensiv Network Manager
          • Deactivating a Warehouse in Extensiv Network Manager
          • Updating the Address/Return Address for Your Warehouse
          • Enabling Use Component Inventory Setting for Bundles and Kits
      • Orderbots
          • Creating an Orderbot
          • Deactivating an Orderbot in Extensiv Network Manager
          • Editing an Orderbot
          • Automate Orders to Fulfill from a Specific Warehouse
          • Postal Zones in Extensiv Network Manager
          • Orderbots filtered by zip code range
          • Support for Shopify's Additional Details
        • Reverify Shopify Connection
      • Reverify Shopify Connection
      • Understanding Order, Shipment and Inventory Sync Times in Network Manager

Importing Orders Via Spreadsheet (In Bulk)

After adding a manual sales channel and linking your listing SKUs to a master SKU, you can start importing your orders into the channel.

To import orders manually, follow the procedure below.

Step 1: Navigate to Order Routing page. Next, open the Orders Module.

Step 2: Click the Import/Export drop-down menu.

Step 3: Select Import Orders. 


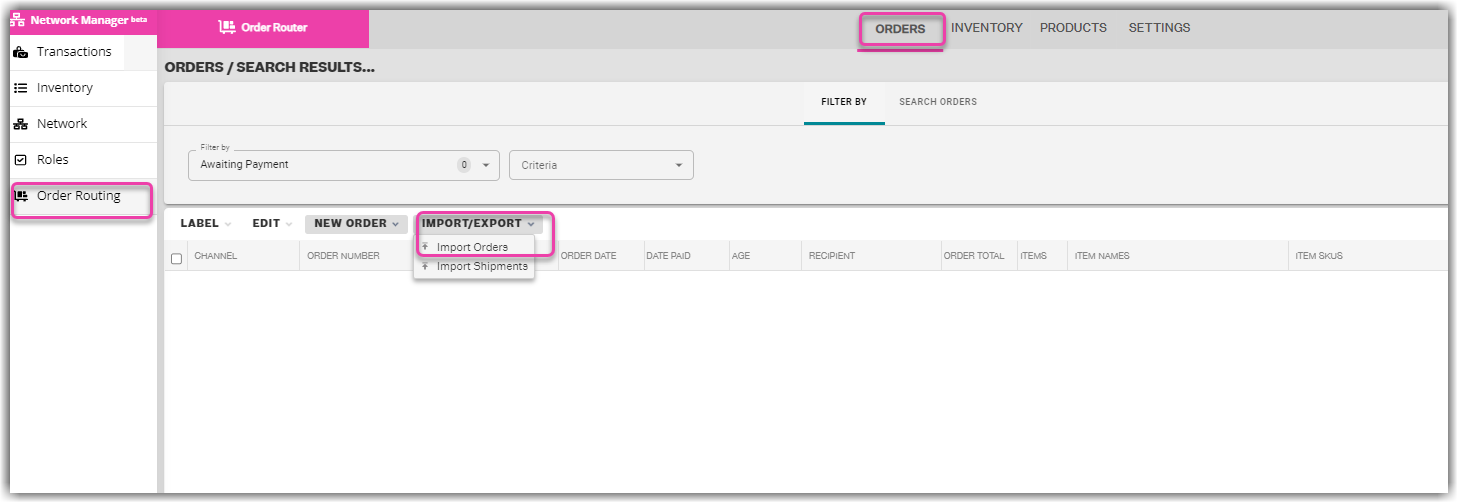
Step 4: In the Manual Order Import window, click Configure. 


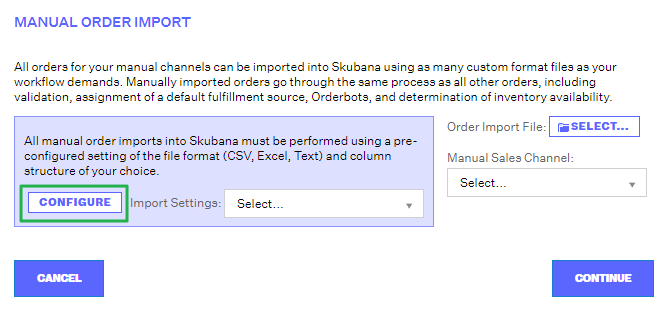
Step 5: In the Order Import Settings window, click New Settings. 

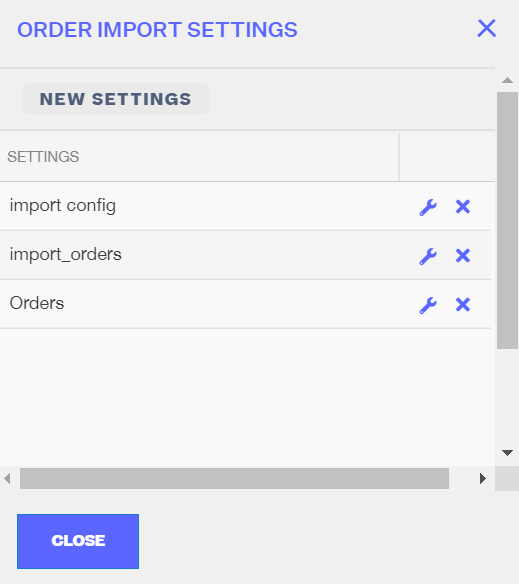
Step 6: In the New Import Settings window, give your settings a title in the Settings Name field. A descriptive name would be best, e.g. Import_All_Fields, or September 2020 Settings.

Step 7: Select the file format from the CSV and Text options, and select the structure, and the date format.

Step 8: Add and/or organize the Data Fields you'd like to use. Ensure that every Data Field has a corresponding Column Name that you'll be able to recognize in your Import File. To reorder Data Fields, drag and drop them.

All data fields in Import Fields are required both in the Configuration and in the actual import file. You may add an optional field through the Add Optional Field dropdown. The following prepopulated and required fields:

  • Order Number
  • Order Date
  • Payment Date
  • Ship to Name
  • Ship to Address 1
  • Ship to City
  • Ship to State
  • Ship to Zip Code
  • Ship to Country
  • Item SKU
  • Order Item Quantity
  • Order Item Unit Price
  • Customer Ship Amount
  • Amount Paid

If you want to make column headers required, make sure to check the Include column headers box.

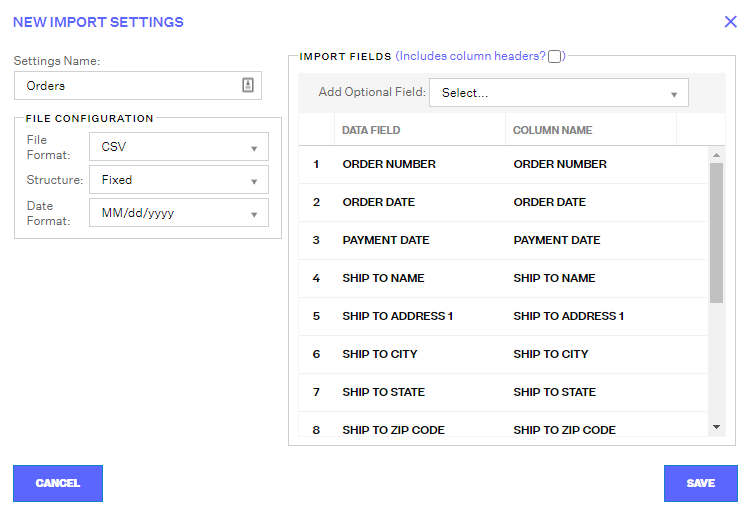
Step 9: Once you're satisfied with your configurations, click Save to close the Import Settings window.

Step 10: Back in the Order Import Settings window, the new settings are now added to your Settings list. Click Close to close the Order Import Settings window and go back to the Manual Order Import window.

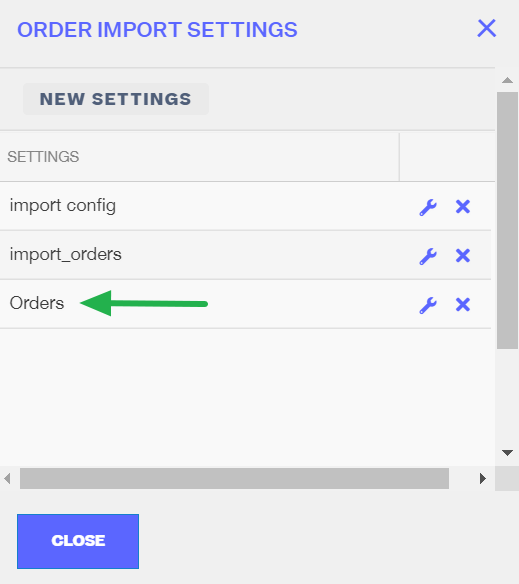
Step 11: Create either a CSV or Text file according to the file format you chose in your configuration settings, and input your orders to import in the exact column format that matches your configuration settings as well.
 

The row headers and configuration settings are case-sensitive. 

Any deviation to the file format will cause import issues, including if you do/don't include the row headers. These issues could be caused by having more columns than your configuration settings to have Data Fields, or putting a Date input in a column that was configured for an amount of money (like Amount Paid). Make sure to double-check that any date text is in the exact format matching your configurations and that all required fields are filled in. Make sure your file is saved in the right file format. 


Importing Orders through a spreadsheet is in a multi-line format. 

Example: if 1 order has 2 items, there should be 2 lines on the spreadsheet to notate that both line items belong to the same order number. 


Step 12: Back in the Manual Order Import window, click the Import Settings dropdown menu and select the settings you just created. Set the Manual Sales Channel to the correct channel. Then click the Select button and choose the CSV or Text file from your computer to import. Click Continue to start uploading the file into Extensiv Network Manager.

Extensiv Network Manager will then start processing the import file. The speed with which the process runs and completes depend on the number of manual orders to be imported into Extensiv Network Manager. If an Error Log is generated, ensure that the rows with issues detected are addressed. If there is a general error that the file could not be uploaded, there is likely an issue with the number and order of columns in your file not matching the Configuration Settings exactly, or the presence or lack thereof of Headers, or the file format itself is incorrect. Double-check your settings and file until an Error Log is produced and notifies you that your import was completely successful.

spreadsheet import orders bulk

Was this article helpful?

Yes
No
Share additional feedback about this article

Related Articles

  • Apply Actions to Existing Orders in Bulk
  • Cancel an Order
  • Resolving an Order in Missing Product Information Status

Not finding the help you need?

Contact Support
Solutions
  • Solutions for Brands
  • Solutions for 3PLs
  • Solutions for 4PLs
  • Solutions for B2B
Products
  • Extensiv 3PL Warehouse Manager
  • Extensiv Warehouse Manager
  • Extensiv Order Manager
  • Extensiv Integration Manager
  • Extensiv Network Manager
Products
  • Customer Success
  • Implementation
  • Consulting
Ecosystem
  • Fulfillment Marketplace
  • Integrations
  • Partners
  • Become a Partner
Resources
  • Resource Library
  • Blog
  • Market Insights
  • What is a 3PL?
  • What is a 4PL?
  • What is a WMS?
  • Why a Cloud-based WMS?
  • Glossary
Help
  • Help Center
  • API Documentation
  • Extensiv Univerisity
  • Community
  • System Status
  • Extensiv Logo
  • 100 N Pacific Coast Hwy, Suite 1100, El Segundo, CA 90245
  • |
  • Contact Us:
  • 83-EXTENSIV 888.375.2368 (main)
  • |
  • 310.844.7570 (local)
  • Copyright © 2023 Extensiv
  • |
  • All rights reserved.
  • Privacy Policy
  • |
  • Terms of Service
  • Follow Us:
Expand