Creating Receipts Manually
Depending on your operations, receipts may be created in advance or at the time the goods arrive at your warehouse. This article reviews how to manually create a receipt.
Guidelines
Step 1: Create Receipt
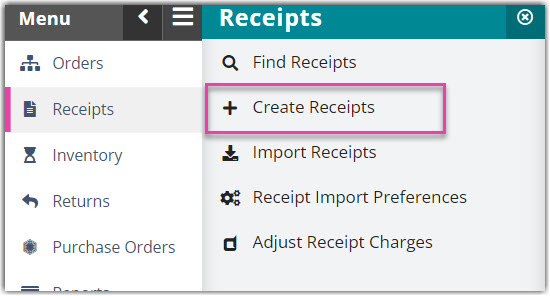
- Navigate to Receipts > Create Receipts.

- Select the Customer and Warehouse for which the goods are being received, then enter a unique Reference ID number (the primary identification field for this receipt).
- Click Save.
Once you successfully save the receipt, three things happen:
- A confirmation message appears.
- A transaction ID is automatically assigned by the system.
- You are redirected to the Edit Receipts page, which allows you to add more details to the receipt.
The top section consists of the following fields.

- Purchase Order: If a relevant purchase order applies to the receipt, enter the PO number or select it from the drop-down list
- Receipt Advice Number: If your customer provided a RAN (receipt of the purchase order that your customer made with the manufacturer), enter the value here
- Expected Date: If the receipt is being created ahead of time, you can enter the date for which the goods are expected to arrive—this value is mostly used for internal purposes and is often populated automatically if the receipt is imported via EDI
-
Arrival Date: The date the received goods arrived—once you mark the receipt as complete, this value is considered the 'Confirm Date' (an administrative user can modify this setting under Admin > Manage Company Info > Receiving Settings)
To manually set a receipt's arrival date, you must have the following permission assigned to your user role: Receipts Module > Edit Receipts > Set Arrival Date.
Each additional receipt section is reviewed in detail below. While many of these fields are not required, we do suggest you review these fields as they may be necessary for your unique operations.
Step 2: Enter transport information
The Transport Information section identifies the carrier that dropped off the received goods at your warehouse. At the time of drop-off, the carrier should provide you with documentation that contains all the relevant information to fill out this section.

The fields in this section are strictly for tracking purposes and should be filled out based on your customer's needs.
- Carrier: Name of the carrier that dropped off the goods
- Trailer Number: Commonly referred to as the "container number" which contained the goods
- Seal Number: Serial number for the specific container that sealed the goods
- Bill of Lading Number: Relevant BOL number used for receiving full pallets—typically serves as tracking number for LTL/FTF shipments
- Tracking Number: Carrier-specific tracking number associated with the receipt
- Capacity Type: Size of the trailer or container which contained the goods—can configure billing charges based on this value in the Billing Wizard (Capacity Based Fee and Tiered Carton Count by Capacity Type)
- Door: Specific dock door where the carrier dropped off the goods
- Notes: Can enter any transport information pertinent to the transaction—these notes populate on the Receipt Ticket and View Transaction Report
Step 3: Enter custom receipt fields (Optional)
The Custom Receipt Info section allows you to input transactional custom fields on a receipt. Custom fields can be created on an ad-hoc basis, which is reviewed below. They can also auto-populate in this section if you set them up under Customers > Custom Fields or if your receipts are being created via EDI or REST API.
For more information on custom fields, please see Understanding Custom Fields.
Please note that Custom Receipt Info is not required to complete a receipt unless you have custom fields configured as such. This functionality is only available if you have the 'Enable custom fields' setting activated in your customer's setup options.
To create an ad-hoc, receipt-level custom field, click Add New Custom Field, enter a Name and Value for the field, then click Save. The new custom field populates in the grid.

Once you manually create a receipt-level custom field, you can edit the value by selecting it within the grid, modifying the value, then selecting < Tab > on your keyboard to save the new value.
Deleting manually created receipt-level custom fields is not currently supported.
Once defined, you can view custom field values in the Mass Add and Manage Inventory grids by adding the Custom Fields grid column.
Step 4: Identify receipt line items
The Receipt Line Items section allows you to identify inventory on the receipt. If a receipt was created via an import file or integration, these details should auto-populate.
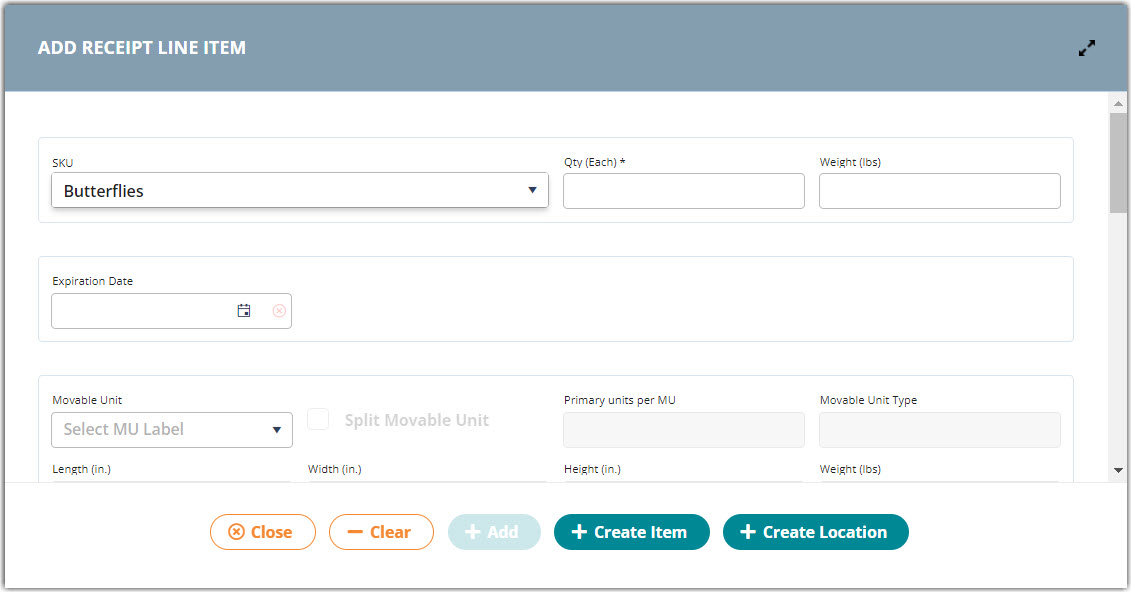
- Click Add Line Item to open the Add Receipt Line Item dialog and identify the items being received.

- Optional: If needed, you can create an ad-hoc item or location by clicking Create Item or Create Location.
- Select a SKU from the drop-down menu, enter the Quantity being received, then enter any relevant track-by information.

- If you are using a Movable Unit,
- Enter your custom MU label, or elect System Assigned from the drop-down menu to have the system automatically assign a MU license plate number.
- Check Split Movable Unit if the total quantity is greater than 1 MU.
- If needed, select a Supplier from the drop-down menu.
- For the item's Put Away Location, specify whether you want to View recommended locations or View all locations to determine what is listed in the drop-down menu, then select a location.

- If you need to place the item on hold, click Put item on hold, then select a Reason for Hold from the drop-down list. This automatically places that SKU on hold upon completion of the receipt and prevents the item from being selected for orders.
- If needed, enter any custom fields relevant to this transaction. (For more on custom fields, see Understanding Custom Fields.)
- Click + Add to save the receipt line.
- To add additional receipt line items, click + Clear then repeat Steps 2–7 for each unique SKU being received. Click Exit when complete, and a confirmation message appears.
Step 5: Calculate charges
The Receipt Charges section allows you to view any automatic receipt charges and add or delete any manual fees for processing the transaction.
To calculate order charges, you must have the following permission assigned to your user role: Receipts Module > Receipt Charges > Manage Charges.
Automatic charges
Since automatic charges are configured in the Billing Wizard to automatically apply to relevant receipts, they are not intended to be modified on a frequent basis and therefore cannot be edited on a receipt.
To view all auto-generated charges that apply to a receipt, click Calculate Charges to make them populate in the Receipt Charges grid.

If you need to edit an automatic charge, you must make an adjustment under Receipts > Adjusting Receipt Charges. See Adjusting Receipt Charges for more information.
Manual charges
There are two types of manual charges: those which you've configured in the Billing Wizard and those that you have not previously configured.
- If you've configured manual charges in the Billing Wizard, the charges automatically display in the Receipt Charges grid, but you must enter the 'Number of Units' to charge for each relevant fee.
- To do so, click in the appropriate row under the 'Number of Units' column, then enter the correct amount.

- At the top of the page, click Save. A confirmation message appears.
- To do so, click in the appropriate row under the 'Number of Units' column, then enter the correct amount.
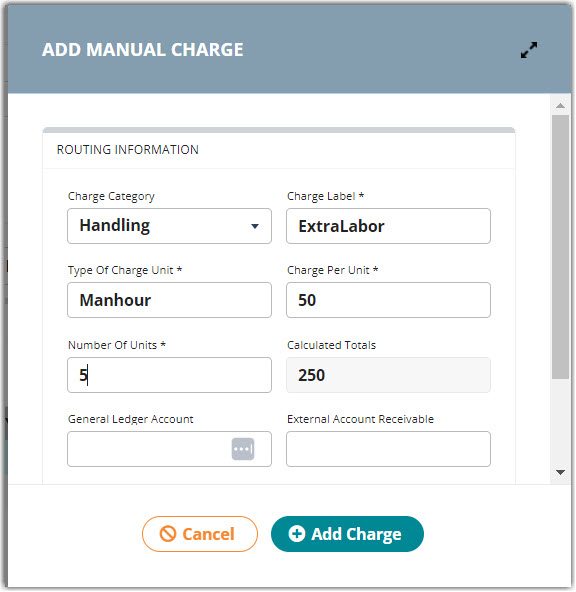
- To add manual charges that have accumulated outside of those that are configured in the Billing Wizard, click Create a Manual Charge.
- Select a 'Charge Category', then enter the necessary charge information—the required fields are denoted as red.

- To edit the quantity associated with a manual charge, click in the appropriate row under the 'Number of Units' column, enter the correct amount, then click Save at the top of the order. A confirmation message appears.
- Select a 'Charge Category', then enter the necessary charge information—the required fields are denoted as red.
Please note that if the receipt has already been marked as complete, you must make an adjustment to modify the receipt charge. See Adjusting Receipt Charges for more information.
Manual charges can also be deleted if the receipt is still in an open state. To do so, click Delete, then Confirm Delete.
Smart User Tip: When closing multiple receipts from the Find Receipts page, you can choose to add manual charges in addition to the charges already defined on each receipt. You'll want to confirm that the individual charges on these receipts are correct before doing so. After selecting the receipts, click Manage > Confirm Receipts. You can then add manual charges and select whether to apply individual charges to all of the selected receipts or spread across them all evenly.
Step 6: Confirm receipt
Once all receipt details are entered, it's time to complete the transaction.

- To indicate that the receipt's associated inventory is ready for processing, click Mark as Complete at the top of the page. The receipt saves in a Complete status, so Customer Users are no longer allowed to make changes, and a confirmation message appears.
- To indicate that the receipt's associated inventory is properly stored and the receipt can be closed, click Confirm Receipt.
- Once you ensure that the charges are correct and make any necessary changes, click Confirm Receipt to complete.
- A confirmation message appears, and the receipt is now considered to be in Closed status.
Once confirmed/closed, the associated inventory is available for order allocation. If the Received event notification is configured, your customer also receives an email notification informing them your facility has received their inventory.
