
Performing Inventory Audits
An inventory audit, or cycle count, is conducted when you need to verify inventory counts for the entire warehouse or a specific set of locations. You must first create an audit job in 3PL Warehouse Manager. Once the audit job is created, a user begins the audit in SmartScan and completes the job in 3PL Warehouse Manager.
This article reviews how to perform an inventory audit from start to finish.
You must have the following permissions assigned to your user role to perform a full inventory audit: Inventory Module > Inventory Audit and Mobile Scanner > Count Inventory. In addition, the user performing the count via SmartScan must have access to the relevant warehouse.
Please note that once you create an audit job, you must complete the audit in its entirety, and you cannot make modifications to the audit once you confirm it.
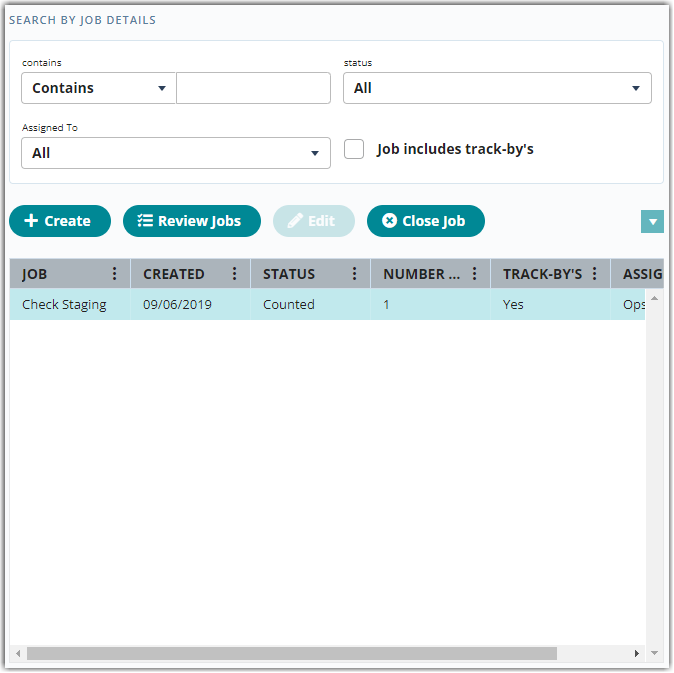
Step 1: Create audit job
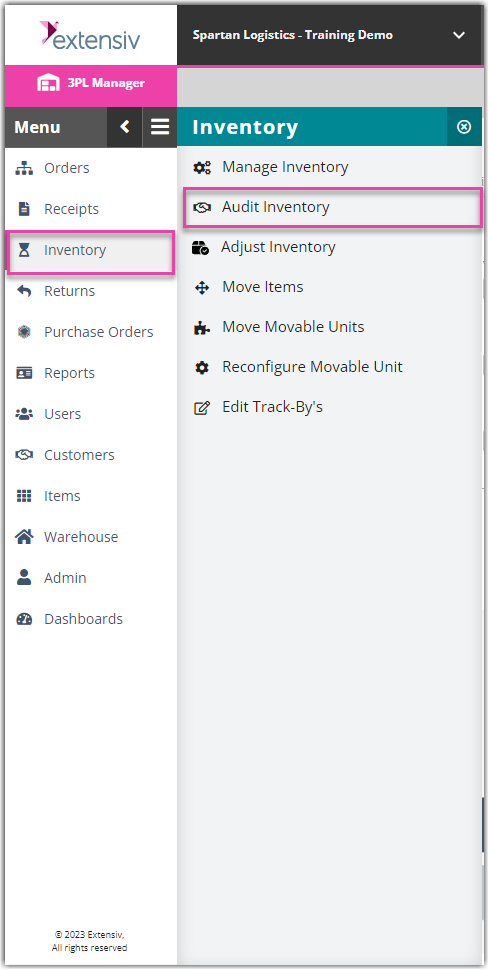
- In 3PL Warehouse Manager, navigate to Inventory > Audit Inventory.
- Select the relevant Warehouse from the drop-down menu, then click Create.
- Select a location from the grid, using < Ctrl > or < Shift > to select multiple locations. If needed, use the search filters in the middle pane to find a specific location, then click Search.
- Click Add Location, then enter a 'Job Name'.
- Using the drop-down menus, select a warehouse user you want the count to be 'Assigned To', as well as the 'Job Priority' (1 being the highest priority and 10 being the lowest).
- If you want to 'Collect Track-Bys', click the selection box.
- Click Create Job, then continue to the next step using SmartScan.
If you need to edit or cancel the audit job, select it from the grid, then click Edit or Close Job.
Step 2: Audit inventory
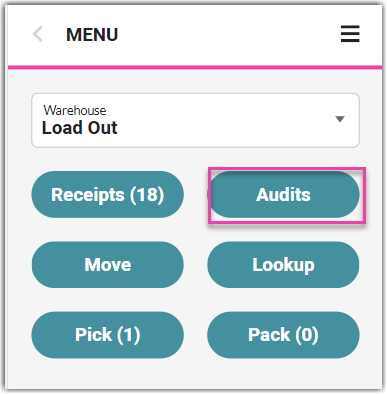
- Log in to SmartScan, and ensure the appropriate warehouse is selected.
- Tap the Audits module.
- Optional: To view details of the audit job, select it from the Audits grid, then tap Info. Review the information, then tap Close.
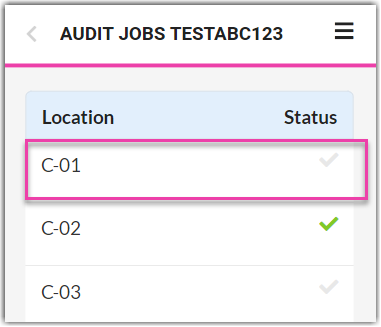
- To start the audit job, select it from the grid, then tap Start.
- Select and click a location from the grid.
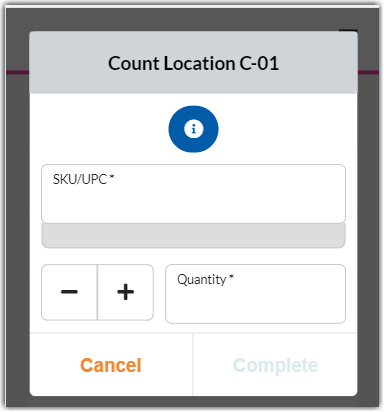
- Then enter the ‘SKU/UPS’ and click -/+ or enter the ‘Quantity ’, then click Complete.
- If using barcode definitions defined in the WMS under Customers > Manage Barcodes, specify the relevant customer.
- Scan the SKU/UPC barcode, or manually enter the SKU and tap Search.
If there are results for multiple customers, select the appropriate customer, then tap Select.
- Scan any associated track-by's, enter the Primary Qty, then tap Save.
- Repeat Steps 6 and 7 for each SKU you need to count. Once complete, tap Location Complete.

- Repeat Steps 5–9 for each location in your count.
From the Location List, you can click an already-counted location to delete its count so it can be recounted.
- Once you have performed a count for each location, tap Complete. The job no longer displays in the Audits grid, and the status changes from Open to Counted. Continue to 3PL Warehouse Manager to complete the remainder of the audit job.
If you do not record counts for one or more locations in the audit job, the system assumes those locations are empty. In this case, you are asked to verify that you want to complete the job with uncounted locations.
Step 3: Review and confirm audit
- Navigate to Inventory > Audit Inventory, select the appropriate Warehouse, then verify that the audit job has changed from Open to Counted in the grid—if you are still logged in from the previous session, you may need to click Search to refresh the page.
- Select the job from the grid, then click Review Jobs.
- Review the jobs in the grid, and make sure you have included all desired locations.
- If you need to recount a location, right-click the location and select one of the following options. Note that if you choose to recount, the status changes to Counting and you must repeat the audit job with SmartScan.
- Recount Everything: requires a recount of the entire job
- Recount with Track-Bys: requires a recount of all items, including track-by's
- Recount Location(s): requires a recount of all selected locations
- If you need to see other locations containing the SKU or qualifier in one location, click the name of the item, then select Add location to Job to recount or Cancel.
- Once you confirm the audits are accurate, click Reconcile Jobs to adjust the inventory by the variance, select the location(s) you need to adjust (using < Ctrl > or < Shift > to multi-select), then click Adjust System Quantities > Make Adjustments to finalize the job.
If the inventory being audited is allocated to a transaction, you cannot reconcile the job and must unallocate the inventory before you can proceed with reconciliation.
A confirmation message appears, and the system reflects the new inventory counts.