Using the Billing Wizard
4.7 min read
|3PL Warehouse Manager's Billing Wizard allows you to manage billing for each customer. This article reviews the different types of charges available in the Billing Wizard and how to configure each type.
To access the Billing Wizard, you must have the following permission assigned to your user role: Customer Module > Manage Customer Billing.
Guidelines
To access the Billing Wizard, navigate to Customers > Billing Wizard, then continue to the appropriate section below.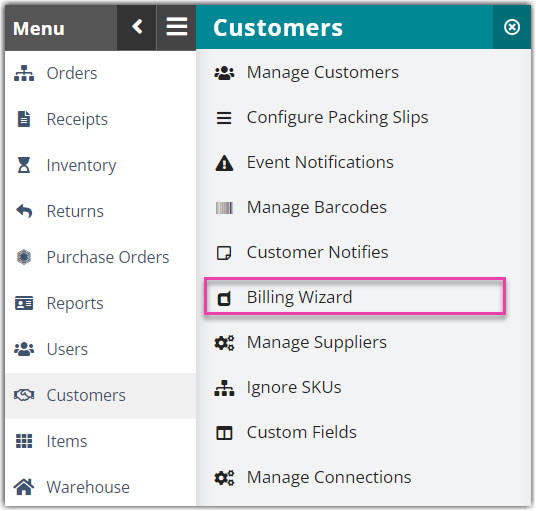
Per Transaction Billing Setup
The Per Transaction Billing Setup section of the Billing Wizard assists you in calculating manual and automatic charges for each transaction associated with your warehouse.
To configure automatic charges, you must enable Automatic Billing Scripts for your account under Admin > Settings.
Click Per Transaction Billing Setup to get started, then select a customer.
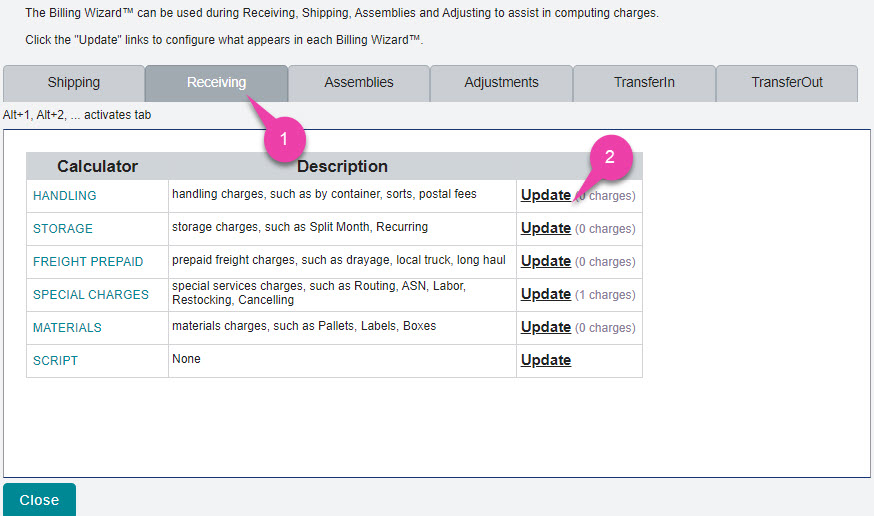
There are different types of charges associated with Shipping, Receiving, Assemblies, Adjustments, TransferIn, and TransferOut, which include the following:
- Handling: Charges for the handling of inventory—such as by container, sorts, or postal fees
- Storage: Charges for the storage of inventory—such as Split Month or Recurring
- Freight Prepaid: Prepaid freight shipping charges—such as drayage, local truck, or long haul
- Freight 3rd Party: Third-party freight shipping charges—such as courier
- Special Charges: Charges for special services—such as routing, ASN, labor, restocking, or canceling
- Materials: Charges for materials—such as pallets, labels, and boxes
Select the appropriate tab, then click Update next to the relevant charge type.
If recording a 'General Ledger Account Number', enter it now, then click Save.
To create a charge, click Add, then enter or select a relevant 'Charge Label' and 'Unit' of measure.
- If creating a manual charge, select Manual, enter the 'Charge per unit' and any other additional fields, and then click Save or Save & New to create an additional charge.
- If creating an automatic charge, select Auto, then click Next to open the Charge grid.
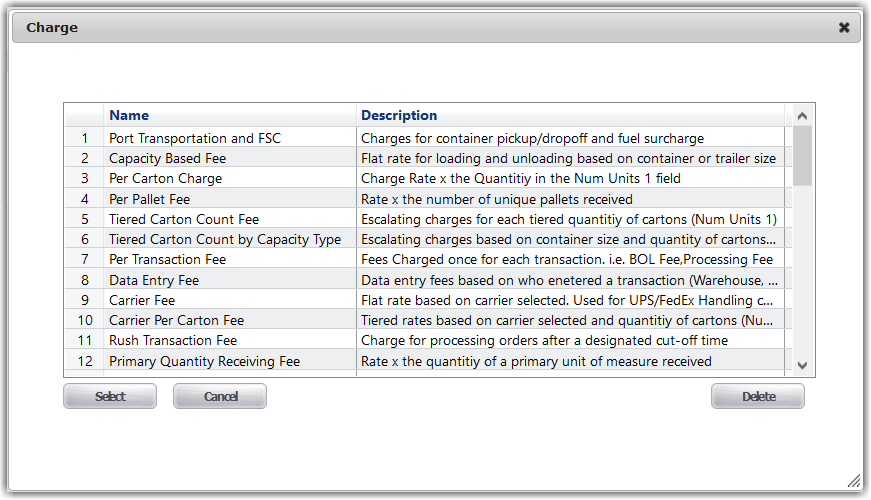
- The Charge grid lists each available billing script, as well as a relevant description of each charge. If needed, drag a column divider to see more or less of the Name or Description.
To learn more about each transactional charge available, see Per Transaction Receiving Scripts and Per Transaction Shipping Scripts.
- Highlight a billing script from the grid, then click Select.
- Enter the details for the charge, then click Save.
- The Charge grid lists each available billing script, as well as a relevant description of each charge. If needed, drag a column divider to see more or less of the Name or Description.
If you want to apply a minimum charge per billing category (i.e., Handling, Storage, Freight Prepaid, etc.), click Change below the charge grid.

Select the Charge Type Min script, click Select, enter a numeric 'Value', then click Save. To remove the charge, select it from the grid, then click Delete.
If you select this script, the system automatically enables this charge even if you don't specify a charge amount. To avoid unintended errors, please specify a charge amount or click Delete to remove the required charge.
System-Calculated Storage and Handling Charge Setup
The System-Calculated Storage and Handling Charge Setup section of the Billing Wizard assists you in calculating storage charges for each receipt and for subsequent billing periods.
To get started, click System-Calculated Storage and Handling Charge Setup, then select the relevant customer and warehouse for the charge setup. Proceed to each relevant tab, explained in detail below.
Order/Receiver
With the Order/Receiver tab, you can manage the settings that apply to auto-billing charges on orders and receipts, as well as establish rates for billing units on both transaction types.
If you aren't familiar with storage and handling billing, please take note of the following definitions before proceeding to the steps below:
- Split Period Rates allow you to charge different rates depending on whether the receipt was made in the first or second half of the period and are often referred to as split period storage charges. These periods are based on your defined 'Split Period Day' in the Billing Wizard.
- Free Days are used when you don't want to immediately start charging for storage. If you set a value of 7, that means charges do not begin accruing until the eighth day of storage.
- Handling Rates are charges that apply for each primary unit on a transaction.
- If you are using split period storage upon receipt billing, specify the 'Determine Rate' of which those charges are calculated, the 'Split Period Storage GL Account #', and the 'Split Period Day'.

-
Optional: If you need to record the relevant GL account numbers for handling at the time of order and receipt completion, enter them for both receiving and shipping.

- Select a default unit for transactional storage and handling charges from the drop-down menu.

- To add a new unit for storage and handling charges, click New. Complete each field, then click Add & Close or Add & New to add an additional unit.
- To modify an existing unit, select it from the grid, click Modify, make your changes, and then click Save.
- To delete an existing unit, select it from the grid, then click Delete.
- Click Save to confirm your changes. These storage and handling rates are now ready to apply on the item level.
Recurring Storage
With the Recurring Storage tab, you can prepare recurring storage charges for each of your customers. Note: If you decide that the default recurring storage settings are sufficient, you must click Save for these charges to go into effect.
The first section consists of the following fields:
- Recurring Storage GL Acct #: Account number relevant for accounting and reporting
- Minimum Storage Charge: Minimum rate charged for recurring storage
- Tax Code: Value recorded on qualifying international accounts (mostly used for QB Canada)
- Tax Rate/Agency: Reporting fields relevant when exporting billing
Under Storage Billing, specify a 'Billing Period' based on the frequency of your billing, the desired date that the '[billing period] ends on', and how many 'days to wait after the period end to automatically generate bill' for the billing period.

Days are considered to be 24-hour periods—meaning that if you select the 1st of the month as the period close, the system generates the bill after 23:59:59 on the 1st.
Moreover, if you enter 3 for 'days to wait after the period ends to automatically generate bill', the bill generates three full days (72 hours) from the period close at midnight.
Under Inventory Counts on Each Monthly Bill, indicate if you want the inventory to be counted by the system 'On Specific Days' or 'On Each Receiver's Anniversary Day' when generating your recurring billing.
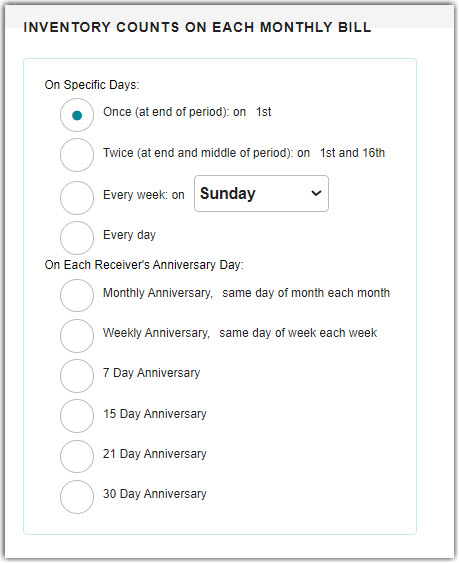
Once completed, click Save. These charges are now ready to be confirmed under Admin > Recurring Storage Charges when the following billing period ends.
Manual
With the Manual tab, you can create monthly "reminders" for calculating additional charges each time you confirm recurring storage charges. These charges can be related to items, such as square footage, that the system cannot calculate, or they can be unrelated to items, such as monthly flat service fees.
To create a manual charge reminder, click New, then fill out the details for the charge. If you don't enter a Default Quantity, you must specify a rate each time you confirm recurring storage charges. Click Add & Close or Add & New to create additional charge reminders.
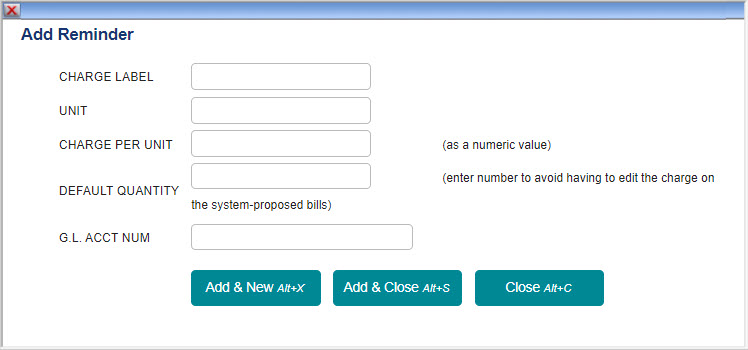
To modify or delete a charge reminder, select it from the grid, then make your appropriate selections.
Once you create a manual charge reminder, you can apply the charges under Admin > Recurring Storage Charges when the following billing period ends.
Location Storage Rates
With the Location Storage Rates tab, you can charge your customers for recurring storage based on the warehouse location being used in your facility. These charges apply to all SKUs in the designated location, regardless of whether an item has recurring storage charges configured or not.
Before you can set your location storage rates, you must first configure the billing types under Admin > Location Billing Type. See Configuring Item-Level Recurring Storage Charges to learn more.

To set a rate, select the relevant location billing type from the grid, then click Set Rates. Use < Ctrl > on your keyboard to set multiple rates at once. Enter a 'Rate', then click OK.
To clear a rate, select the relevant location billing type from the grid, then click Clear Rates. Use < Ctrl > on your keyboard to clear multiple rates at once.
Once you're finished, click Save.

