Managing Invoices
2.7 min read
|The Manage Invoices page lets you view all charges for a confirmed transaction. You can choose to have your invoices include all types of transactions or invoices for specific transactions. This page helps you generate and print invoices for all of your customers at one time.
This article reviews how to find transactions and generate invoices from the Manage Invoices page.
To access the Manage Invoices page, you must have the following permission assigned to your user role: Administration Module > Manage Invoices.
If utilizing QuickBooks, please see Exporting Invoices to QuickBooks.
Guidelines
Find transactions
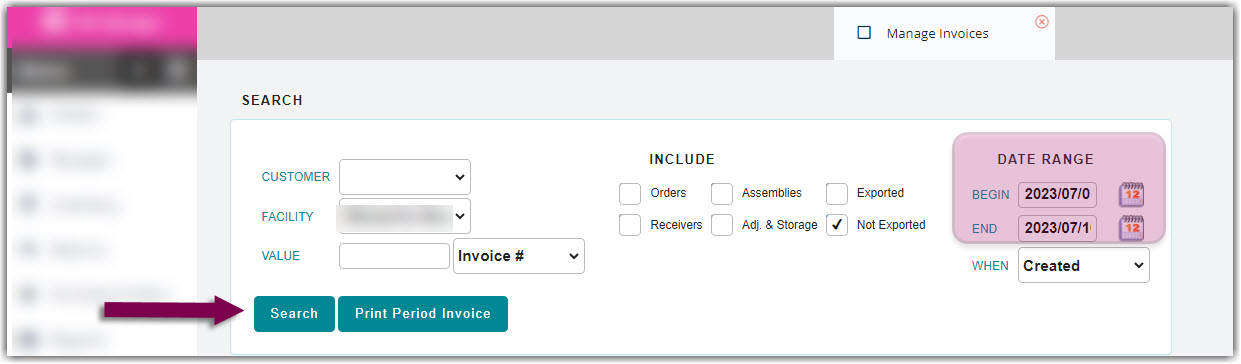
- Navigate to Admin > Manage Invoices.

- Under Search, select a Customer and Facility from the respective drop-down menus.
- Under Include, select the transaction types you wish to include in your search.
- Orders includes invoices created from closed order transactions
- Receivers includes invoices created from closed receipt transactions
- Assemblies includes invoices created from confirmed assembly transactions
- Adj. & Storage includes invoices created from confirmed adjustment transactions, C2C transfers, and confirmed recurring storage charges
- Exported includes invoices that have already been exported to the QuickBooks Invoice Queue
- Not Exported includes invoices that have not been exported to the QuickBooks Invoice Queue
- Under Date Range, enter a Begin and End Date as needed, then click Search. The Invoice Queue grid populates the relevant transaction charges.
5. To export an invoice, select it from the grid, then click Export.
- Make the appropriate selections, then enter an 'Invoice Date'.
- Select one of three options for export.
- To export the invoice into a PeachTree CSV file, click PeachTree.
- To export the invoice into a generic CSV file, click Export.
- Note that this export removes the 'Inv. Delivered' date from the grid.
6. To print an invoice, select it from the grid, click Print, make the appropriate selections, then click Run Report.
7. To email the invoice to your customers, click Notify, make the appropriate selections, then click Notify.
8. To view the invoices in the QuickBooks Invoice Queue, click QB Invoice Queue. This sends the transaction data directly from 3PL Warehouse Manager to QuickBooks.
9. To remove an invoice from the QB Invoice Queue, select the invoice from the grid, click Undo QB Export, then click OK to confirm. The invoice is now deleted from the queue.
To learn more about the QB Invoice Queue, please see Exporting Invoices to QuickBooks.
Generate invoices
To automatically print an invoice for the period you have selected, do the following from the same Manage Invoices screen.
- Repeat Steps 2–4 above, then click Print Period Invoice.
- To view transaction-level billing details, select Details.
- To view a summary of the charges, select Summary.
- Click Run Report. An invoice generates with the ability to export.
Example #1: Consolidated Month End
This invoice generates charges for all services provided in a given month.
- Under 'Search', select a Customer and Facility from the respective drop-down menus.
- Under 'Include', select all transaction types.
- Under 'Date Range', enter the first and last days of the month for which you wish to bill, then click Search.
- Click the Select All selection box to select all transactions in the grid.
- Click Print, then select Consolidate into one invoice.
- To view transaction-level billing details, select Details.
- To view a summary of the charges, select Summary.
- Click Run Report. An invoice generates with the ability to export.
If you have a connection to an Accounting platform, such as QuickBooks, you can also use the 'Assign invoice numbers' option to generate invoice numbers. If you do not currently have an Accounting platform integration set up with 3PL Warehouse Manager and would like to learn more, please contact your CSM for more information.
Example #2: Transactional
This invoice generates charges for one or more specific transactions.
- Under 'Search', select a Customer and Facility from the respective drop-down menus.
- Under 'Include', select the transaction types for which you wish to generate invoices.
- Under 'Date Range', enter a Begin and End Date, then click Search.
- Select a transaction for which you wish to generate an invoice, using < Ctrl > or < Shift > to select multiple orders.
- Click Print, then select One invoice per transaction.
- To view transaction-level billing details, select Details.
- To view a summary of the charges, select Summary.
- Click Run Report. An invoice generates with the ability to export.
If you have a connection to an Accounting platform, such as QuickBooks, you can also use the 'Assign invoice numbers' option to generate invoice numbers. If you do not currently have an Accounting platform integration set up with 3PL Warehouse Manager and would like to learn more, please contact your CSM for more information.
