3PL Warehouse Manager

Updated on September 12th, 2023

  • Extensiv Hub
    Popular Articles Getting Started Using Hub Technical Issues & FAQs Extensiv's Ideas Portal
  • 3PL Warehouse Manager
    Receiving Operations Inventory Management Shipping Operations System Configuration Scanning Operations Integrations Content Best Practice Resources Release Notes Popular Articles Troubleshooting Guides
  • Warehouse Management
    Getting Started Admin Console Shipping Order Picking & Packing Receiving Customer Portal Cycle Counting Kit Building Managing Users Barcode Scanner Import/Export Integrations Barcoding Wave Picking Bin Move Mobile Receiving and Picking Settings Popular Articles Reporting
  • Order Management
    Dashboard Orders Inventory Purchase Orders Shipments Customers Products Analytics Settings API API Integrations Accessing and Navigating Order Manager Error Messages Order Manager Popular Articles Accounting Integrations
  • Integration Management
    Getting Started with Integration Manager General Support Troubleshooting Extras & Addons API Documentation Popular Articles Order Sources Order Destinations
  • FAQs
  • Network Manager
    Getting Started Order Routing Management Technical Issues Shopping Carts Settings Settings, Products, and Orders
  • Billing Manager
    Getting Started Using Billing Manager
  • Release Notes
    Extensiv Sandbox Extensiv Extensiv Hub 3PL Warehouse Manager Integration Management Warehouse Management Order Management Billing Manager
  • Fulfillment Marketplace
    Getting Started
  • Sandbox
    Getting Started
+ More
  • Help Center
  • 3PL Warehouse Manager
  • System Configuration
  • Customer Setup
  • System Configuration
    • Warehouse Setup
        • Configuring 3PL Settings
        • Managing Warehouses
        • Creating Locations
        • Mass-Updating Locations
        • Using Custom Labels
        • Freezing Transactions
    • Customer Setup
        • Managing Customers
        • Managing Customer Notifies
        • Managing Suppliers
        • Ignoring SKUs
        • Understanding Custom Fields
        • Cloning Customers
        • Connecting to 3PL Warehouse Manager SFTP Service
    • User Setup
        • Managing User Roles
        • Managing Users
    • Billing Setup
        • Using the Billing Wizard
        • Per Transaction Receiving Scripts
        • Per Transaction Shipping Scripts
        • Understanding Recurring Storage Charges
        • Managing Invoices
        • Exporting Invoices to QuickBooks
        • Reviewing Recurring Storage Charges

Cloning Customers

If you don't want to create a new customer from scratch, you can choose to "clone" an existing customer's general settings and transactional billing charges to save time in the configuration process. Customer-specific data, such as names, contact information, and account numbers, are purposely excluded from this cloning process.

This article reviews how to clone a customer.

Please note that some subscription plan types may incur additional monthly subscription fees for creating customers beyond a designated threshold. Your Customer Success Manager can assist you in determining if this is the case.


To create and edit customers, you must have the following permissions assigned to your user role: Customer Module > Manage Customers > Create Customer and Edit Customer.

 
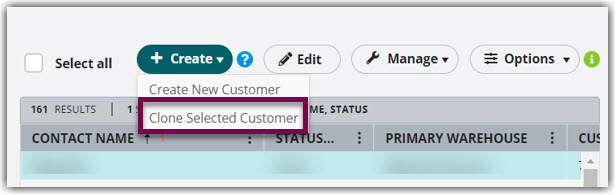
  1. Navigate to Customers > Manage Customers in 3PL Warehouse Manager.
  2. Select an existing customer from the grid, then click Create > Clone Selected Customer.
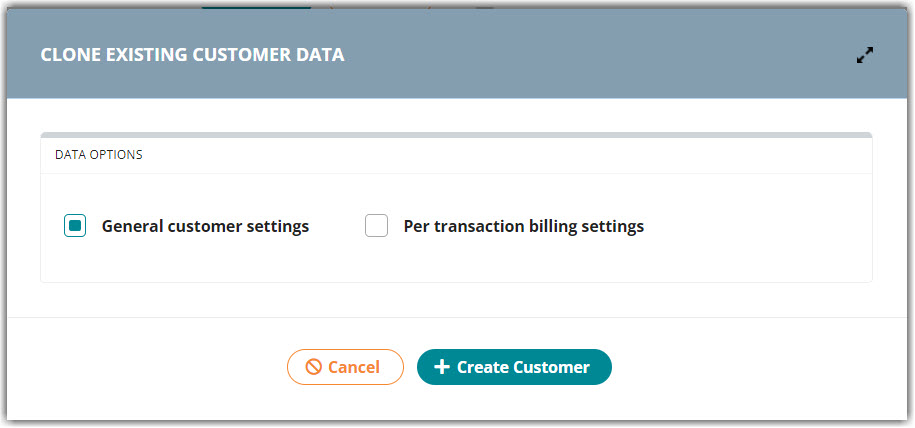
  3. Specify the data you want to be included in the clone, then click Create Customer.
    • General customer settings: Clones all of the general settings in the Customer Basics, Receipts, Orders, and System configuration sections of the existing customer's record
    • Per transaction billing settings: Clones all of the billing charges configured for the existing customer under Customers > Billing Wizard > Per Transaction Billing Setup
  4. Fill in the customer-specific information for the new customer, ensure all of the cloned settings are appropriate, then click Save. Once saved, up to two confirmation messages appear.
     
  • Per transaction billing settings cloned successfully
  • Customer created successfully


To learn more about each customer setting, please see Managing Customers.


Extensiv University

Gain deeper insights and learn more about 3PL Warehouse Manager with our online course at Extensiv University.
replicate duplicate

Was this article helpful?

Yes
No
Share additional feedback about this article

Related Articles

  • Moving Inventory with SmartScan
  • Adjusting Receipt Charges
  • Configuring Invoice Settings
  • Ignoring SKUs

Not finding the help you need?

Contact Support
Solutions
  • Solutions for Brands
  • Solutions for 3PLs
  • Solutions for 4PLs
  • Solutions for B2B
Products
  • Extensiv 3PL Warehouse Manager
  • Extensiv Warehouse Manager
  • Extensiv Order Manager
  • Extensiv Integration Manager
  • Extensiv Network Manager
Products
  • Customer Success
  • Implementation
  • Consulting
Ecosystem
  • Fulfillment Marketplace
  • Integrations
  • Partners
  • Become a Partner
Resources
  • Resource Library
  • Blog
  • Market Insights
  • What is a 3PL?
  • What is a 4PL?
  • What is a WMS?
  • Why a Cloud-based WMS?
  • Glossary
Help
  • Help Center
  • API Documentation
  • Extensiv Univerisity
  • Community
  • System Status
  • Extensiv Logo
  • 100 N Pacific Coast Hwy, Suite 1100, El Segundo, CA 90245
  • |
  • Contact Us:
  • 83-EXTENSIV 888.375.2368 (main)
  • |
  • 310.844.7570 (local)
  • Copyright © 2023 Extensiv
  • |
  • All rights reserved.
  • Privacy Policy
  • |
  • Terms of Service
  • Follow Us:
Expand