Managing Customers
9.3 min read
|This article reviews the basic functionalities of the Manage Customers page. Keep in mind that the more information you enter for each customer, the more 3PL Warehouse Manager can help you manage your warehouse more effectively.
Please note that some subscription plan types may incur additional monthly subscription fees for creating customers beyond a designated threshold. Your Customer Success Manager can assist you in determining if this is the case.
To create and edit customers, you must have the following permissions assigned to your user role: Customer Module > Manage Customers > Create Customer and Edit Customer.
Guidelines
Navigate to Customers > Manage Customers in 3PL Warehouse Manager.
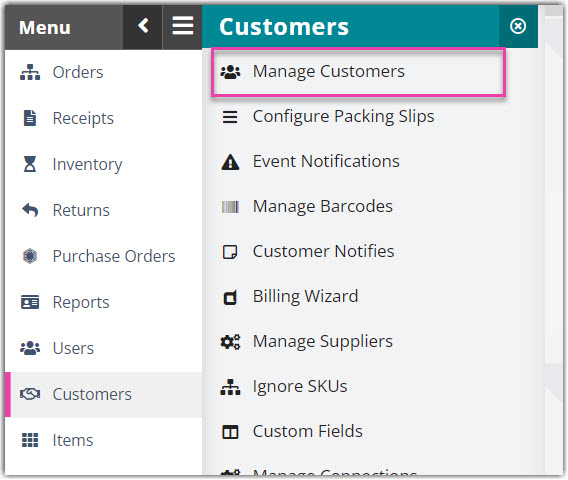
The Manager Customers page populates with all existing customers. Continue reading below to learn more about your options on this page
Create a new customer
Before you can begin receiving from a customer, you have to set them up in the system. There are two options to create a customer: build off of an existing customer's configuration or start from scratch.
Using an existing customer's configuration
If you have customers that share similar settings, you can "clone" an existing customer's configuration to create a new customer. When cloning, you have the option to duplicate the existing customer's general settings and transactional billing charges.
To learn more about the cloning process, please see Cloning Customers.
Using a clean slate
To create a new customer, click Create > Create New Customer. Each section is explained in detail below.
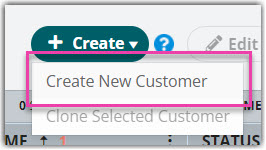
If one or more of the below fields are not available, an administrative user must enable the associated setting under Admin > Settings.
Customer Basics
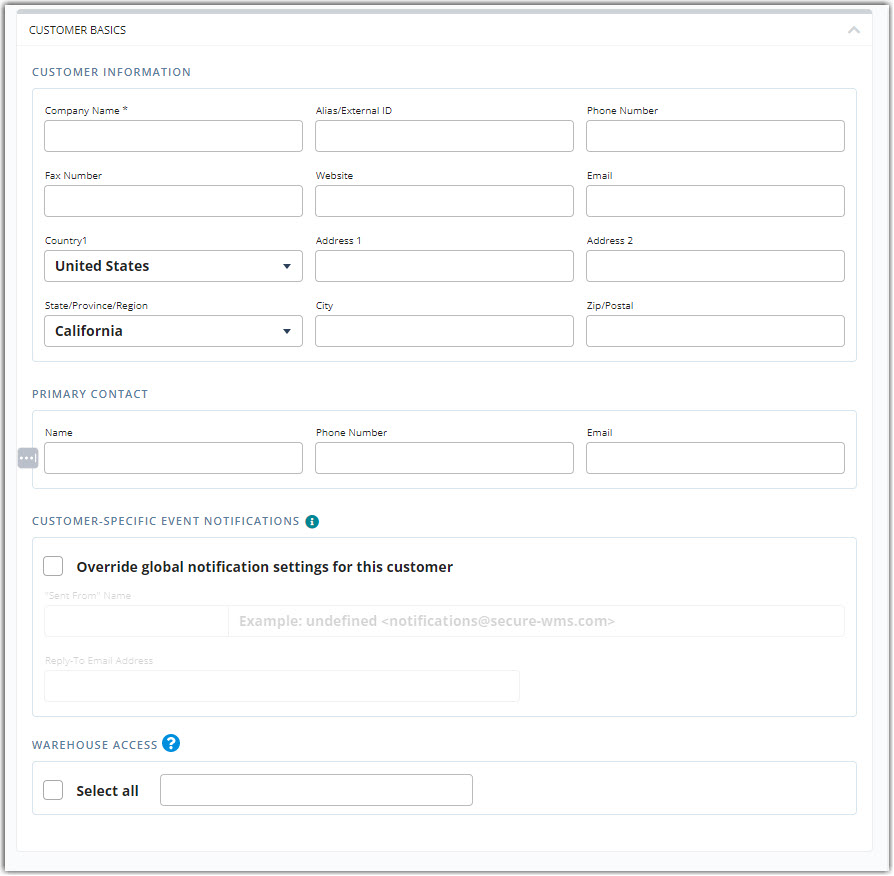
The first section for customer configuration is labeled Customer Basics, which consists of basic contact and warehouse information.

For the 'Customer Information' and 'Primary Contact' fields, enter the general contact information for this customer in the appropriate fields. Though Company Name is the only required field, we recommend filling out all relevant information for reference purposes.
The 'Customer-Specific Event Notifications' settings allow you set up notification configurations specific to this customer. If this section is disabled, event notifications will use the global settings defined under Admin > Settings.
For 'Warehouse Access', specify each facility that stores this customer's inventory. Click the field to select each warehouse individually, or click Select All to grant the customer access to all of your warehouses.
Receipts
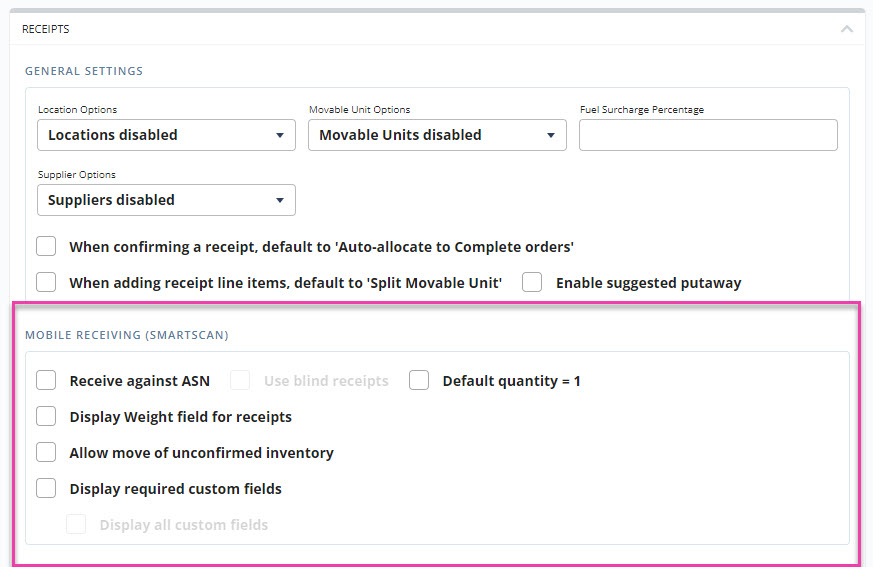
The second configuration section is for Receipts and allows you to enable default settings for this customer in the receiving process. While none of these fields are required, we do recommend you review each option and decide what makes sense for your operations.

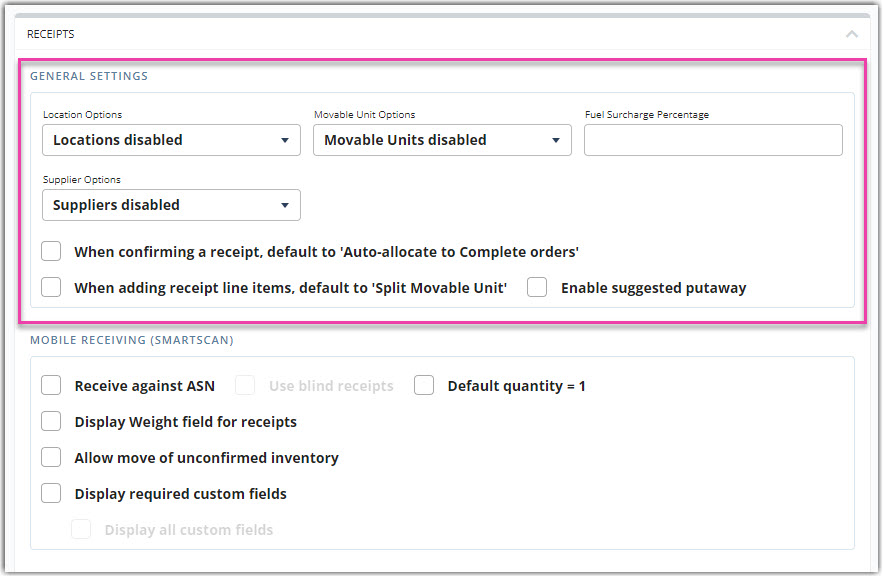
Each field under the 'General Settings' header is detailed below.
-
Location Options: Options to disable, allow, or require the use of locations
-
Movable Unit Options: Options to disable, allow, or require the use of movable units (must have Movable Units enabled for your account under Admin > Settings)
-
Fuel Surcharge Percentage: Fuel expense added to freight charges on a percentage basis
-
Supplier Options: Options to disable, allow, or require specifying who supplied the SKU on a receipt line item
-
When confirming a receipt, default to Auto-allocate to Complete orders: When checked, automatically toggles the option to allocate inventory to Complete orders upon receipt confirmation
- When adding receipt line items, default to Split Movable Unit: When checked, automatically toggles the option to split receipt line items among multiple movable units (based on the quantity per MU defined in an item's set up)
- Enable suggested putaway: When checked, activates the Suggested Putaway feature, which provides a list of locations when receiving items so that you can easily consolidate like SKUs (must have Suggested Putaway enabled for your account under Admin > Settings)
Each field under the 'Mobile Receiving (SmartScan)' header is detailed below.
-
Receive against ASN: When checked, allows you to receive against an ASN with SmartScan (must have Receive Against ASN enabled for your account under Admin > Settings)
-
Use blind receipts: When checked, allows you to receive items that are not attached to an existing receipt and confirm the receipt within the mobile scanner
-
Default quantity = 1: When checked, sets the default quantity to 1 when receiving items with SmartScan
- Display Weight field for receipts: When checked, allows SmartScan users to specify a weight value for receipt line items
- Allow move of unconfirmed inventory: When checked, allows you to use the SmartScan Move function to move inventory on unconfirmed receipts. Typically, Move only looks at confirmed inventory. Th receipt line items will show updated locations upon confirmation.
-
Display required custom fields: When checked, if an order line item has required custom fields, this setting lets you see and set those values as part of the receipt process.
- Display all custom fields: When checked, displays all custom fields whether they are required or not.
Orders
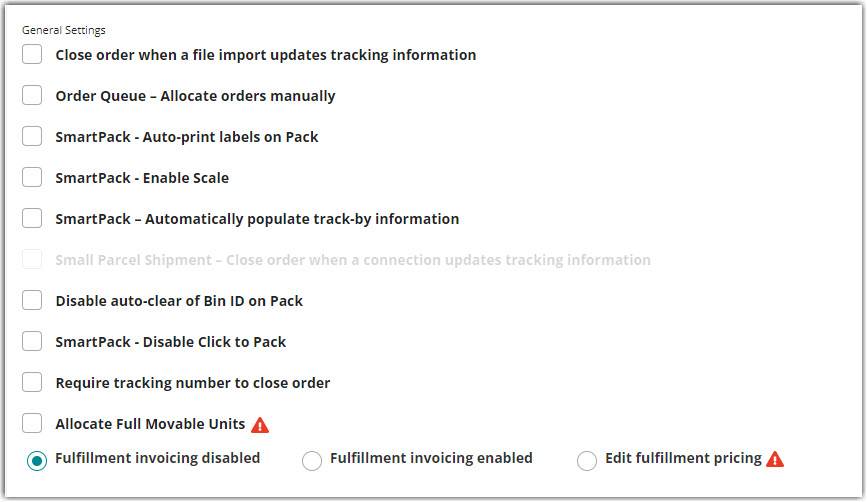
The third configuration section is for Orders and allows you to enable default settings for this customer in the shipping process. While none of these fields are required, we do recommend you review each option and decide what makes sense for your operations.

Each field under the 'General Settings' header is detailed below.
-
Close order when a file import updates tracking information: When checked, automatically closes an order once tracking information is imported into the system via flat file (must have Close Orders Upon Tracking Update enabled for your account under Admin > Settings)
-
Order Queue – Allocate orders manually: When checked, ignores system allocation logic and requires a user to manually allocate inventory for all orders (must have Order Queue enabled for your account under Admin > Settings)
-
SmartPack – Auto-print labels on Pack: When checked, automatically enables the option to auto-print labels when packing in the Small Parcel space
-
SmartPack – Enable scale: When checked, allows you to connect a postal scale when packing this customer's orders with SmartPack (must have SmartPack Scale enabled for your account under Admin > Settings)
-
SmartPack – Automatically populate track-by information: When checked, allows users to bypass the scan validation of track-by values when packing in SmartPack
-
Small Parcel Shipment – Close order when a connection updates tracking information: When checked, automatically closes an order after SmartParcel updates the 'Small Parcel Ship Date' and 'Tracking Number' fields with relevant tracking information (must have Close Orders Upon Tracking Update enabled for your account under Admin > Settings)
-
Disable auto-clear of Bin ID on Pack: When checked, disables the automatic clearing of the Bin ID value once the pack is finalized in Small Parcel Suite and instead removes the Bin ID once the order is closed
-
SmartPack – Disable click to pack: When checked, disables the "click" function in the Pack and Ship dialog—this allows for a more controlled packing process driven by scanning
-
Require tracking number to close order: When checked, requires that a tracking number is present on an order before it can be closed
-
Allocate Full Movable Units: When checked, automatically rounds up a partial MU quantity to the full pallet quantity (typically used if you're primarily shipping pallets that cannot be broken down)
If you have more line items for a particular SKU than you have MUs containing that SKU, not all line items will round up to the full quantity—only the number of line items can be matched to an MU.
-
Fulfillment invoicing: Options to disable or allow the use of fulfillment invoices when using third-party billing (must have Fulfillment Invoicing enabled for your account under Admin > Settings)
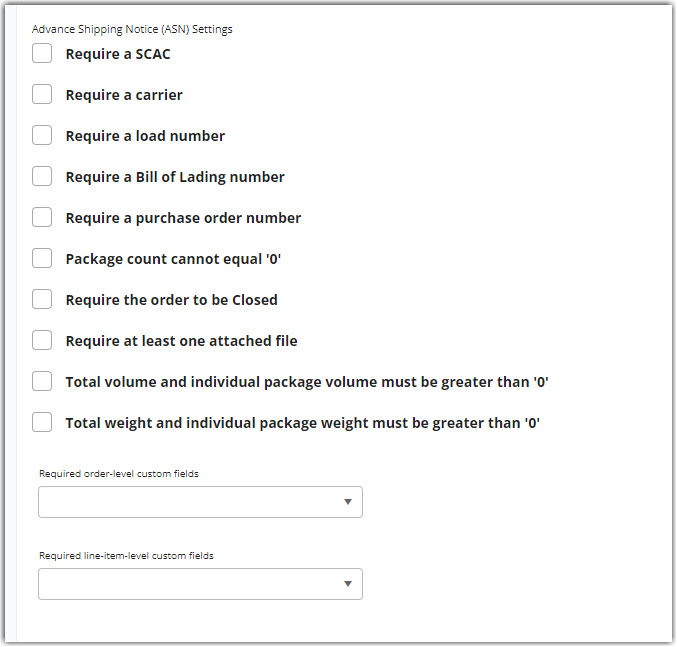
Each field under the 'Advance Shipping Notice (ASN) Settings' header is detailed below.
-
Require a SCAC: When checked, requires that a Standard Carrier Alpha Code is specified on an order to successfully send an ASN
-
Require a carrier: When checked, requires that a carrier is specified on an order to successfully send an ASN
-
Require a load number: When checked, requires that a load number is specified on an order to successfully send an ASN
-
Require a Bill of Lading number: When checked, requires that a Bill of Lading number is specified on an order to successfully send an ASN
Since it is best practice to create BOL numbers at the time of routing, we recommend generating a BOL prior to printing UCC labels. Otherwise, the label will not include the BOL number.
-
Require a purchase order number: When checked, requires that a purchase order number is specified on an order to successfully send an ASN
-
Package count cannot equal '0': When checked, requires that at least one package is specified on an order to successfully send an ASN
- Require the order to be Closed: When checked, requires that an order is closed to successfully send an ASN
- Require at least one attached file: When checked, requires that at least one file is attached to an order to successfully send an ASN (must have Attach Files enabled for your account under Admin > Settings)
- Total volume and individual package volume must be greater than '0': When checked, requires that each package on an order has a volume greater than 0 to successfully send an ASN
- Total weight and individual package weight must be greater than '0': When checked, requires that each package on an order has a weight greater than 0 to successfully send an ASN
- Required order-level custom fields: Allows you to enter or select order-level custom fields that are required on an order to successfully send an ASN (must have Custom Fields enabled for your account under Admin > Settings)
- Required line-item-level custom fields: Allows you to enter or select line-item-level custom fields that are required on an order to successfully send an ASN (must have Custom Fields enabled for your account under Admin > Settings)
To learn more about ASNs, please see Sending an ASN and Troubleshooting ASN Errors.
Each field under the 'Mobile Processing' header is detailed below.

-
Pick – Allow reallocate: When checked, allows you to pick items that were not originally allocated to an order—i.e., the same SKU with different track-by's
-
Pick – Allow multiple pickers: When checked, allows multiple SmartScan users to pick an order at the same time—see Multi-User Picking in SmartScan to learn more
When multi-user picking is enabled, the below pick options are disabled to help prevent potential picking inaccuracies.
-
Pick – Auto-advance to next line item: When checked, instructs SmartScan to automatically open the next pick line item upon completing the current pick item (enabled by default)
- Auto-fill SKU and Track-by's when identical: When checked, instructs SmartScan to auto-fill values when the current pick item is identical to the line item that was just picked—this lets pickers complete the pick more quickly but does sacrifice data validation for every pick line item
Under the 'Packing Slips' header, you can find each custom packing slip created via Customers > Configure Packing Slips. Once created on that page, you must come here to authorize the packing slip by selecting the template from the grid and clicking Enable Config. Note: If it is already authorized, the button will say "Disable Config" instead.
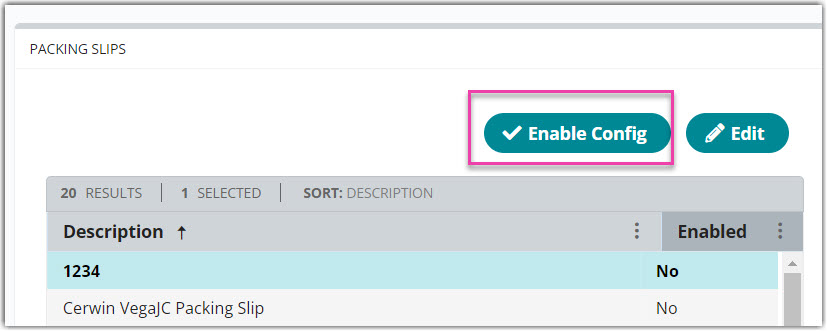
For detailed guidelines on the creation, authorization, and branding of custom packing slips, see Creating Packing Slip Templates.
Below the grid is the option to upload a header and footer image for your packing slip templates. These images will be applied to each custom packing slip template by default, unless otherwise indicated for a specific template. Simply enter the image file URL, or select a file from Browse Files for both the header and footer images.

If you do not have these files saved on your device and do not know how to retrieve the relevant image URL, refer to Step 2A of our Creating Packing Slip Templates article.
Batches
The fourth configuration section (if enabled) is labeled Batches and allows you to enable auto-batching for this customer.
To learn more about auto-batching, please see our article on Batch Order Processing.
System
The fifth configuration section is labeled System and allows you to enable default settings for this customer throughout the system.

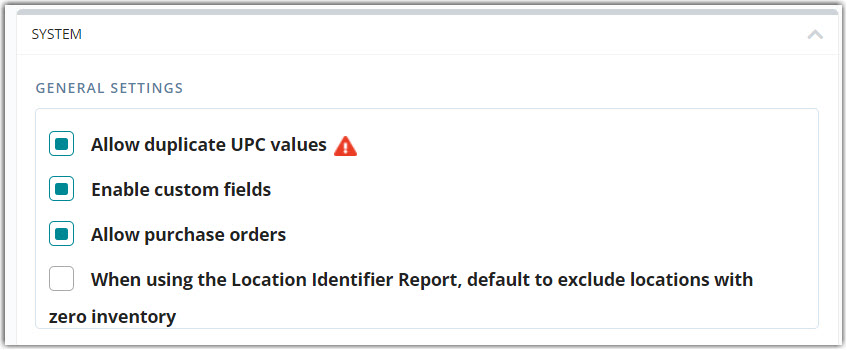
Each field under the 'General Settings' header is detailed below.
-
Allow duplicate UPC values: When checked, disables the UPC fields at the secondary and packaging unit levels in an item's setup—unit of measure-based UPC values must be unique within a given customer's set of SKUs (if you have duplicate UPC values across your item setups, you will receive an error upon scanning that value to identify a SKU)
-
Enable custom fields: When checked, allows utilization of custom fields or saved elements (must have Custom Fields enabled for your account under Admin > Settings)
-
Allow purchase orders: When checked, allows you to create and receive against purchase orders for this customer (must have Purchase Orders enabled for your account under Admin > Settings)
- When using the Location Identifier report, default to exclude locations with zero inventory: When checked, automatically enables the option to exclude locations that contain no inventory when generating the Location Identifier Report
Each field under the 'QuickBooks Invoice Terms' header is detailed below.
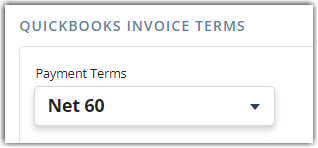
- Payment Terms: Option to define the customer's QuickBooks Online payment terms (must match record in QuickBooks exactly, and QuickBooks Online must be enabled for your account under Admin > Settings)
Each field under the 'Carrier Account' header is detailed below.

-
UPS Account Number: Default account number when billing third-party OR prepaid for orders shipped via UPS
-
FedEx Account Number: Default account number when billing third-party OR prepaid for orders shipped via FedEx
-
Carrier Postal Code: Postal code associated with the above carrier accounts; required when billing third-party and by some carriers for generating shipping labels
-
Add Carrier Info to Orders: Option to auto-populate Account Number and Postal Code defined above on orders with the specified method of billing
When billing prepaid, the carrier bills shipping charges to the shipper's account. With third-party billing, the carrier bills shipping charges to a party other than the shipper or recipient.
Each field under the 'Per Transaction Options' header is detailed below.

-
Create Invoice Defaults: Option to automatically toggle the checkbox that automates invoice generation when closing a transaction—this sends the invoice directly to the QuickBooks Invoice Queue and removes the need to export from the Manage Invoices page
-
Accounting Name: Customer's name on QuickBooks account (must match record in QuickBooks exactly and contain only alphanumeric characters)
- Default invoice confirmation date to the transaction confirmation date: When checked, automatically populates the date a transaction was closed as the invoice confirmation date
Each field under the 'EDI X12 940–945' header is detailed below.

- Customer Interchange ID: Unique identifier for a customer in the EDI exchange process
- Customer ID Qualifier: Code that further specifies the data and structure used in the Customer Interchange ID for the respective customer
- 3PL Interchange ID: Unique identifier for a 3PL in the EDI exchange process
- 3PL ID Qualifier: Code that further specifies the data and structure used in the 3PL Interchange ID for the 3PL
Each field under the 'Pre-Wired Connections' header is detailed below.

- SPS Trading Partner ID: Unique identifier specifying the Trading Partner ID that SPS Commerce has assigned to the customer
Each field under the 'Document Settings' header is detailed below.

-
Next VICS Bill of Lading ID: Option to set the prefix number to use for the BOL number
-
Manufacturing ID: Allows you to set a 6-digit number to become part of Carton IDs for UCC-128 labels
-
Use Transaction-based bill of lading number format rather than VICS standard: When checked, formats BOL as transaction-based instead of VICS standard
- Display the Vendor ID instead of the Retailer ID on bills of lading: When checked, displays the Vendor ID on BOL instead of the Retailer ID (this setting is not currently supported—to make this change, please do so under Customers > Classic BOL Templates; see Generating Order Documents for further guidance)
Once you've completed each configuration section, click Save. The customer record populates in the grid on the left. Repeat these steps for any additional customers you wish to create.

Modify an existing customer
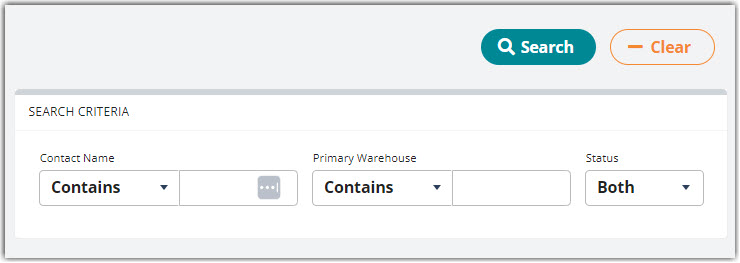
There are three options for modifying an existing customer: edit, activate and deactivate. Optional: If you need to refine the results that display in the grid, enter the relevant Search Criteria, then click Search.
- To edit a customer, select a customer from the grid, then click Edit to open the customer record. Make your changes, then click Save. A confirmation message appears.

- To activate or deactivate a customer, select the customer from the grid, hover over Manage, then make your selection. A confirmation message appears.

