3PL Warehouse Manager

Updated on December 12th, 2023

  • Extensiv Hub
    Popular Articles Getting Started Using Hub Technical Issues & FAQs Extensiv's Ideas Portal
  • 3PL Warehouse Manager
    Receiving Operations Inventory Management Shipping Operations System Configuration Scanning Operations Integrations Content Best Practice Resources Release Notes Popular Articles Troubleshooting Guides
  • Warehouse Management
    Getting Started Admin Console Shipping Order Picking & Packing Receiving Customer Portal Cycle Counting Kit Building Managing Users Barcode Scanner Import/Export Integrations Barcoding Wave Picking Bin Move Mobile Receiving and Picking Settings Popular Articles Reporting
  • Order Management
    Dashboard Orders Inventory Purchase Orders Shipments Customers Products Analytics Settings API API Integrations Accessing and Navigating Order Manager Error Messages Order Manager Popular Articles Accounting Integrations
  • Integration Management
    Getting Started with Integration Manager General Support Troubleshooting Extras & Addons API Documentation Popular Articles Order Sources Order Destinations
  • FAQs
  • Network Manager
    Getting Started Order Routing Management Technical Issues Shopping Carts Settings Settings, Products, and Orders
  • Billing Manager
    Getting Started Using Billing Manager
  • Release Notes
    Extensiv Sandbox Extensiv Extensiv Hub 3PL Warehouse Manager Integration Management Warehouse Management Order Management Billing Manager
  • Fulfillment Marketplace
    Getting Started
  • Sandbox
    Getting Started
+ More
  • Help Center
  • 3PL Warehouse Manager
  • System Configuration
  • Customer Setup
  • System Configuration
    • Warehouse Setup
        • Configuring 3PL Settings
        • Managing Warehouses
        • Creating Locations
        • Mass-Updating Locations
        • Using Custom Labels
        • Freezing Transactions
    • Customer Setup
        • Managing Customers
        • Managing Customer Notifies
        • Managing Suppliers
        • Ignoring SKUs
        • Understanding Custom Fields
        • Cloning Customers
        • Connecting to 3PL Warehouse Manager SFTP Service
    • User Setup
        • Managing User Roles
        • Managing Users
    • Billing Setup
        • Using the Billing Wizard
        • Per Transaction Receiving Scripts
        • Per Transaction Shipping Scripts
        • Understanding Recurring Storage Charges
        • Managing Invoices
        • Exporting Invoices to QuickBooks
        • Reviewing Recurring Storage Charges

Managing Suppliers

Suppliers are those who supply your customers' inventory items. In the case that you need to know who produced an item, you can create supplier contacts to have their information readily available in 3PL Warehouse Manager. Once a supplier contact is created, you can select the supplier on a receipt line item and sort or filter by that information when adding order line items via the Mass Add tool.

This article reviews how to create and manage supplier contacts for your customers.

Guidelines

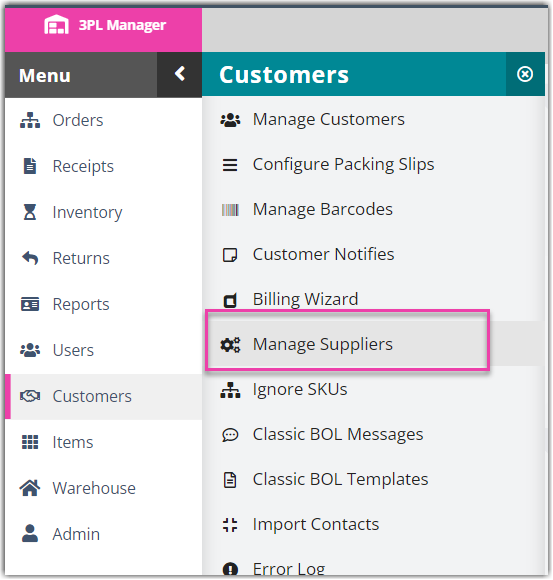
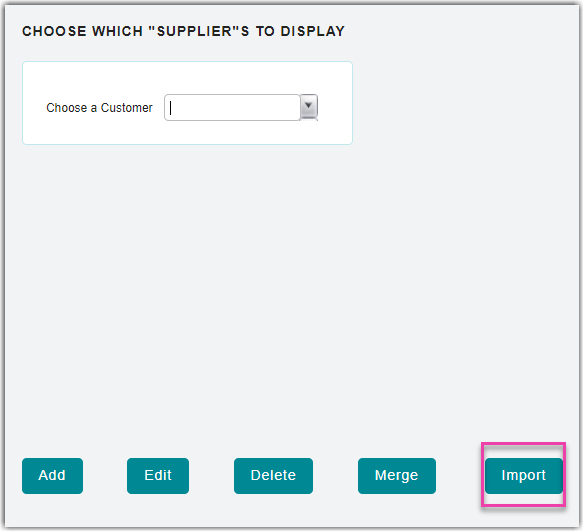
Navigate to Customers > Manage Suppliers in 3PL Warehouse Manager, then select a customer from the drop-down menu.

Continue reading below for instructions on how to add a new supplier and manage an existing supplier.

Add a new supplier

There are two options for creating a new supplier contact in 3PL Warehouse Manager: via manual entry or an import file. Instructions for both are listed below.

Create supplier contacts manually

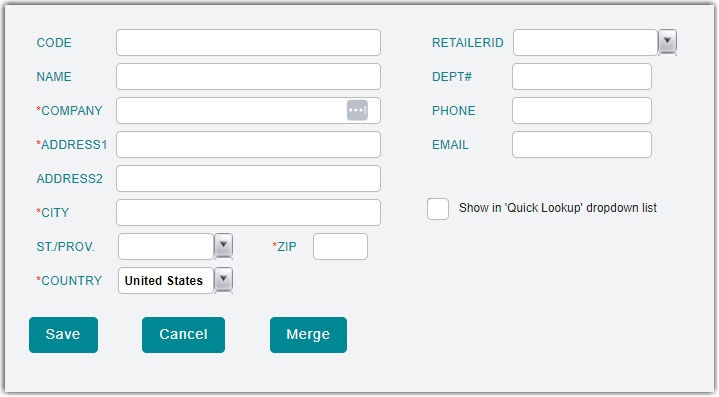
  1. To create a supplier contact via manual entry, click Add.
  2. Enter the supplier's contact information using the appropriate fields. Note that fields with a red asterisk (*) are required.
    • Code: Value used to identify the contact in the Advanced Lookup tool when editing an order—e.g., You could use code HD1099 to identify Home Depot store 1099
    • Retailer ID: Option to select a relevant existing retailer
    • Show in 'Quick Lookup' dropdown list: When checked, it appears in 'Shipping Destination Favorites' drop-down menu when creating/editing an order
  3. Once complete, click Save. The new supplier populates in the grid and is available for the selection of online items for the associated customer.

Repeat Steps 1–3 for each supplier contact as needed. If you need to create new supplier contacts for additional customers, be sure to select the relevant customer from the drop-down menu.

Import supplier contacts

If you have multiple supplier contacts to create or you already have a spreadsheet that contains the supplier information, we recommend adding these contacts into the system via import file.

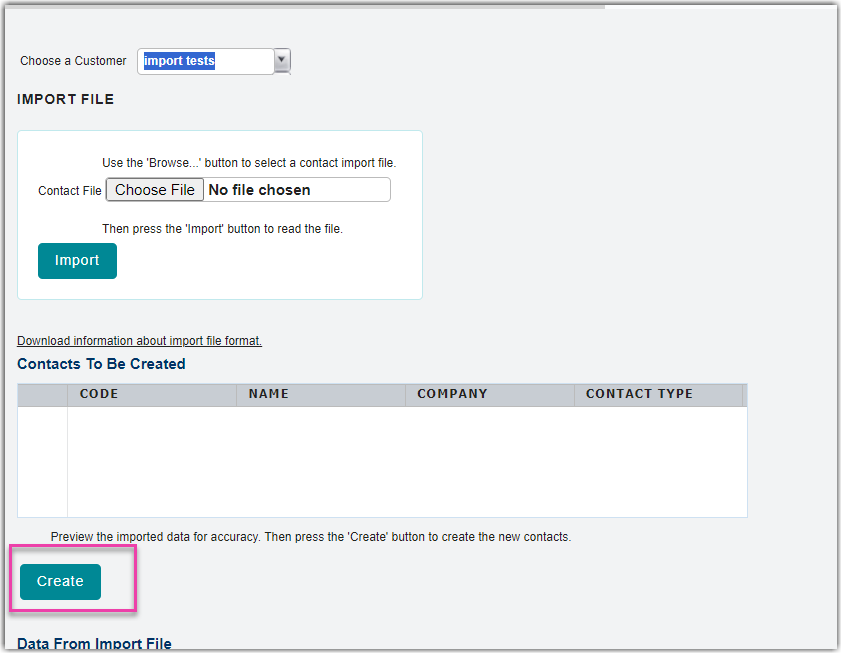
  1. Follow the instructions on the Contact Import Template—making sure that you enter Supplier in Column N for each supplier contact listed in the file, then click Import on the Manage Suppliers page.
  2. Click Browse, then double-click the import file.
  3. Click Import. A preview of the contact data is displayed in the 'Contacts To Be Created' grid and the bottom two text boxes.
  4. Once you verify for accuracy, click Create to finalize the import. If successful, you can view each contact on the Manage Suppliers page.

Manage an existing supplier

There are three different options for managing an existing supplier.

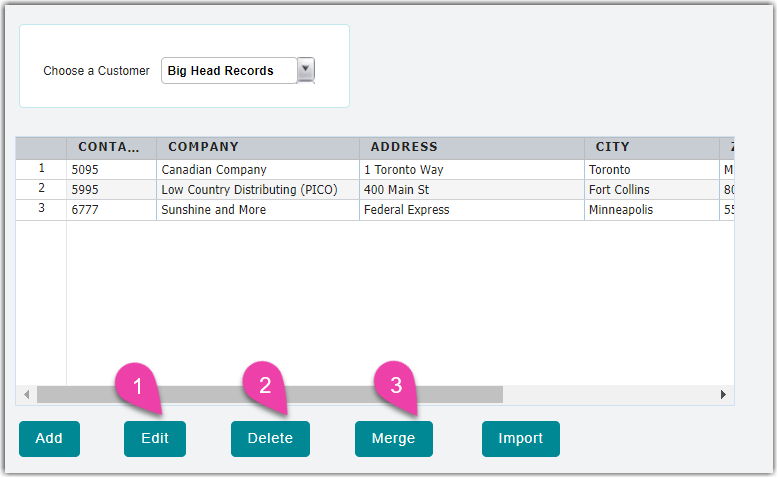
  1. Edit a supplier. Select a supplier from the grid, click Edit, make your changes, then click Save.
  2. Delete a supplier. Select a supplier from the grid, then click Delete.

    Please note that you cannot delete a supplier that has been used on an existing transaction.

     
  3. Merge two or more suppliers into one contact. Use < Ctrl > or < Shift > on your keyboard to select the suppliers from the grid, then click Merge. Select the supplier whose contact information you wish to remain in the system, then click Merge.

    Please note that you cannot reverse this action, and it results in the modification of all existing transactions where the merged supplier is present.

     
supplier management vendor control

Was this article helpful?

Yes
No
Share additional feedback about this article

Related Articles

  • Shipping with FedEx One Rate®
  • Creating End of Day Requests (Manifesting)
  • Managing Ship-to Contacts
  • eBay Shopping Cart Connection

Not finding the help you need?

Contact Support
Solutions
  • Solutions for Brands
  • Solutions for 3PLs
  • Solutions for 4PLs
  • Solutions for B2B
Products
  • Extensiv 3PL Warehouse Manager
  • Extensiv Warehouse Manager
  • Extensiv Order Manager
  • Extensiv Integration Manager
  • Extensiv Network Manager
Products
  • Customer Success
  • Implementation
  • Consulting
Ecosystem
  • Fulfillment Marketplace
  • Integrations
  • Partners
  • Become a Partner
Resources
  • Resource Library
  • Blog
  • Market Insights
  • What is a 3PL?
  • What is a 4PL?
  • What is a WMS?
  • Why a Cloud-based WMS?
  • Glossary
Help
  • Help Center
  • API Documentation
  • Extensiv Univerisity
  • Community
  • System Status
  • Extensiv Logo
  • 100 N Pacific Coast Hwy, Suite 1100, El Segundo, CA 90245
  • |
  • Contact Us:
  • 83-EXTENSIV 888.375.2368 (main)
  • |
  • 310.844.7570 (local)
  • Copyright © 2023 Extensiv
  • |
  • All rights reserved.
  • Privacy Policy
  • |
  • Terms of Service
  • Follow Us:
Expand