
Configuring SmartScan on Zebra Enterprise Browser
Extensiv currently requires Zebra Enterprise Browser to install and use SmartScan on any Zebra device. Enterprise Browser acts as a platform that connects the SmartScan application to Zebra hardware. Not using Enterprise Browser will result in significantly degraded performance.
Since Enterprise Browser has certain requirements for connecting web applications, a hardware partner with knowledge of Zebra devices, Enterprise Browser, and SmartScan is highly recommended for accelerating the device configuration and deployment. Extensiv's official hardware partner is BarcodesInc (formerly Emkat)—please contact your CSM for more information.
However, you also have the option to configure your own devices. This article reviews how to install the SmartScan application on Zebra Enterprise Browser and update the configuration files as needed.
Note that we recommend this configuration option only if you have sufficient technical expertise on staff. If you choose to proceed with these guidelines using your own internal staff, you are responsible for troubleshooting the installation if and when issues arise.
Extensiv does not provide support for hardware devices or Enterprise Browser. As a result, we recommend that you always work with a qualified hardware partner for configuring and maintaining mobile hardware.
Enterprise Browser versions and supported functionalities
Enterprise Browser supports direct connections to a printer.
- Without EB, you must install BrowserPrint as an intermediary for accessing a printer.
Camera support requires EB v3.x.
- Android 11 seems to work best with EB 3.2.5
- Android 10 seems to work best with EB 3.0.6
Step 1: Access the Enterprise Browser install location
The steps below review how to connect your Zebra device for USB file transferring and navigate to the Enterprise Browser install location so that you can properly install SmartScan and update these files as needed.
- To begin, close Enterprise Browser on your Zebra device.
- If your device is running Android 9 or newer, you can close the app by swiping up from the bottom of your device, then swiping up on the app preview.
- If your device is running Android 8 or older, you can close the app by selecting the "Recent Items" button on the bottom-right corner of your screen (to the right of the Home button), then swiping up on the app preview.
- Once you close the Enterprise Browser app, affix your Zebra device to your Windows computer using a supported USB cable.
If prompted, tap Allow to grant your computer access to the files needed.
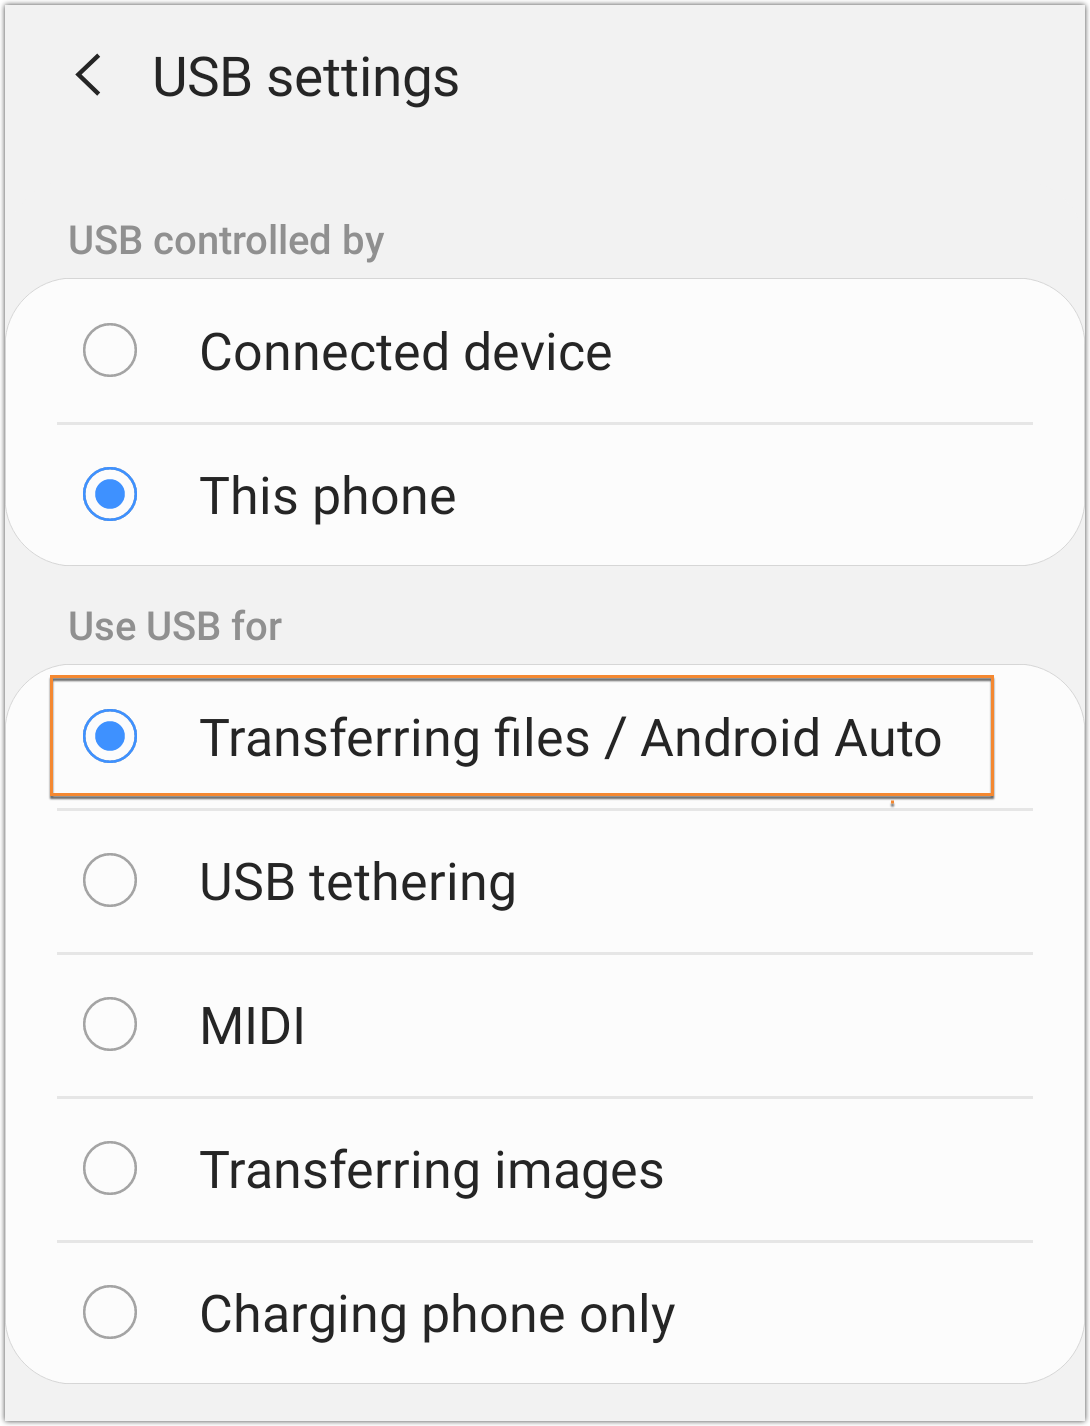
- Swipe down from the top-right of the Zebra device, then locate the silent notification from 'Android System' and ensure it states "USB for file transfer".
- If it does, proceed to Step 4.
- If the notification does not indicate that the USB is configured for transferring files, tap the notification, then tap it again and select Transferring files.
- On your computer, open File Explorer , select This PC, then double-click the device's drive to open the file repository.
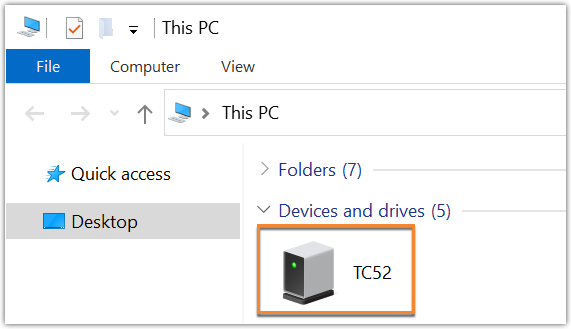
- Navigate to the install location via the following file path: sdcard > EnterpriseBrowser.
- Proceed to Step 2a below if you're installing SmartScan files for the first time or Step 2b if you're simply updating these files.
Step 2a: Install SmartScan
If this is your first time installing SmartScan on your Zebra device, follow the steps below after navigating to the install location in the previous section.
If you have already installed SmartScan on Enterprise Browser and simply need to update these files, please proceed to the next section (Step 2b).
- Locate the config.xml file in the install location, then right-click config.xml to open the file in your default text editor and make the following edits:
- Add the <CustomDOMElements> tag specified below in <Application>.
- Modify the <StartPage> tag to reference index.html.
<Configuration>
..
<Applications>
<Application>
..
<General>
..
<StartPage value="file://%PRIMARYDIR%/EnterpriseBrowser/Index.html" name="Menu" />
</General>
..
<CustomDOMElements value="file://%PRIMARYDIR%/EnterpriseBrowser/eb.txt" />
</Application>
</Applications>
</Configuration>
- Save your changes to the file, then close the text editor.
- Next, copy each file contained in installfiles.zip to the install location by dragging and dropping or copying and pasting the files from their original location on your computer.
- Open the zipped file from Step 3 and locate the config.json file, then right-click config.json to open the file in your default text editor.
- Replace {database_guid_here} with your account's dedicated GUID value. If you don't know your GUID, you can find it on the Account page in the Support Portal or retrieve it from the end of your WMS login URL.
configData = '{ "Tpl":"{XXXXXXX}", "Host": "3w.extensiv.com", "UseHttps":true }'; - Save your changes to the file, then close the text editor.
- Once the files are edited and loaded onto your device, unplug your Zebra device from the USB cable and tap the Enterprise Browser app to navigate to the SmartScan homepage.
Step 2b: Update SmartScan configuration
In rare situations, it may be necessary for you to update the SmartScan application files on your Zebra device. If that happens or if you're notified that this is necessary and you are not working with our recommended hardware provider BarcodesInc, you can use the steps below to update these files once you navigate to the install location in the previous section.
- In a new File Explorer window, open the file location of the replacement file.
- Resize the two File Explorer windows, as needed, to drag and drop the replacement file into the existing install folder. When prompted, confirm that you want to replace the existing file.
- Once you've replaced the file, unplug your Zebra device from the USB cable and tap the Enterprise Browser app to navigate to the SmartScan homepage.