
Using Outbound Serialization
If you don't need to capture serial numbers during the receiving process, you can choose to capture them when you pack the orders using outbound serialization with SmartScan or SmartPack.
This article reviews how to enable outbound serialization for your items and how to serialize during the packing process.
If you're interested in viewing serial numbers captured through outbound serialization, a custom report is required. Please see Customizing Reports for more information.
Step 1: Enable outbound serialization for each item
Outbound serialization is configured in the item setup, which you must enable for each relevant item.
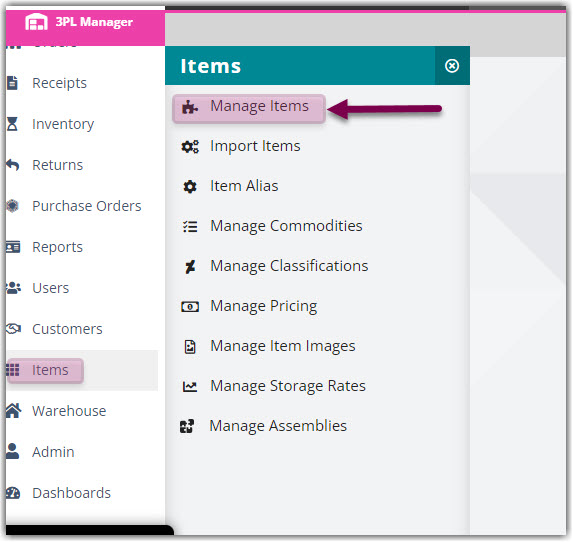
- In 3PL Warehouse Manager, navigate to Items > Manage Items and select a customer.
2. Select a relevant item from the grid, then click Edit.
3. Locate the 'Outbound Mobile Serialization' field under Items > Tracking Options, then use the drop-down list to enable outbound serialization. Note the following information for these options:
- Require Quantities to Match: requires the number of serial numbers you scan to match the number of items being packed
-
Ignore Quantity Mismatches: does not require the number of scanned serial numbers to match the number of items being packed
- Require Scan at Pick: this option is for inbound 'Serial Number Tracking' only and does not apply to outbound serialization—if enabling with one of the two options above, a scan is automatically required at pack
4. Click Save.
5. Repeat Steps 2–4 for each item that needs outbound serialization enabled.
If you have a large number of items that need outbound serialization enabled, you can opt to update them via the Batch Item Update process using Column BC of the export file. To learn more, please see Batch-Updating Items.
Once the items are configured for outbound serialization, proceed to receive, pick, and pack these items as normal using SmartScan or SmartPack.
Step 2: Serialize during the packing process
Pack with SmartScan
After you have completed a pick job for an order that contains an item set up for outbound serialization, proceed to pack the order as normal using SmartScan. If you need full guidelines on packing, please see Packing Orders with SmartScan.
Once you scan the item, you'll also scan each unique serial number and click Next once complete.
After a line item is fully packed, you can tap the right side of the row in the line item grid to open a dialog with the list of scanned serial numbers.
Once the pack is finalized, the serial number values are reflected on the associated order.
Capturing multiple serial numbers in a single barcode in SmartScan
You can streamline your workflow for capturing multiple outbound serial numbers by using a single barcode formatted with comma- or colon-separated lists.
Comma-separated list: The individual serial numbers need to be unique and separated by commas. Note: The scanning logic assumes the barcode begins with a SKU and Quantity and skips the first two values. If your barcode only contains serial numbers, leave two blank values at the beginning of the barcode Otherwise, the first two serial numbers will be skipped because of this.
For example:
- A barcode with five unique serial numbers, a SKU, and Quantity values would be:
SKU 01, 15, 1890001,1890002,1890003,1890004,1890005 - A barcode with only five unique serial numbers would be:
,,1890001,1890002,1890003,1890004,1890005
Colon-separated list: This barcode format requires the following values separated by a colon:
- The keyword “BULK”
- The keyword “V1”
- The SKU
- The total number of serial numbers in the barcode
- A list of all the serial numbers separated by colons
For example, SKU 1001 with five unique serial numbers would be formatted as: BULK:V1:1001:5:0000001:0000002:0000003:0000004:0000005
Pack with SmartPack
After you have picked an order that contains an item configured with outbound serialization, proceed to pack the order as normal using SmartPack. If you need full guidelines on packing, please see Packing in the Small Parcel Space.
Once you scan the full quantity for an item (or scan a partial quantity and click Next), SmartPack requests you to scan or enter a serial number for each item.
Once the pack is finalized, the serial number values are reflected on the order.