Managing Customer Notifies
6.2 min read
|The Customer Notifies page allows you to set up automatic email notifications for your customers when certain events occur in 3PL Warehouse Manager. This article reviews the general guidelines for configuring event notifications and editing notification templates.
Before you can successfully configure event notifications, you must have the following permission assigned to your user role: Customer Module > Manage Customer Notifications.
Understand each event
Each type of event and the action which triggers the notification for that event are as follows:
- Item Create/Update: When an item is created or updated
- Advance Shipping Notice (ASN): When a receipt is created and you have "Receive Against ASN" enabled in a customer's setup
- Receive on Dock: When a receipt is first created via SmartScan or the Find Receipts/Create Receipt pages
- Received: When a receipt is confirmed into inventory
- Order Created by Customer: When a new order is created by a customer user and marked as 'Complete'
- Order Created by Warehouse: When a new order is created by a warehouse user and marked as 'Complete'
- Orders Created through FTP: When an order is created through an FTP connection
- Order Updated: When an order is updated
- Order Loaded Complete: When an order achieves a status of 'Loaded Complete' (used with Classic Mobile's Load Out functionality)
- Order Loaded Incomplete: When an order achieves a status of 'Loaded Incomplete' (used with Classic Mobile's Load Out functionality)
- Order Shipped – Notify Customer: When an order is shipped and closed
- Order Shipped – Notify Ship-to: When an order has shipped and contains a ship-to email address
- FTP Order Import Failed: When an order imported through an FTP connection fails
- Stock Status Report Failed: When an inventory report file scheduled to post to an FTP connection fails
- Custom Report Failed: When a custom report file scheduled to post to an FTP connection fails
- FTP Receiver Import Failed: When a receiver file scheduled to import to an FTP connection fails
- 944–945 Confirmation Not Received: When an order's ASN is sent but no ASN confirmation is received back
- Batch Packed Complete Notify: When a set of batched orders are completely packed and ready to ship
- Item Import Failed: When an item import fails
- Adjustment: When an inventory adjustment is made
- Invoice Delivered: When an invoice is delivered using the 'Notify' button on the Manage Invoices page
- Invoice Preview: No longer support
- Item Minimum Reached: When an item has fallen below its minimum value—triggers once daily at midnight (defined in an item's setup under Items > Inventory Options as 'Min on Hand')
- Location Minimum Reached: When a SKU at a location has fallen below its minimum value—triggers once daily at midnight (defined in a location's setup under 'Capabilities' as 'Min Quantity')
- Product Expiration Threshold Reached: When a product is at its expiration threshold value
- Inventory Placed on Hold: When an item is placed on hold
- Inventory Released from Hold: When an item is released from hold
Set up event notifications
There are two steps to setting up event notifications—the first is configuring your notification preferences, and the second is specifying recipients for each notification. Both of these steps are reviewed below.
Step 1: Configure notification preferences (Optional)
Once a recipient is specified for an event, notifications are sent from <notifications@secure-wms.com>. If desired, you can specify a sender name to accompany this "Sent From" email address or designate a reply-to email address to enable the reply-to functionality.
Global notification preferences are configured under Admin > Settings, which apply to all notifications that have recipients defined. If desired, you can override these settings on a per-customer basis under Customers > Manage Customers.
Understanding Reply-To Email Functionality: Reply-to email addresses are typically hidden from notification recipients. Designating a reply-to email address in the WMS simply allows you to receive direct replies from notification recipients.
- If you have a "Reply-To Email Address" specified on the Settings or Manage Customers page (further detailed below), this indicates that the reply-to functionality is enabled. As a result, if a recipient replies to a notification, their reply is routed to the reply-to address defined in the WMS instead of the "from" address.
- If no email address is specified as a "Reply-To Email Address", this indicates that the reply-to functionality is disabled. As a result, if a recipient replies to a notification, they will receive an email informing them that the email address they've attempted to contact does not accept replies.
If you want to configure your notification preferences, follow the steps below. If not, you can skip ahead to the next step.
- Navigate to Admin > Settings in 3PL Warehouse Manager.
- In the Event Notifications section, enter a "Sent From" Name and (if desired) a Reply-To Email Address.

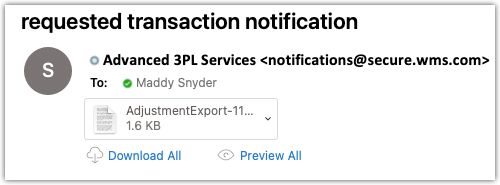
- Click Save to apply these global settings. Once saved, an event notification that uses the "Sent From" Name in the image above would appear to Outlook recipients as such:
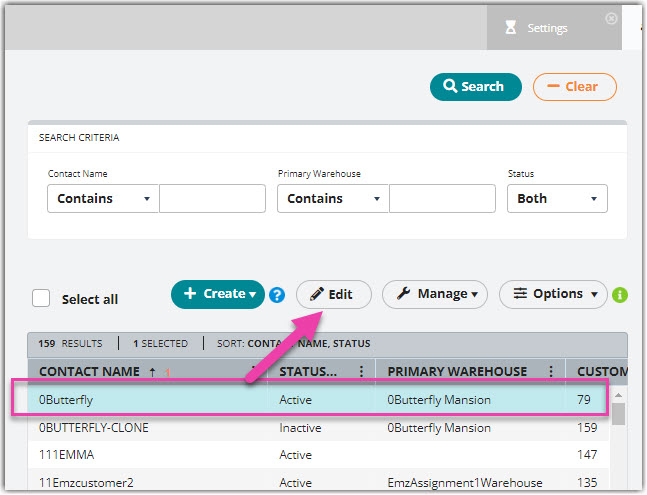
- If you want to override these settings for a certain customer, navigate to Customers > Manage Customers.
- Select the relevant customer from the grid, then click Edit.
- Under 'Customer-Specific Event Notifications', activate Override global notification settings for this customer.
- Enter a "Sent From" Name and (if desired) a Reply-To Email Address, then click Save.
- Repeat Steps 4–7 for each customer as needed.
Step 2: Specify notification recipients
Once your notification preferences are configured, it's time to specify the recipients for each event.
It is important to note that if a specified email recipient utilizes free email services, this could negatively impact the reliability of the notifications to reach those email addresses. This is because of a server-level change Google and other email providers have made which flags constant emails as Spam before they ever reach your inbox.
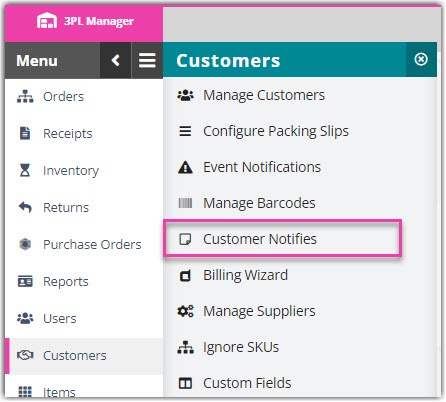
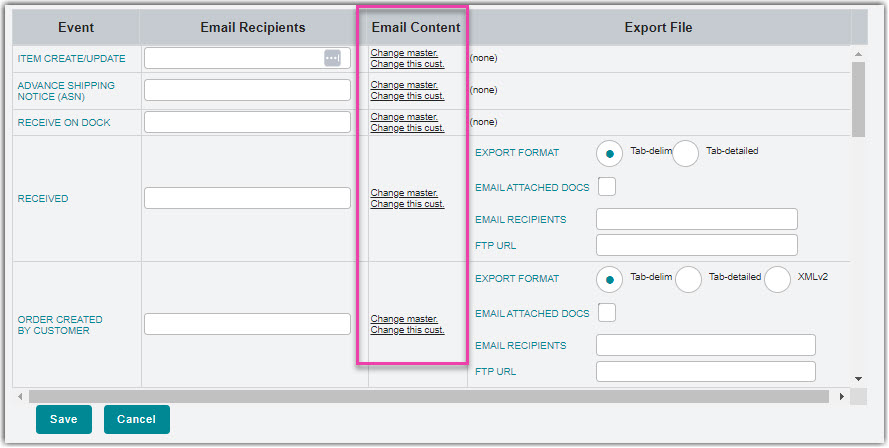
- Navigate to Customers > Customer Notifies.
- From the drop-down menu, 'Choose a Customer' and click Select.
- Under the 'Email Recipients' column, enter one or more email addresses next to each event you'd like the recipient to be notified of. If using multiple recipients for one event, separate them with semicolons.
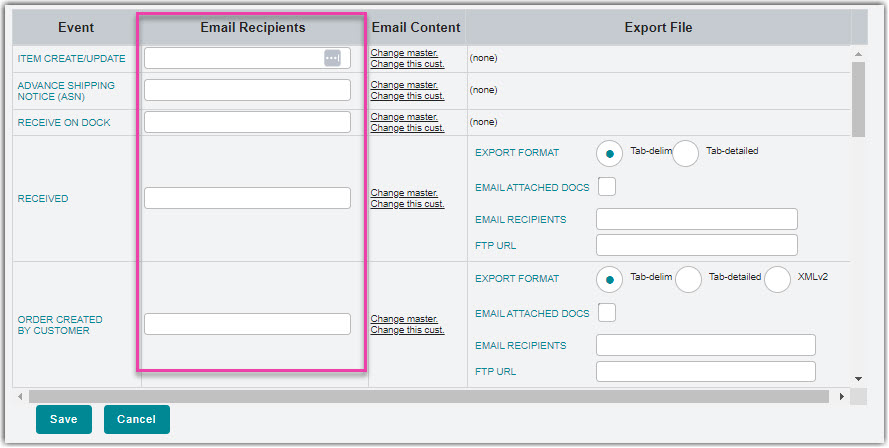
- To change the notification content for an event, you can click Change this cust. to update the email template for that particular customer, or click Change master to update the email template for all of your customers.
Customer templates are used by default. If you want to instead utilize the master template, you must erase all content from the customer-specific template. For a better understanding of these email templates, see the Edit notification templates section below.
- To include an attachment (of the event details or attached files) in the notification, note the following options that are available in the 'Export File' column next to the relevant event.

- Select an available Export Format.
- Tab-delim: Text file with limited transaction details
- Tab-detailed: Text file with full transaction details
- XMLv2: XML file with limited transaction details
- EDI (947): EDI file with limited transaction details
- Detail Tab-Delimited: Text file with limited transaction details
- Include in email body is enabled by default. Disable this option to exclude the exported content from the email body.
- Click the selection box next to Email Attached Docs to include files attached to the transaction. Note that you must have 'Attach Files to Customer Notifies' enabled for your account under Admin > Settings.
- Enter one or more Email Recipients, using semicolons to separate multiple email addresses.
Please note that if you list a recipient here, you must also include the same email address under the 'Email Recipients' column.
- Specifying an FTP URL here is no longer supported. To set up event notifications via EDI, please contact edi@extensiv.com.
- Click Save. Repeat Steps 2–6 for each customer as needed.
Edit notification templates
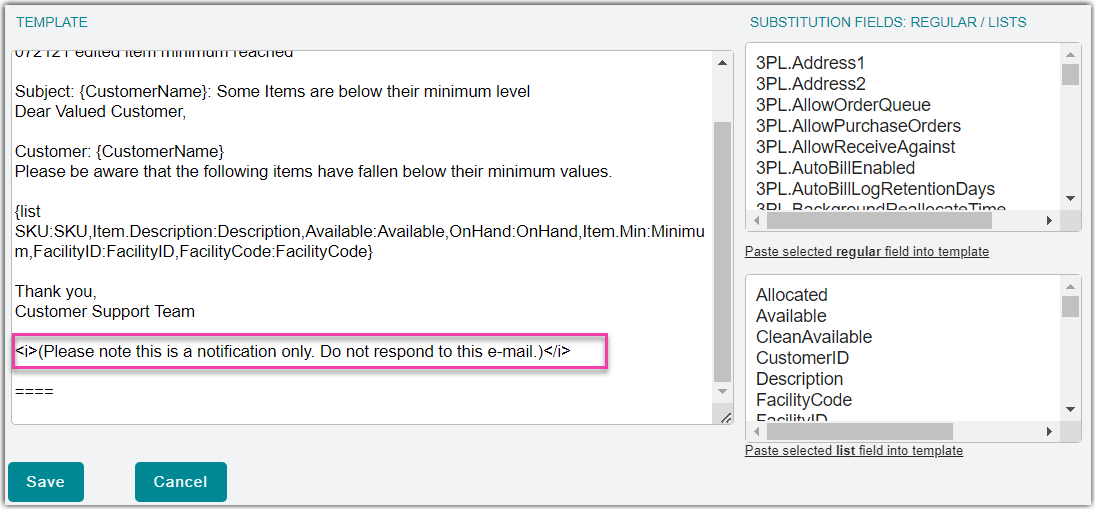
Step 5 above refers to the email notification template for an event, which contains the message content you want to send when that event occurs. Each email template allows you to customize event notifications by adding or removing relevant fields or text to the notification template.
In general, HTML logic/language is recommended for editing the notification template. Continue reading below for additional information and tips.
Use substitution fields
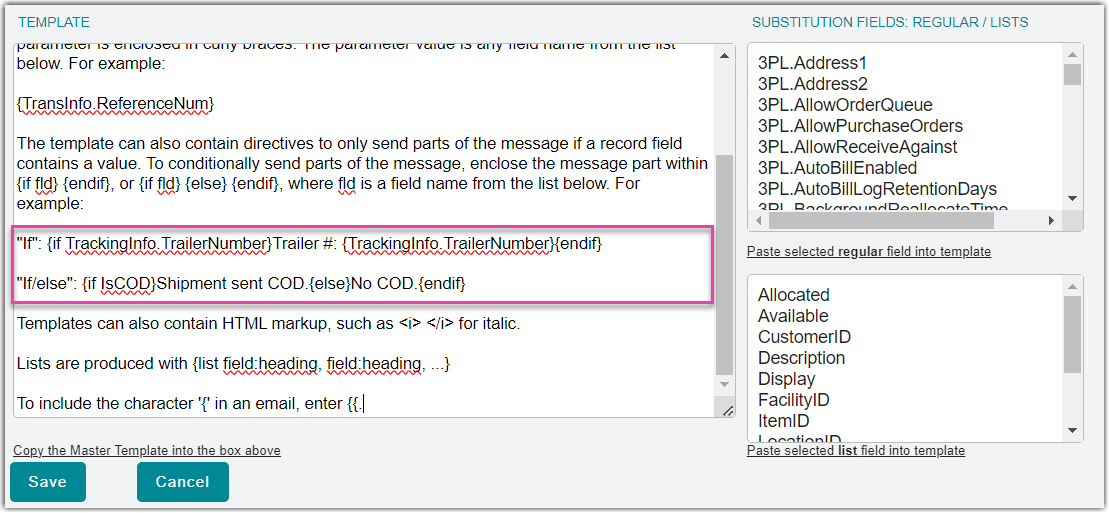
Each template can contain substitution fields, which reflect the details associated with the selected attribute in the notification. For example, if you included the 'PurchaseOrder.ID' substitution field in a template, the notification recipient would see the actual purchase order identification number in the notification.
These fields are found in the bottom-right section of the Customer Notifies page.
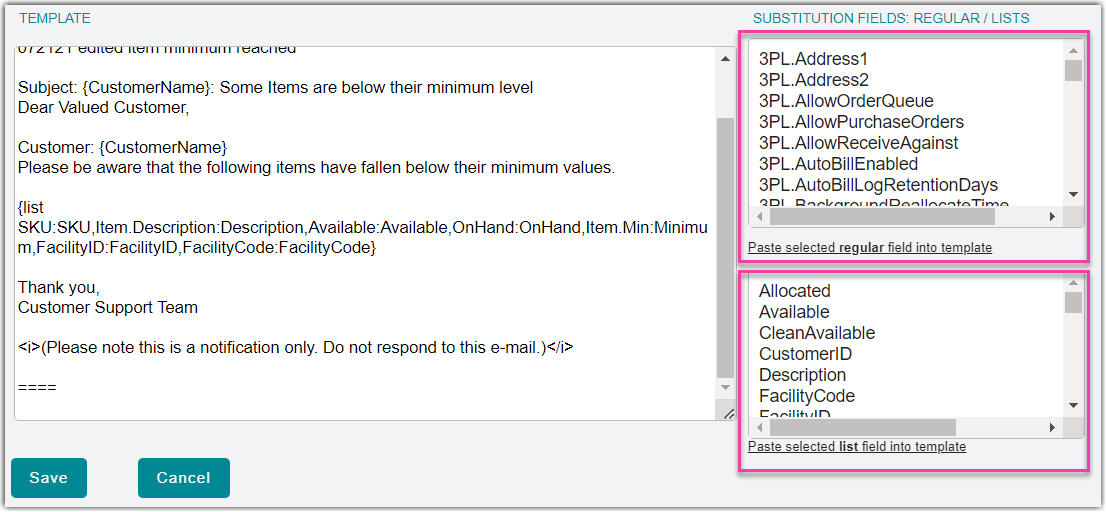
There are two types of substitution fields—regular fields and list fields. When adding either of these substitution fields to a template, you must enclose the field names in curly braces.
- Regular fields, as seen in the top text box above, are used for single-entry points of data. These fields are usually pulled straight from a single source of information and are not used to pull more than one entry at a time. You can freely type a field name (enclosed in curly braces) in the template, or you can select a field from the text box and click Paste selected regular field into template.
- List fields, as seen in the bottom text box above, allow you to pull in lists of data associated with the labels. These lists populate as tables in the notification using the following formatting:
{list FieldFromList:ColumnHeader,FieldFromList:ColumnHeader, ...}
For example: {list SKU:Item,Qty:Quantity,SerialNumber:Serial #,LotNumber:Lot #}
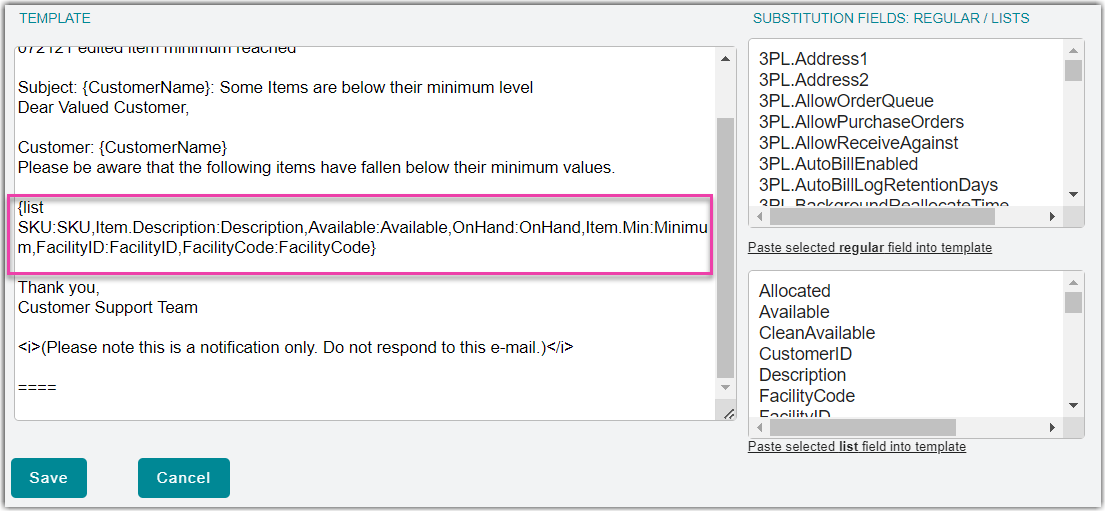
Do not add any text listed before the period in a list field—e.g., use Available instead of OrderItem.Available.
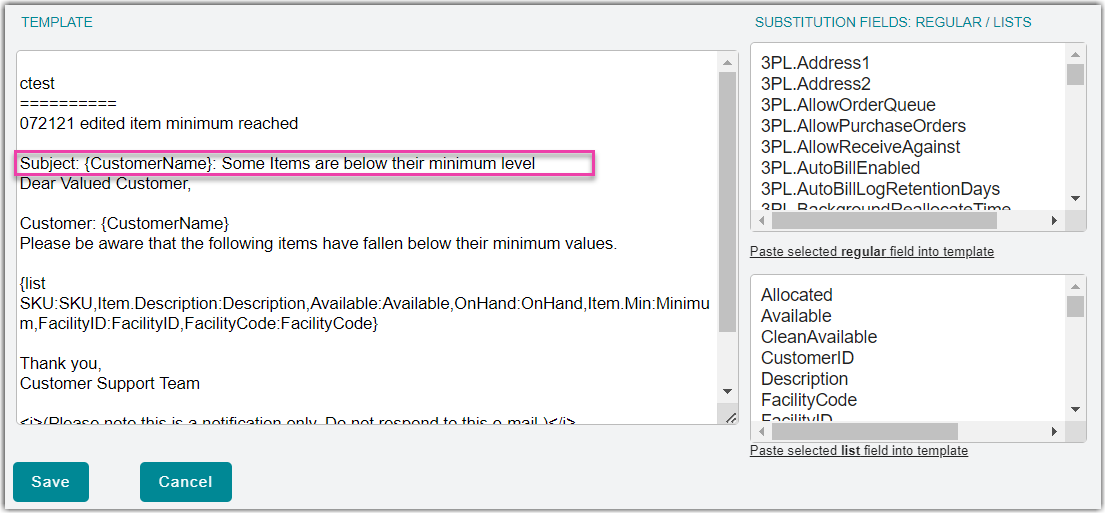
Add a subject
You can add a subject to your notifications by entering Subject: at the very top of the template, followed by your desired subject content. You can also add regular fields here to include specific information in the subject line.
Add images
You can also add images to your notifications if the image is hosted on an existing website. (We review how to retrieve image URLs in Step 2A of our Creating Packing Slip Templates article.)
Add an image to your notifications using the following syntax:
<img src="Image URL here"/>
Once added to an event's template, this image is sent with every notification.
Add tracking information
If you wish to add tracking information to your notifications, you can do so with the following logic:
{if TrackingInfo.TrackingNumber}Your custom text here:
<a href="https://www.google.com/search?en&q={TrackingInfo.TrackingNumber}" target="_blank"> {TrackingInfo.TrackingNumber}</a>{else}Shipping tracking reference not available.{endif}
This feature only works for FedEx, UPS, and USPS.
Save and test
Once you're finished editing the notification template, click Save to apply your changes. When configuring event notifications for the first time, we recommend you send a test email to an accessible address before adding your customer or other stakeholder as an email recipient.
Below is the notification that sends based on the content outlined in the examples above for the 'Order Shipped - Notify Customer' event.