3PL Warehouse Manager

Updated on July 13th, 2023

  • Extensiv Hub
    Popular Articles Getting Started Using Hub Technical Issues & FAQs Extensiv's Ideas Portal
  • 3PL Warehouse Manager
    Receiving Operations Inventory Management Shipping Operations System Configuration Scanning Operations Integrations Content Best Practice Resources Release Notes Popular Articles Troubleshooting Guides
  • Warehouse Management
    Getting Started Admin Console Shipping Order Picking & Packing Receiving Customer Portal Cycle Counting Kit Building Managing Users Barcode Scanner Import/Export Integrations Barcoding Wave Picking Bin Move Mobile Receiving and Picking Settings Popular Articles Reporting
  • Order Management
    Dashboard Orders Inventory Purchase Orders Shipments Customers Products Analytics Settings API API Integrations Accessing and Navigating Order Manager Error Messages Order Manager Popular Articles Accounting Integrations
  • Integration Management
    Getting Started with Integration Manager General Support Troubleshooting Extras & Addons API Documentation Popular Articles Order Sources Order Destinations
  • FAQs
  • Network Manager
    Getting Started Order Routing Management Technical Issues Shopping Carts Settings Settings, Products, and Orders
  • Billing Manager
    Getting Started Using Billing Manager
  • Release Notes
    Extensiv Sandbox Extensiv Extensiv Hub 3PL Warehouse Manager Integration Management Warehouse Management Order Management Billing Manager
  • Fulfillment Marketplace
    Getting Started
  • Sandbox
    Getting Started
+ More
  • Help Center
  • 3PL Warehouse Manager
  • Scanning Operations
  • Configuration
  • Scanning Operations
    • Configuration
        • Setting Up Barcodes
        • Getting Started with GS1 Barcodes
        • Connecting Printers to SmartScan
        • Managing Barcode Definitions
        • Updating Samsung Keyboards
        • Configuring SmartScan on Zebra Enterprise Browser
        • Clearing Enterprise Browser Cache in SmartScan
        • Creating Custom MU Labels
        • Configuring SmartScan on Keyence Devices
        • Capturing Images in SmartScan
    • Inbound Operations
        • Receiving with SmartScan
        • Creating Receipts with SmartScan
        • Receiving Against an ASN
        • Printing MU Labels for Receipts
    • Inventory Management
        • Performing Inventory Audits
        • Moving Inventory with SmartScan
        • Looking Up Inventory with SmartScan
    • Outbound Operations
        • Picking Orders with SmartScan
        • Creating Pick Jobs
        • Multi-User Picking in SmartScan
        • Picking Multiple Orders
        • Bin-Picking
        • Picking for Load-Out
        • Picking for Load-Out FAQs
        • Packing Orders with SmartScan
        • Packing from Shelves
        • Using Outbound Serialization
        • Enabling Pick Paths
        • Picking a Single Order

Getting Started with GS1 Barcodes

To use GS1 self-defining barcodes with SmartScan, you must have already configured your barcodes with GS1—if you have not done so, please see their Get Started Guide. Please note that it is the product owners' responsibility to register with GS1 and label in accordance to the standard.

The GS1 data elements that SmartScan currently supports, as well as their respective AI and specs, are as follows:

  • UPC, AI 01 – fixed length value; no FNC1 needed
  • Secondary UPC or Packaging UPC, AI 02 – fixed length value; no FNC1 needed
  • Lot Number, AI 10 – variable length; FNC1 required
  • Expiration Date (YYMMDD), AI 17 – fixed length value; no FNC1 needed
  • Serial Number, AI 21 – variable length; FNC1 required
  • Quantity, AI 30 – variable length; FNC1 required
  • SKU, AI 240 & AI 241 – variable length; FNC1 required
  • Net Weight (Kg), AI 3100-3105
  • Net Weight (Lbs), AI 3200-3205

    Scanned values auto-populate into the Weight field in the "Receipt Line Item" modal.

    The value should still be captured and recorded in the DB even if the display of the Weight field is disabled in the SmartScan UI.

    This setting is available in Manage Customers > Receipts tab > Mobile Receiving.


This article reviews how to identify the UPC of an item in 3PL Warehouse Manager for GS1 interpretation.

UPC and SKU are the only data elements that require you enter unique values for the relevant items in the system, while the rest of the elements listed above are track-by's that you enable in the item setup under Items > Tracking Options.


If you are tracking these data points, our 3PL experts recommend requiring the track-by's you want to capture from GS1 barcode scanning rather than simply enabling them.

Guidelines

These guidelines review the process for entering the relevant UPC value for an item, but if you have already set up the SKU field to reflect the UPC, SmartScan automatically recognizes it using the interpretation progression listed in Setting Up Barcodes.

  1. In 3PL Warehouse Manager, navigate to Items > Manage Items and select the relevant customer.
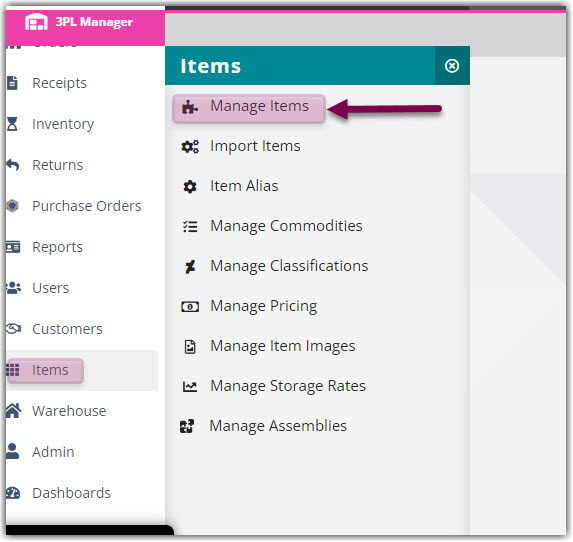
  2. Select an item from the grid that is set up for GS1 scanning, then click Edit.
  3. Enter the assigned value in the 'UPC' field.
  4. If you have relevant track-by's, weight, and primary quantity configured with GS1, ensure that those fields are also complete and accurate.
  5. Click Save.
  6. Repeat Steps 2–5 for each item that needs configuration for GS1 scanning.

Once all items are configured with the appropriate UPC values, you can receive them as normal in SmartScan. When you add a new line item to a receipt and scan the relevant barcode, SmartScan interprets and populates all associated data elements. Increase the quantity if needed, then continue your receiving workflow.

starting point gs1 barcodes

Was this article helpful?

Yes
No
Share additional feedback about this article

Related Articles

  • Importing Orders
  • Managing Suppliers
  • January 23, 2020 – Minor Release Notes
  • Shipping with UPS

Not finding the help you need?

Contact Support
Solutions
  • Solutions for Brands
  • Solutions for 3PLs
  • Solutions for 4PLs
  • Solutions for B2B
Products
  • Extensiv 3PL Warehouse Manager
  • Extensiv Warehouse Manager
  • Extensiv Order Manager
  • Extensiv Integration Manager
  • Extensiv Network Manager
Products
  • Customer Success
  • Implementation
  • Consulting
Ecosystem
  • Fulfillment Marketplace
  • Integrations
  • Partners
  • Become a Partner
Resources
  • Resource Library
  • Blog
  • Market Insights
  • What is a 3PL?
  • What is a 4PL?
  • What is a WMS?
  • Why a Cloud-based WMS?
  • Glossary
Help
  • Help Center
  • API Documentation
  • Extensiv Univerisity
  • Community
  • System Status
  • Extensiv Logo
  • 100 N Pacific Coast Hwy, Suite 1100, El Segundo, CA 90245
  • |
  • Contact Us:
  • 83-EXTENSIV 888.375.2368 (main)
  • |
  • 310.844.7570 (local)
  • Copyright © 2023 Extensiv
  • |
  • All rights reserved.
  • Privacy Policy
  • |
  • Terms of Service
  • Follow Us:
Expand