Transactions Reports
6.1 min read
|This article reviews each report specific to transactions and how to generate these reports.
To learn which permissions are required to access any of the reports reviewed below, please see Understanding Reports.
Navigate to Reports > Transactions, then proceed to the relevant guidelines below.
![]()
Transaction Register
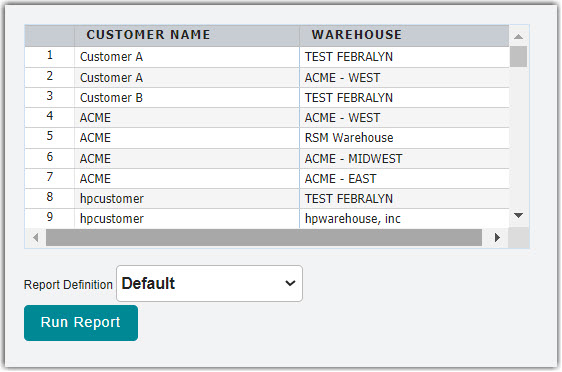
The Transaction Register Report is the most comprehensive warehouse report. It is a summary of all activity by customer for a specific date range. The report includes transaction highlights and warehouse charges and can be used for period billing or invoice back-up. You can drill down to view the transaction details and click on UPS tracking numbers to confirm package receipts.
![]()
- Click Transaction Register from the list of Transactions reports.
- Select the relevant Customer Name and Warehouse from the grid. To select multiple customers, use < Ctrl > on your keyboard to multi-select.
- Select the relevant Start Date and End Date.
- Specify whether you want to generate a Detailed, Summary, or Daily Ship List report.
- Click Run Report.
The detailed report generates with the following columns:
- Name: Name of customer
- Date: Date transaction was created
- ShipDate: Date transaction was shipped and closed
- Trans #: Relevant transaction number
- CustomerRef: Reference number recorded on the transaction
- Tracking #: Tracking number recorded on the transaction
- QtyIn: Number of primary units received in
- QtyOut: Number of primary units shipped out
- Handling: Handling rate charged—based on fees configured under Billing Wizard > System-Calculated Storage and Handling Charge Setup
- Auto Handling: Handling rate charged—based on fees configured under Billing Wizard > Per Transaction Billing Setup
- Materials: Rate charged for materials—based on manual fees configured under Billing Wizard > Per Transaction Billing Setup
- Storage: Storage rate charged—based on fees configured under Billing Wizard > System-Calculated Storage and Handling Charge Setup
- Auto Storage: Storage rate charged—based on fees configured under Billing Wizard > Per Transaction Billing Setup
- Special: Rate charged for special charges—based on manual fees configured under Billing Wizard > Per Transaction Billing Setup
- Freight PP: Rate charged for freight prepaid
- Freight3: Freight charge that is owed
- Total: Total charges on the transaction
- Notes: Warehouse Instructions recorded on a transaction
- Paperclip icon: Indicates if files were attached to the transaction
The summary report generates with the following unique columns:
- Customer / Warehouse: Relevant customer and warehouse name
Transaction by Activity
The Transaction by Activity Report is similar to the Transaction Register Report but allows you to include specific transactions, such as orders, receipts, returns, etc.
![]()
- Click Transaction by Activity from the list of Transactions reports.
- Select the relevant Customer Name and Warehouse from the grid. To select multiple customers, use < Ctrl > on your keyboard to multi-select.
- Specify the relevant transaction type to include in the report: Orders, Receivers, Returns, Assemblies, or Adjustments.
- Select the relevant Start Date and End Date.
- Specify whether you want to sort the data by Transaction #, BOL #, PO #, or Carrier.
- By default, 'Sort In Ascending Order' is checked. To sort the report by descending order, de-select the selection box.
- Click Run Report.
The report generates with the following columns:
- Trans#: Relevant transaction number
- Ref #: Reference number recorded on the transaction
- BOL#: Associated Bill of Lading number
- PO NUM: Purchase order number recorded on the transaction
- Carrier: Shipping carrier recorded on the transaction
- SKU: Primary identifier of an item
- Qualifier: Relevant item qualifier
- Description: Description of item
- Qty Rcv/Ord: Number of primary units received/ordered
- Cu Ft: Total default volume of primary units measured in cubic feet
- Lbs/Kgs: Total default weight of primary units measured in Imperial or Metric
- Packed per Dim UoM: Number of primary units per packaging unit
- Total Qty Dim UoM: Total number of packaging units
- Dim Unit of Measure: Packaging unit of measure
View Transaction
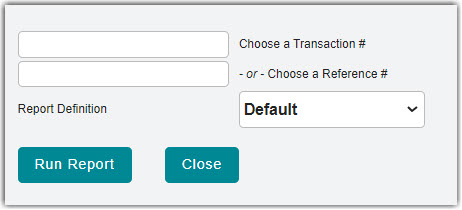
The View Transaction Report is a comprehensive report of a single transaction.
![]()
- Click View Transaction.
- Enter a transaction identifier: Transaction #, Reference #, or PO #.
- Specify whether you wish to 'Show Packages' or 'Show Billing Details' on the report.
- Click Run Report.
The report contains basic transactional data, including billing charges, carrier information, ship-to information, package details, and the following fields:
- Warehouse Instructions: Warehouse Instructions entered on a transaction to display on a pick ticket
- Carrier Instructions: Carrier Instructions entered on a transaction to display on a packing slip and/or Bill of Lading
Transaction by Line Item
The Transaction by Line Item Report lists all line items for closed transactions that occurred within a specified time period.
![]()
- Click Transaction by Line Item.
- Select the relevant Customer Name and Warehouse from the grid. To select multiple customers, use < Ctrl > on your keyboard to multi-select.
- Select the relevant Start Date and End Date.
- Click the 'Show Retailer' selection box to add an additional Retailer column to the report.
- Specify whether you want to generate a Transaction by Line Item Report, Transaction Weekly Shipping Report, or Outbound Orders by Load Report.
- Click Run Report.
The Trans by Line Item Report generates with the following columns:
- Name: Name of customer
- ShipDate: Date transaction was shipped and closed
- CustomerRef: Reference number recorded on the transaction
- Carrier: Shipping carrier recorded on the transaction
- PO #: Purchase order number recorded on the transaction
- Trans #: Relevant transaction number
- SKU: Primary identifier of an item
- Lot #: Lot number recorded on an item
- Qty: Number of primary units
- Tracking #: Tracking number recorded on the transaction
- Freight3: Freight charge that is owed
- Service: Shipping service recorded on the transaction
- ExpDate: Expiration date recorded on an item
- Serial #: Serial number recorded on an item
The Shipping Report generates with the following unique columns:
- ShipTo: Name of ship-to contact recorded on the transaction
- UOM: Primary unit of measure
- DIM Qty: Number of secondary units on the transaction
- Cost per Unit: Cost per primary unit
- Total Cost: Total cost calculated for all primary units on the transaction
Shipment Value
The Shipment Value Report is an invoice that calculates the value of a shipment by multiplying item price by quantity.
- Click Shipment Value.
- Enter a transaction identifier: Transaction # or Reference #.
- Click Run Report.
The report generates with the following columns:
- Item Number: Identification number assigned to an item
- Description: Description of an item
- Quantity: Number of primary units
- UOM: Primary unit of measure
- Price Each: Product cost per primary unit
- Amount: Total shipment rate, calculated by multiplying Price Each and Quantity
Open Orders
The Open Orders Report lists all orders currently in the warehouse and being processed (in an Open or Complete status). This report can be used for ensuring orders are properly confirmed and billed.
- Click Open Orders.
- Select the relevant Customer Name and Warehouse from the grid. To select multiple customers, use < Ctrl > on your keyboard to multi-select.
- Select the relevant Start Date and End Date.
- Specify whether you want to filter by a specific date: Creation Date, ASN Sent Date, Pickup Date.
- Click Run Report.
The report generates with the following columns:
- Customer Name: Name of customer
- Entered Date: Date order was created
- Trans #: Relevant transaction number
- Ref #: Reference number recorded on the order
- PO #: Purchase order number recorded on the order
- Carrier: Shipping carrier recorded on the order
- Ship To: Ship-to destination recorded on the order
- Earliest Ship Date: Earliest Ship Date recorded on the order
- Cancel Date: Ship Cancel Date recorded on the order
- Pickup Date: Expected Pickup Date / Time recorded on the order
- Notes: Warehouse Instructions recorded on the order
- Is Under Allocated: Indicates whether the order has overallocated (unavailable) inventory
- Retailer: Retailer ID recorded on the order
- Stage: Indicates whether an order is marked as Complete
Open Receipts
The Open Receipts Report is similar to the Open Orders Report above but is used for receipts that have come in the warehouse and have yet to be confirmed and billed (in an Open or Complete status).
- Click Open Receipts.
- Select the relevant Customer Name and Warehouse from the grid. To select multiple customers, use < Ctrl > on your keyboard to multi-select.
- Click Run Report.
The report generates with the following columns:
- Customer Name: Name of customer
- Entered Date: Date receipt was created
- Trans #: Relevant transaction number
- Ref #: Reference number recorded on the receipt
- PO #: Purchase order number recorded on the receipt
- Carrier: Shipping carrier recorded on the receipt
- Notes: Notes recorded on the receipt
Open Assemblies
The Open Assemblies Report is similar to the Open Orders Report above but is used specifically for assembly transactions.

- Click Open Assemblies.
- Select the relevant Customer Name and Warehouse from the grid. To select multiple customers, use < Ctrl > on your keyboard to multi-select.
- Click Run Report.
The report generates with the following columns:
- Customer Name: Name of customer
- Entered Date: Date transaction was created
- Trans #: Relevant transaction number
- Ref #: Reference number recorded on the assembly
- PO #: Purchase order number recorded on the assembly
- Carrier: Shipping carrier recorded on the assembly
- Notes: Notes recorded on the assembly
Overage/Shortage & Damaged
The Overage/Shortage & Damaged (also known as OS&D) Report allows you to view any discrepancies between the expected and actual quantities of received items.

- Click Overage/Shortage & Damaged.
- Enter a transaction identifier: Transaction # or Reference #.
- Click Run Report.
The report generates with the following columns:
- SKU: Primary identifier of an item
- Qualifier: Relevant item qualifier
- Lot#: Lot number recorded on an item
- Serial#: Serial number recorded on an item
- ExpDate: Expiration date recorded on an item
- Supplier: Supplier contact recorded on an item
- Cost: Landed cost recorded on an item
- MovUnit: Unique MU license plate assigned to an item
- Location: Warehouse location assigned to an item
- Inv Qty: Actual quantity of received items
- Exp Qty: Expected quantity of received items
- Variance: Difference between Inv Qty and Exp Qty
- Inv UOM: Primary unit of measure
Transfer Activity
The Transfer Activity Report allows you to view any transfer activity that has taken place in your warehouse within a certain timeframe.
![]()
- Select a Customer from the drop-down menu.
- Select a relevant Start Date and End Date.
- Click Run Report. A PDF file opens in a new tab of your browser.
The report generates with the following columns:
- Transfer Date: Date transfer occurred
- Source Owner / Destination Owner: Names of the original customer and the customer to which the item was transferred
- Source Item# / Destination Item#: Names of the original SKU and the name of the SKU under the new customer
- Source Item Description / Destination Item Description: Original item description and the item description under the new customer
- Source Lot Number / Destination Lot Number: Original lot number and the lot number under the new customer
- Source Qty / Destination Qty: Original item quantity and the item quantity under the new customer
- Source Location / Destination Location: Original location of the item and the location of the item under the new customer
- Source License Plate / Destination License Plate: Original MU label and the MU label under the new customer
