Pallet In/Carton Out Workflow
4.1 min read
|Overview
What is pallet in/carton out?
The pallet in/carton out workflow is a part of the order fulfillment process, in which warehouses pick full cartons and ship them to a recipient. This process is essential to the efficiency, accuracy, and speed of your shipments.
When would I use it?
A pallet in/carton out workflow works best when you receive inventory that is not going to get broken down into individual units. This inventory may or may not be stored on pallets.
What is the process?
There are several configurations that need to take place in and out of 3PL Warehouse Manager before you can successfully implement this pallet in/carton out workflow. Please make sure the following have been completed before proceeding:
- All relevant orders are fully allocated and in a Complete status
- All relevant billing charges are properly configured
- All relevant items are fully configured
- All relevant package types are configured
- SmartScan is enabled
- SmartParcel is enabled and configured
- Rate shopping is enabled and configured
- Zebra Browser Print is installed and fully configured
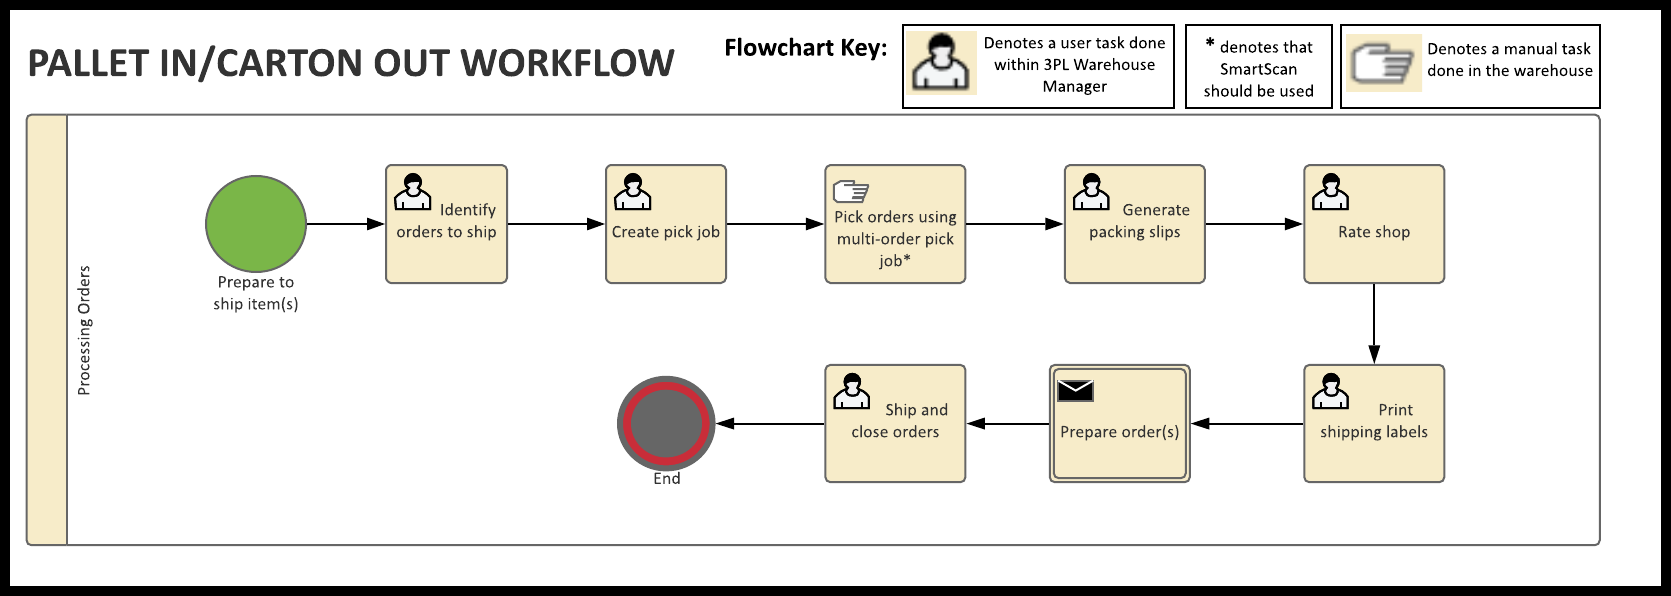
Below is a flowchart of the overall process of a pallet in/carton out workflow, which is further detailed in this article. To enlarge, right-click the image and select "View image" or "Open image in new tab"—the verbiage depends on your web browser.
Processing Guidelines
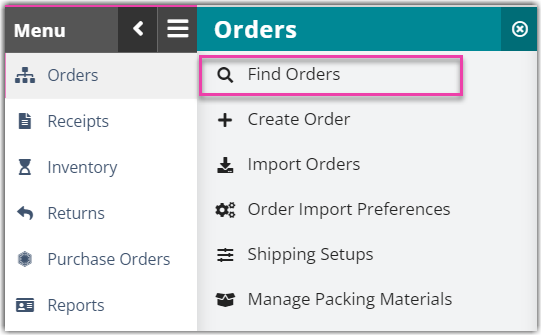
Step 1: Find orders
Once you are ready to start processing your orders, locate them in the Orders grid of 3PL Warehouse Manager under Orders > Find Orders. If needed, use the search filters in the left pane to refine the results displayed in the grid.
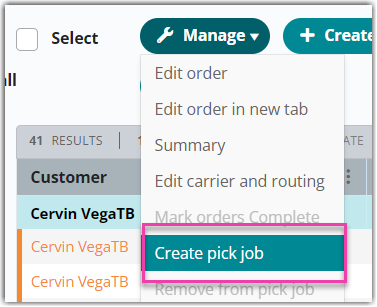
Step 2: Create pick job
The pick job functionality allows you to seamlessly create one pick job for two or more orders using a multi-order pick job. This picking process is best practice if you are picking multiple orders that contain medium-sized cartons or case items.
Follow the steps below to get started.
- Select all the relevant orders you wish to include in the pick job, using < Ctrl > or < Shift > on your keyboard to multi-select.
- Hover over Manage, then click Create pick job to open the Create Pick Job dialog box.
- Optional: From the drop-down menu, select a 'Priority'. 1 denotes the highest priority, while not specifying a priority prioritizes the job based on the time the pick job was created.
-
Optional: Select a specific 'Owner' to complete the pick job, then enter any necessary 'Instructions' the picker may need for the job.
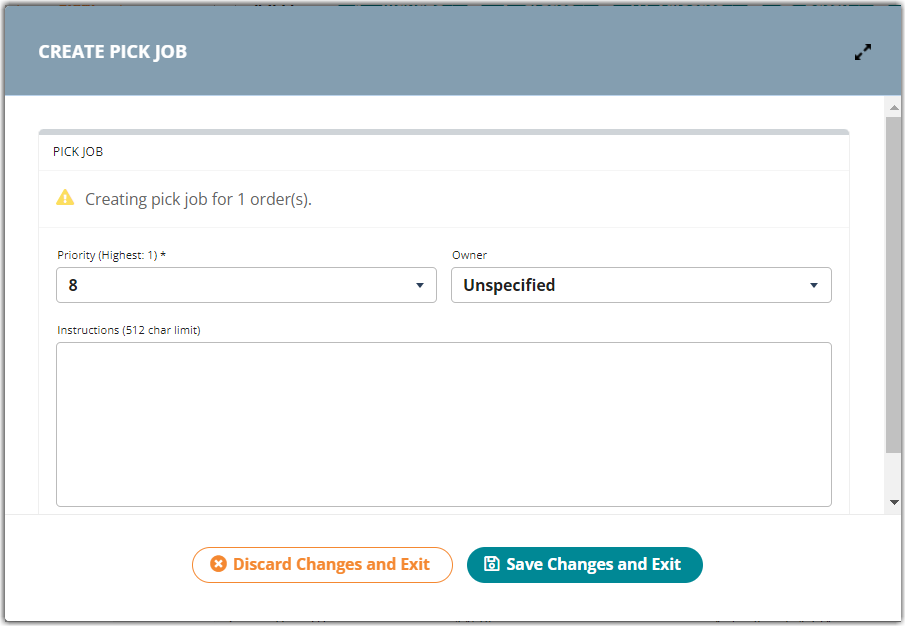
- Click Save Changes and Exit. You can then proceed to pick the job using SmartScan.
Step 3: Pick orders
The following diagram displays the overall layout of the multi-order pick process.

Once you create a multi-order pick job in 3PL Warehouse Manager, utilize SmartScan to complete the batch pick.
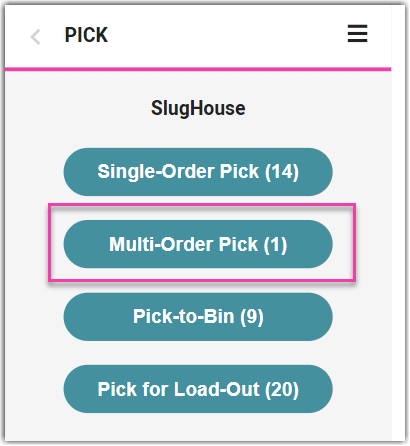
- Log in to SmartScan.
- Ensure the appropriate 'Warehouse' is selected from the drop-down list, then tap the Pick module. Note that the number displayed reflects the number of orders available to pick.
- Tap Multi Order Pick Job.
- Pick jobs are prioritized by specified priority and transaction number.
- To begin the order shown, tap Start Pick.
- To skip to the next prioritized order, tap Skip Pick. Once all orders are skipped, there is an option to 'Reset Pick' to the beginning of the pick job list.
- If a specific location is associated with the pick job, SmartScan directs you to proceed to that location.
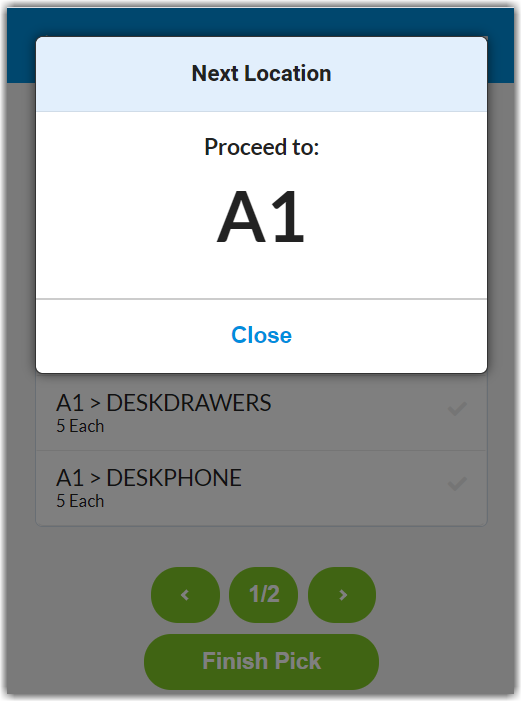
- Once the Pick SKU/UPC dialog box opens, scan the 'Location' and 'SKU/UPC' for the first item, as well as any required track-by's, such as Lot Number or Serial Number.
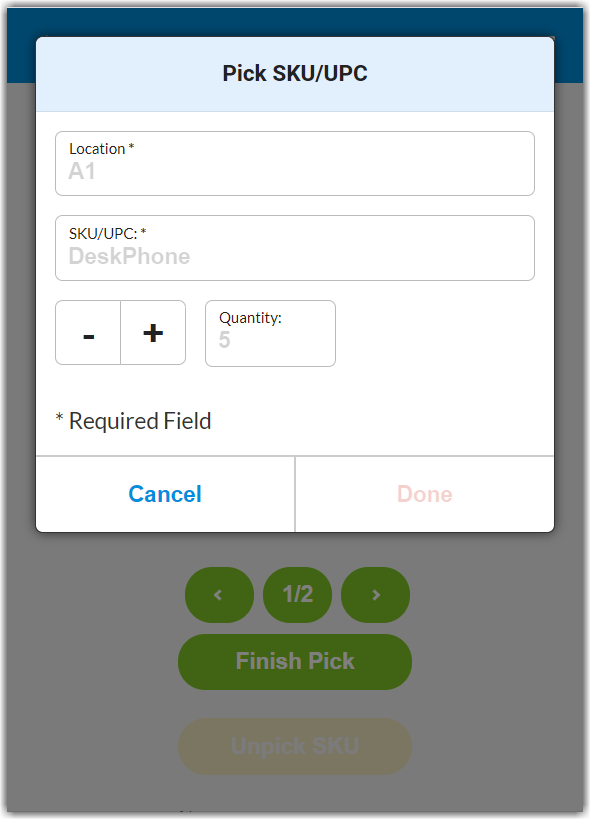
If you click Cancel to return to the pick list, you can search for a specific SKU, UPC, or MU by typing or scanning the respective value. SmartScan will open the first line item that matches the specified value.
- Enter the SKU 'Quantity', then tap Done. The line item shows a green check to indicate the inventory has been picked.
- Repeat Steps 5 and 6 until all items are picked. If you have multiple pages of line items to pick, tap one of the bottom arrows to navigate to the next or previous page of line items.
If you need to unpick an item, select the appropriate line item, then tap Unpick SKU. Repeat the pick as needed.
- Once you have completed the pick job, tap Finish Pick. A confirmation message appears.
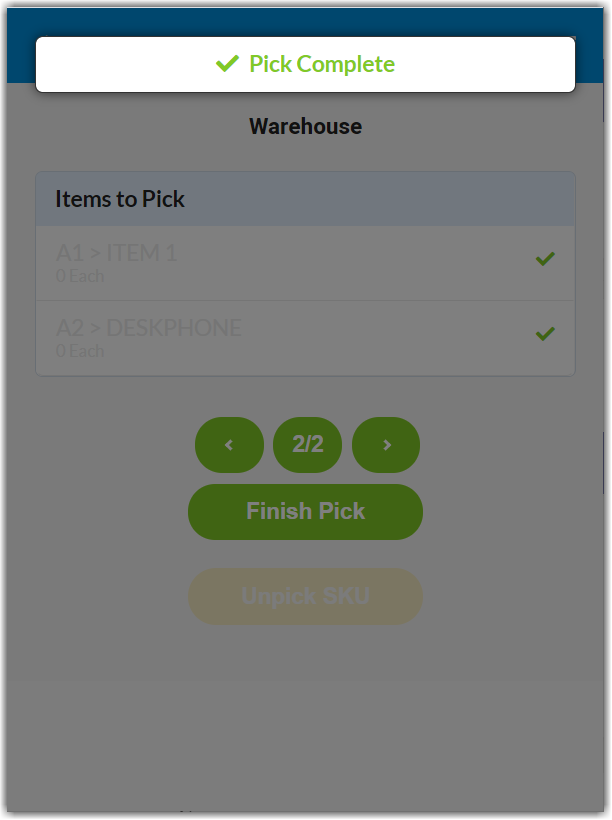
If you were unable to pick all items associated with the pick job and you have the 'Force Pick Complete' permission applied to your user role, the application allows you to pick the partial inventory and prompts you to specify a reason. Once selected, tap Complete to receive the confirmation message.
Now it's time to print your packing slips.
Step 4: Generate packing slips
3PL Warehouse Manager contains a standard packing slip to accompany the shipment. Packing slips provide the recipient of an order with a full list of the items dispatched from the warehouse.
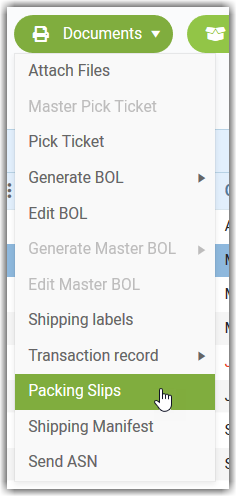
- To generate a packing slip, locate the relevant orders on the Find Orders page.
- Select the relevant orders from the grid, then click Documents > Packing Slips.
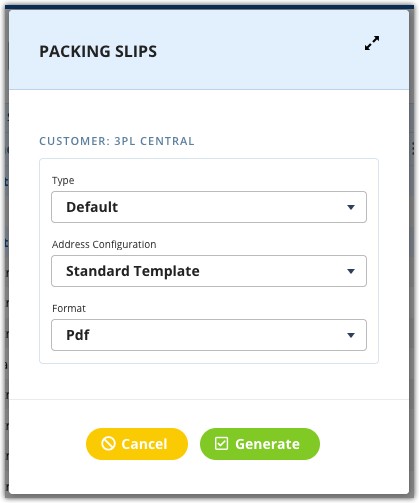
- Ensure the appropriate version, template, and export format is selected, then click Generate.
- Repeat for each order as needed.
Step 5: Print shipping labels
SmartParcel is a premium feature that allows you to generate carrier shipping labels directly from 3PL Warehouse Manager. Once a label is printed, your tracking number automatically populates in the Find Orders and Small Parcel grid.
If your shipping method depends on identifying the best carrier/service by carrier costs or delivery times, you may want to utilize our rate shopping feature, covered in Step 2 below. Please note that there may be instances where your customers require a specific carrier and service to be used. In those situations, rate shopping would not be utilized.
To print your shipping labels using SmartParcel, follow the steps below.
- Navigate to the Small Parcel space, then select the relevant orders from the grid.
-
Optional: Select Manage > Shop Cheapest Rate.
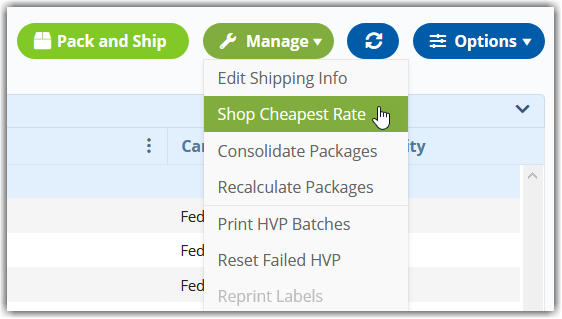
- A confirmation message appears to inform you that your orders had rates applied to them and which orders, if any, could not populate rates.
- Depending on the services you have listed in your orders and the rules you have configured in the system, the Carrier, Ship Service, and Small Parcel Ship Date columns of the grid populate with the cheapest shipping rate and estimated delivery date. (If these columns are not visible in the grid, you can select them under Options > Columns.)
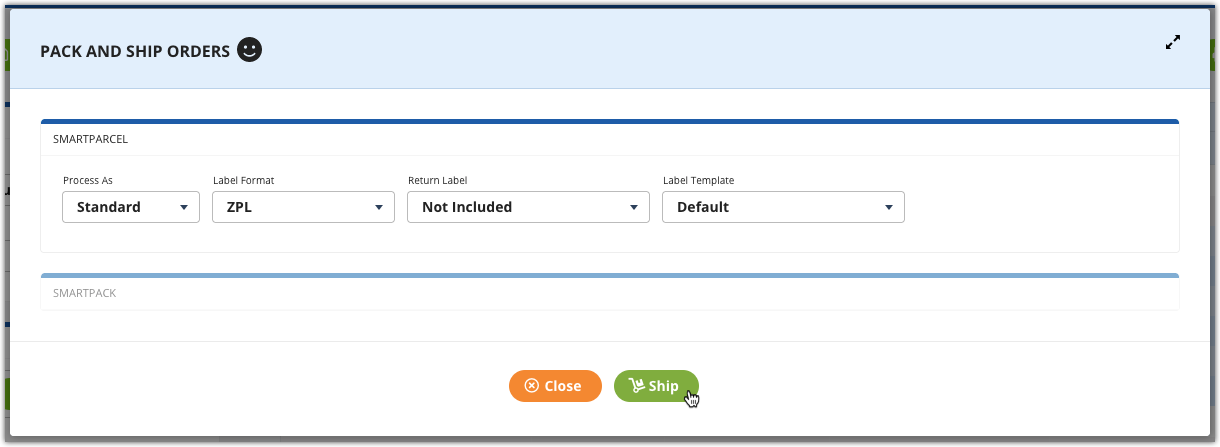
- Click Pack and Ship to select your label preferences.
- Select Standard for 'Process As', ZPL as the 'Label Format', then click Ship to generate the labels from your Zebra printer.
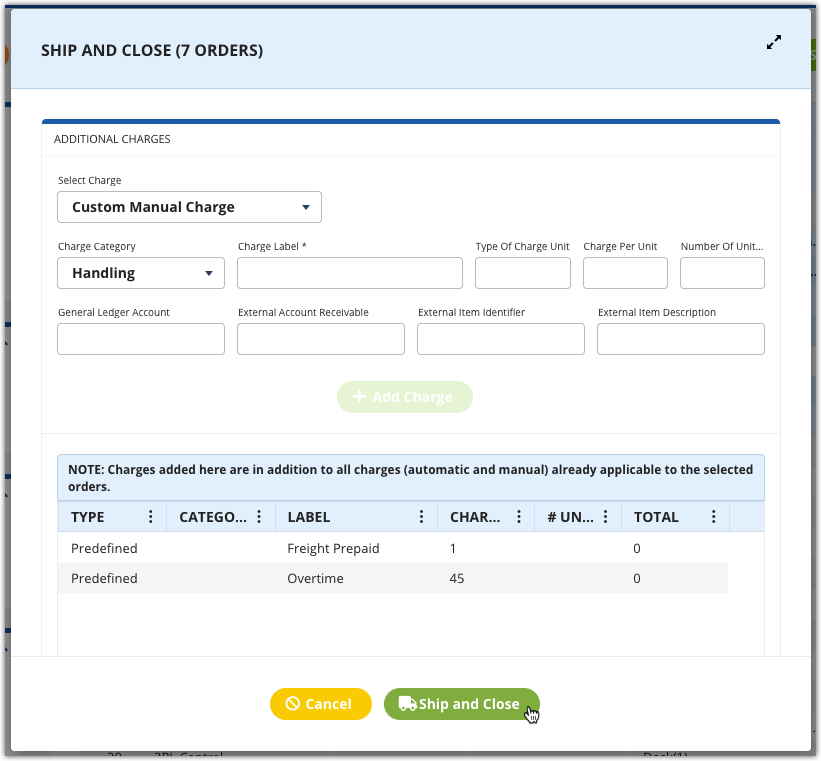
Step 6: Ship and close orders
Once you've picked your orders and generated the necessary documentation, it's time to ship them to their destination and mark them as closed from the Small Parcel homepage.
To do so, select the relevant orders from the grid, then click Manage > Close Orders to open the Ship and Close dialog.
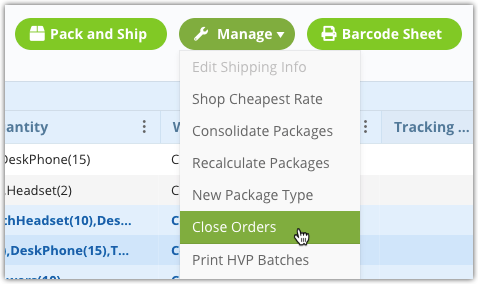
Note: You can also close orders via Manage > Ship and close from the Find Orders page in the WMS.
Add additional charges as needed, then click Ship and Close.