3PL Warehouse Manager

Updated on July 17th, 2023

  • Extensiv Hub
    Popular Articles Getting Started Using Hub Technical Issues & FAQs
  • 3PL Warehouse Manager
    Receiving Operations Inventory Management Shipping Operations System Configuration Scanning Operations Integrations Content Best Practice Resources Release Notes Popular Articles Troubleshooting Guides
  • Warehouse Manager
    Getting Started Admin Console Shipping Order Picking & Packing Receiving Customer Portal Cycle Counting Kit Building Managing Users Barcode Scanner Import/Export Integrations Barcoding Wave Picking Bin Move Mobile Receiving and Picking Settings Popular Articles
  • Order Manager
    Dashboard Orders Inventory Purchase Orders Shipments Customers Products Analytics Settings API API Integrations Accessing and Navigating Order Manager Error Messages Order Manager Popular Articles Accounting Integrations
  • Integration Manager
    Getting Started with Integration Manager General Support Troubleshooting API Documentation Extras & Addons Popular Articles Order Sources Order Destinations
  • FAQs
  • Support
  • Network Manager
    Getting Started Order Routing Management Technical Issues
  • Extensiv Release Notes
    Extensiv Hub 3PL Warehouse Manager Integrations Manager Warehouse Manager Order Manager
  • Billing Manager
    Getting Started Using Billing Manager
+ More
  • Help Center
  • 3PL Warehouse Manager
  • Shipping Operations
  • Order Creation
  • Shipping Operations
    • Order Creation
        • Creating Orders
        • Importing Orders
        • Entering Order Contact Details
        • Entering Order Line Items
        • Entering Carrier and Routing Information
        • Entering Custom Order Info
        • Entering Order Charges
    • Order Management
        • Understanding Order Statuses
        • Navigating the Find Orders Page
        • Generating Order Documents
        • Batch Order Processing
        • Adjusting Order Charges
    • Shipping Setups
        • Understanding the Parcel API
        • Connecting Carriers to Providers
        • Understanding Carrier Account Logic
        • Configuring Zebra Browser Print
        • Configuring Small Parcel Settings
        • Using Address Validation
        • Connecting Multiple Accounts for the Same Carrier
        • Managing Carrier Accounts
        • Configuring Fulfillment Invoicing
        • Using a Flat File Carrier Integration
        • Managing Shipping Carriers
        • Configuring a Drop Ship Address
        • Managing Ship-to Contacts
        • Managing Retailers
        • Importing Ship-to Contacts
        • Managing Ship Method Mappings
        • Managing 3rd-Party-Billing Contacts
    • Small Parcel Carriers
        • Shipping in Small Parcel Suite
        • Shipping with Amazon Buy
        • Shipping with APC
        • Shipping with Australia Post
        • Shipping with Canada Post
        • Shipping with Canpar
        • Shipping with DHL eCommerce
        • Shipping with DHL Express (AU)
        • Shipping with DHL Express (US)
        • Shipping with ePost Global
        • Shipping with FedEx
        • Shipping with FirstMile
        • Shipping with Globegistics
        • Shipping with Landmark
        • Shipping with OnTrac
        • Shipping with PARCLL
        • Shipping with Pitney Bowes Cross-Border Delivery
        • Shipping with Pitney Bowes Standard
        • Shipping with Purolator
        • Shipping with RR Donnelley
        • Shipping with SEKO Ecommerce
        • Shipping with Stallion Express
        • Shipping with UPS
        • Shipping with USPS (BUKU Ship)
        • Shipping with USPS (Endicia)
        • Shipping with USPS (Stamps.com)
        • Shipping with UPS Mail Innovations®
        • Shipping with FedEx One Rate®
        • Shipping with USPS (Pitney Bowes Expedited)
    • Packing Basics
        • Packing Orders
        • Managing Packaging
        • Configuring Scales for SmartPack
        • Creating Packing Slip Templates
        • Processing Packages
        • Understanding Automatic Package Generation
        • Consolidating Packages
        • Recalculating Packages
    • Order Processing
        • Navigating the Small Parcel Homepage
        • Packing in the Small Parcel Space
        • Shipping in the Small Parcel Space
        • Using High-Volume Processing (HVP) with SmartParcel
        • Printing Return Labels
        • Printing Combo Labels
        • Creating End of Day Requests (Manifesting)
        • Voiding Shipping Labels
        • Troubleshooting Blank Shipping Labels
    • Billing Best Practices for Shipping
        • Common Transactional Shipping Charges
        • Flat Order Processing Fees
        • Item-Based Handling Fees
        • Freight Fees
    • International Shipping
        • Shipping Internationally with SmartParcel
        • Capturing Digital Assets for International Shipping
        • Tax Identifiers in Small Parcel Suite
        • Package Description for Mexico Shipments

Entering Order Line Items

The Order Line Items section of the order allows you to allocate inventory to the order. If an order was created through an import file or pre-wired integration, these details should populate based on your predetermined connection settings.

This article reviews how to add and edit line items on an order.

To manually modify order allocations, you must have the following permission assigned to your user role: Orders Module > Order Allocation.

Please note that you cannot save a manually created order without allocating at least one line item.


Add line items

There are two different methods of adding line items, or allocating inventory, to an order: auto-allocating items and allocating specific inventory to an order. Each of these is explained below.

Auto-allocate items to an order

You would typically use this option if you want to allocate specific items to an order and ignore the system's default allocation logic. For more information, please see Understanding Allocation Logic.

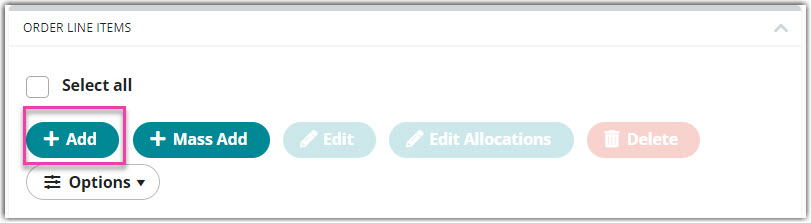
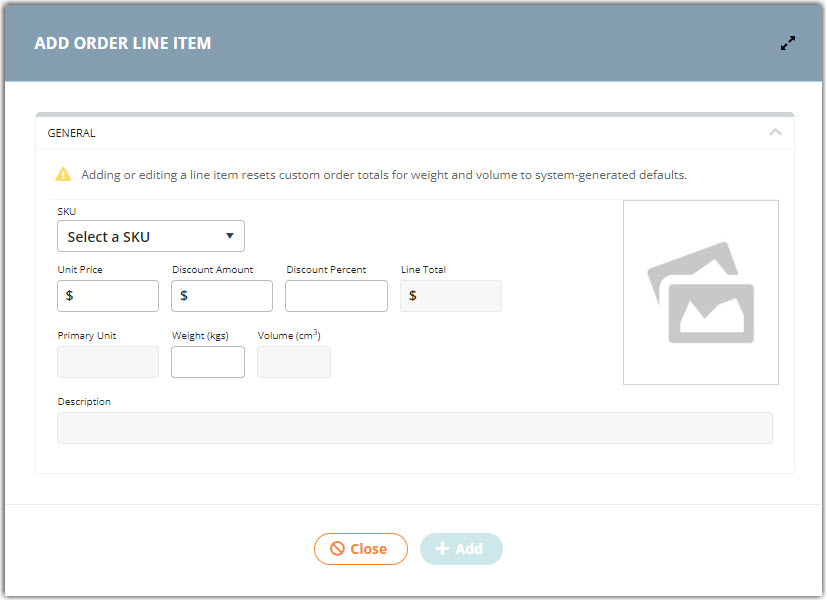
  1. To start, click Add, then select a SKU from the drop-down menu.
  2. Enter the Quantity of the SKU's primary packaging unit, as well as any other necessary fields, then click Add. A confirmation message appears, and the line item populates in the Order Line Items grid.

    To learn about creating ad-hoc custom fields for a line item, please see Entering Custom Order Info.

     
  3. Repeat Step 2 for each additional line item.
  4. Once complete, click Close to return to the order, then click Save to save your changes.

Allocate specific inventory to an order

If you have specific lot number or serial number attributes you need to add to an order, or you simply prefer to have visibility of existing inventory while you allocate, this manual allocation process gives you the ability to do so.

  1. To start, click Mass Add. The Mass Add dialog displays all SKUs in your warehouse that are available for allocation.
    ,
  2. To modify the results in the grid, drag-and-drop the columns to your preference, select a column to sort the grid, or use the filters on the left to specify the SKUs you wish to display.

    Click Options > Columns to adjust the columns that display in the grid.

     
  3. Decide whether you want to enter individual quantities or multi-select the total available quantities.
    • Individual quantities: Under the 'Primary Qty to Add' column, click inside of a row to enter the quantity of the listed SKU. Use < Tab > on your keyboard to proceed to the next row. Once you enter all necessary quantities, select < Enter > and click Add.
    • Total available quantities: Select a SKU from the grid. Use < Ctrl > or < Shift > on your keyboard to select additional SKUs. Click Add All Selected to add the full quantities of the selected SKUs.
  4. Click Close to return to your order.
  5. After you've added all line items to the order, click Save and a confirmation message appears.

    Smart User Tip: For more tips on how to use the Mass Add tool, feel free to reference our Mass Add interactive walkthrough guide. You can access the guide by selecting the blue tooltip badge next to the title in the Mass Add dialog, as well as in the Resource Center under 'Interactive Guides' from the Edit Order page.


Edit line items

There are two different methods of editing existing line items on an order: modifying the quantity & other general information and modifying the allocation of a line item. Each of these is explained below.

Edit quantity, price amounts, and custom field values

If you need to modify the quantity, price and discount amounts, weight, or custom field values for an existing line item, select the line item from the grid and click Edit. 

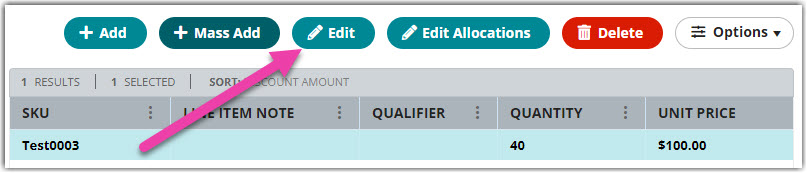
Make your changes, then click Save.

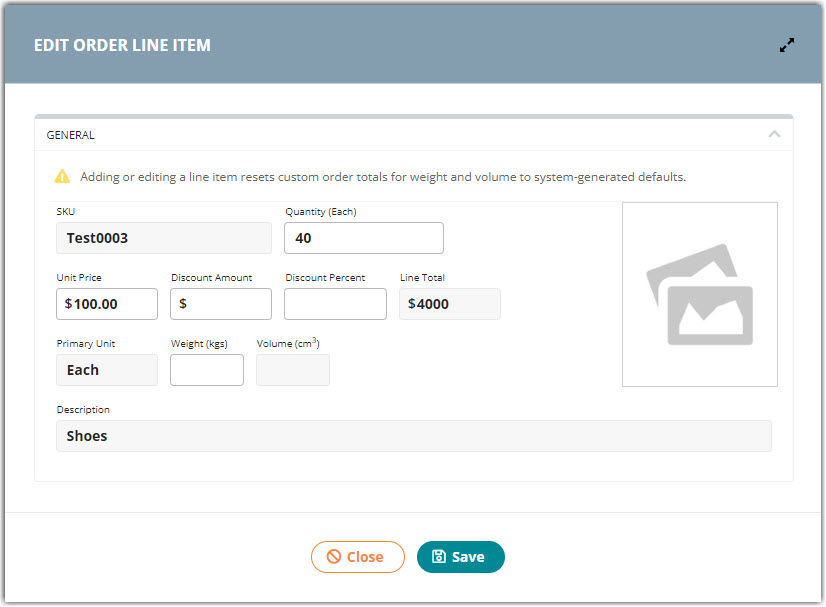
Repeat for each line item that requires editing. Once you've made all your changes, click Save at the top of the page.

Smart User Tip: To customize the line items grid, click the ellipsis next to a column header to specify which columns you'd like to display or to apply a filter to a specific column. You can also drag-and-drop the columns to your preferred sorting.


Edit the allocation of a line item

If you need to change the allocation of a given SKU, the Edit Allocations feature allows you to select items from the warehouse with the same SKU that may have different lot numbers, serial numbers, expiration dates, etc.

  1. To get started, select a line item from the grid, then click Edit Allocations. The Edit Allocations dialog box displays all available allocation options for the selected SKU.
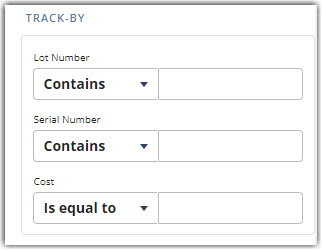
  2. If needed, use the filters in the left pane to locate an item associated with a specific track-by.
  3. Once you find the new stock you wish to allocate to the line item, click inside the relevant row under the 'Primary Units to Add' column, then enter the new amount(s) for the new allocation.
  4. Modify the amount(s) from the former allocation, then click Save. The entered amounts must match what the line item calls for in order to save your changes.

Once you've entered the order's line items, you can continue to the next section—Carrier and Routing. If you'd like to come back and edit the order at a later time, don't forget to click Save!


line items ordering

Was this article helpful?

Yes
No
Share additional feedback about this article

Related Articles

  • Navigating the Find Orders Page
  • Creating Orders
  • Entering Order Contact Details
  • Creating End of Day Requests (Manifesting)

Not finding the help you need?

Contact Support
Solutions
  • Solutions for Brands
  • Solutions for 3PLs
  • Solutions for 4PLs
  • Solutions for B2B
Products
  • Extensiv 3PL Warehouse Manager
  • Extensiv Warehouse Manager
  • Extensiv Order Manager
  • Extensiv Integration Manager
  • Extensiv Network Manager
Products
  • Customer Success
  • Implementation
  • Consulting
Ecosystem
  • Fulfillment Marketplace
  • Integrations
  • Partners
  • Become a Partner
Resources
  • Resource Library
  • Blog
  • Market Insights
  • What is a 3PL?
  • What is a 4PL?
  • What is a WMS?
  • Why a Cloud-based WMS?
  • Glossary
Help
  • Help Center
  • API Documentation
  • Extensiv Univerisity
  • Community
  • System Status
  • Extensiv Logo
  • 100 N Pacific Coast Hwy, Suite 1100, El Segundo, CA 90245
  • |
  • Contact Us:
  • 83-EXTENSIV 888.375.2368 (main)
  • |
  • 310.844.7570 (local)
  • Copyright © 2023 Extensiv
  • |
  • All rights reserved.
  • Privacy Policy
  • |
  • Terms of Service
  • Follow Us:
Expand