Understanding Class Tracking
If you want to organize your billing by warehouse or include billing item charge details on your invoices, you can utilize class tracking in QuickBooks Desktop. This article reviews how to set up classes in 3PL Warehouse Manager.
Feel free to review the guidelines below to get a better understanding of class tracking before enabling. However, before class values in 3PL Warehouse Manager can map to QuickBooks, please ensure the following requirements have been met:
- Classes are enabled and class values are defined in QuickBooks.
- See Intuit's guidelines here.
- Note that class values are case-sensitive and must match the WMS values exactly.
- Classes are enabled in 3PL Warehouse Manager.
- Must contact Technical Support and specify what you'd like enabled and for which customers.
Warehouse class
If you have multiple facilities, you can use the warehouse class to organize your invoices by warehouse in QuickBooks.
- Ensure all warehouse class values are set up correctly in QuickBooks.
- In 3PL Warehouse Manager, navigate to Warehouse > Manage Warehouse.
- Select a warehouse from the grid, then click Edit.
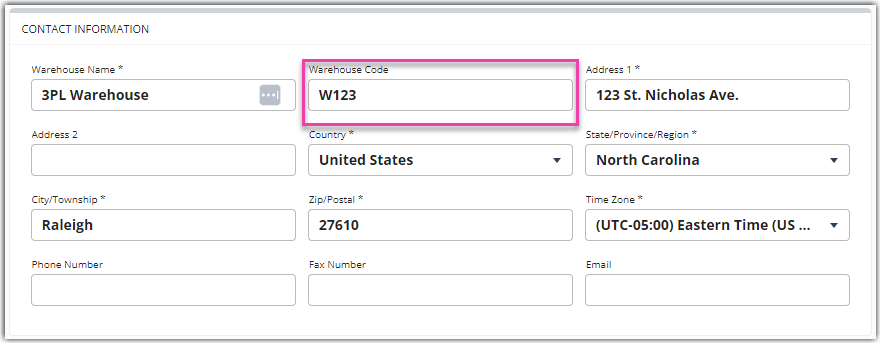
- Enter a value for 'Warehouse Code', then click Save.
This value is case-sensitive and must match the class value in QuickBooks exactly.

- Repeat Steps 3 and 4 for each warehouse.
Once saved, all future invoices exported to QuickBooks will include the specified warehouse code in the 'Class' field.
Line item class
If you specify an 'Item Description' value in your billing charge setup, you can include these charge details on your QuickBooks invoices.
Once enabled for a customer, all billing scripts for that customer must include an item description.
- Ensure all line item class values are set up correctly in QuickBooks.
- In 3PL Warehouse Manager, navigate to Customers > Billing Wizard > Per Transaction Billing Setup.
- Select a customer, then create a new or open an existing billing script.
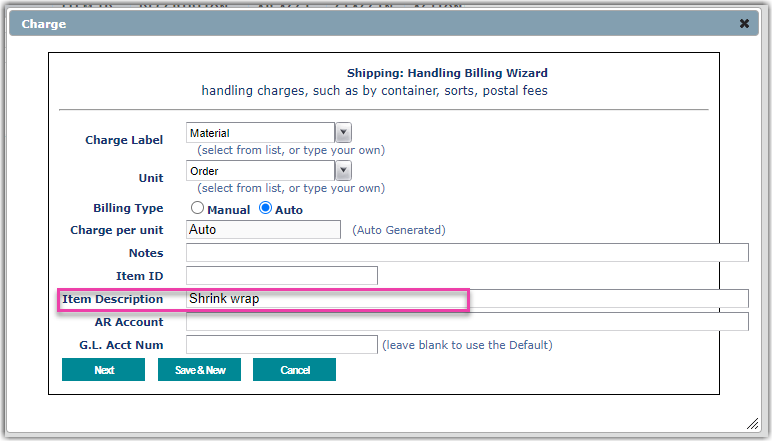
- Enter a value for 'Item Description', then click Next.
This value is case-sensitive and must match the class value in QuickBooks exactly.

- Select the appropriate billing script, then click Select.
- Enter or modify charge value(s) as needed, then click Save.
- Repeat Steps 3–6 for each billing charge per customer.
Once class values have been added to each charge, all future invoices exported to QuickBooks will include the specified item descriptions in the 'Class' column.
