Understanding QuickBooks Desktop Billing Setup
7.6 min read
|QuickBooks Desktop organizes your billing charges as services, which mirrors the charges configured in 3PL Warehouse Manager. The level of detail selected at the time of export in 3PL Warehouse Manager determines which details are reflected in your invoice when it exports into QuickBooks, as well as the method in which you set up your billing in QuickBooks.
Each level of detail for invoice exports in 3PL Warehouse Manager requires a different setup in QuickBooks. This article reviews how to set up each level of detail when connecting your WMS billing charges in QuickBooks Desktop.
Once you use the guidelines below to complete your billing setup in QuickBooks, see Exporting Invoices to QuickBooks for next steps.
If you need help organizing your QuickBooks software, please contact Intuit for assistance.
Step 1: Ensure your billing charges are configured the same
Before you set up your billing charges in QuickBooks Desktop, you must already have your billing scripts fully configured in 3PL Warehouse Manager's Billing Wizard. QuickBooks is case-sensitive, so it is highly recommended that you use a consistent naming scheme for each of your customer's billing charges.
The more unified your billing is in 3PL Warehouse Manager, the less you have to configure in QuickBooks.
If your billing charges do not mirror across 3PL Warehouse Manager and QuickBooks, you will receive a failure message when attempting to integrate your charges between the two systems.
Step 2: Understand which fields are relevant in QuickBooks
There are three Billing Wizard components that come to play in QuickBooks Online: transaction type, billing field, and billing unit. Each of these are reviewed below.
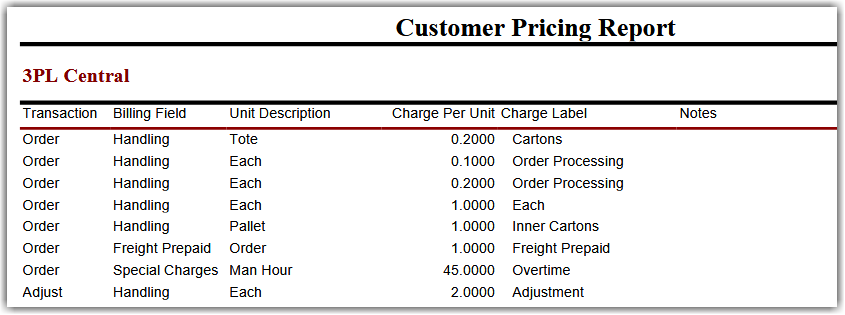
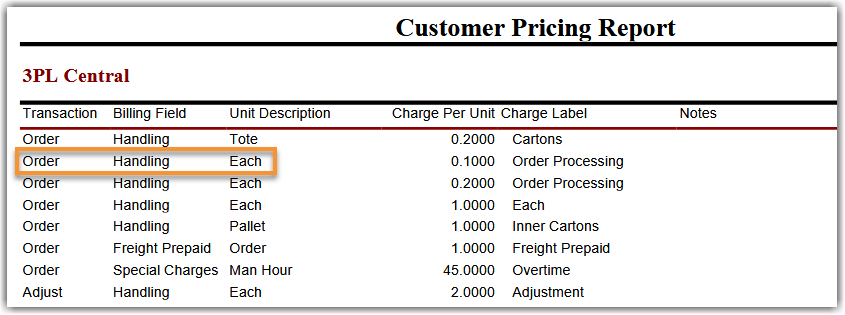
Generating a Customer Pricing Report via Reports > Management in the WMS also provides a helpful visualization of the QuickBooks mappings detailed below.
Transaction type
It's critical that you enter these transaction type values exactly as defined below when setting up your charges in Step 3, so be sure to keep these values on hand to avoid any unintended errors.
- For transactional charges, QuickBooks determines a charge's transaction type based on the transaction that was selected when configuring your transactional billing charges on the Per Transaction Billing Setup page in the Billing Wizard.
Each transaction type maps differently to QuickBooks—the mappings are as follows:- Shipping = Order
- Receiving = Inbound
- Assemblies = Assembly
- Adjustments = Adjust
- TransferIn = Adjust
- TransferOut = Adjust
- For system-calculated recurring storage charges, QuickBooks always maps Adjust as the transaction type.
- For system-calculated storage and handling charges, QuickBooks maps Inbound for the storage transaction type and Order as the handling transaction type.
Billing field
It's critical that you enter these billing field values exactly as defined below when setting up your charges in Step 3, so be sure to keep these values on hand to avoid any unintended errors.
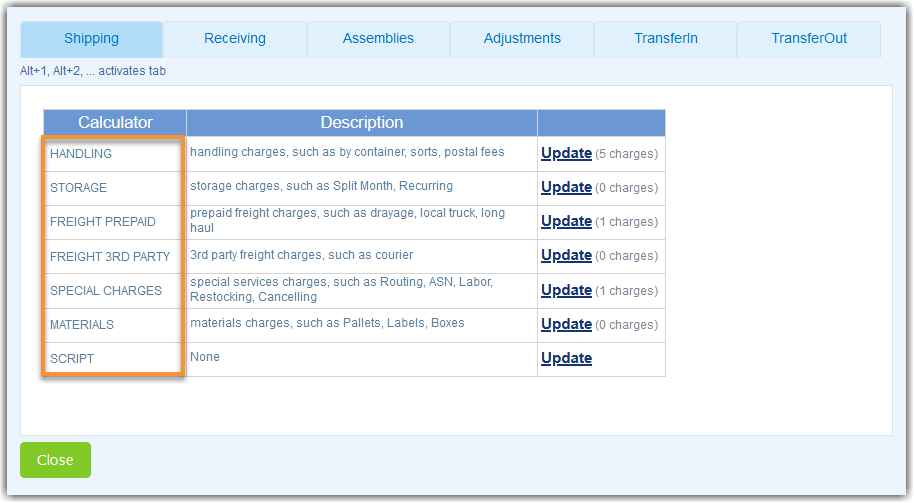
- For transactional charges, QuickBooks determines a charge's billing field based on the transaction type and billing category you selected when configuring your transactional billing charges on the Per Transaction Billing Setup page in the Billing Wizard.

- Each of these respectively display as the following in QuickBooks: Handling, Storage, Freight Prepaid, Freight 3rd Party, Special Charges, and Materials. (Script charges do not populate on invoices.)
- For system-calculated recurring storage charges, QuickBooks always maps Auto-calc Storage for the billing field.
- For system-calculated storage and handling charges, QuickBooks maps Auto-calc Storage as the billing field for storage upon receipt and Auto-calc Handling as the billing field for handling at time of shipment.
Billing unit
It's critical that you enter these billing unit values exactly as defined below when setting up your charges in Step 3, so be sure to keep these values on hand to avoid any unintended errors.
- For transactional charges, QuickBooks determines a charge's billing unit based on the type of unit specified when configuring your transactional billing charges on the Per Transaction Billing Setup page in the Billing Wizard.
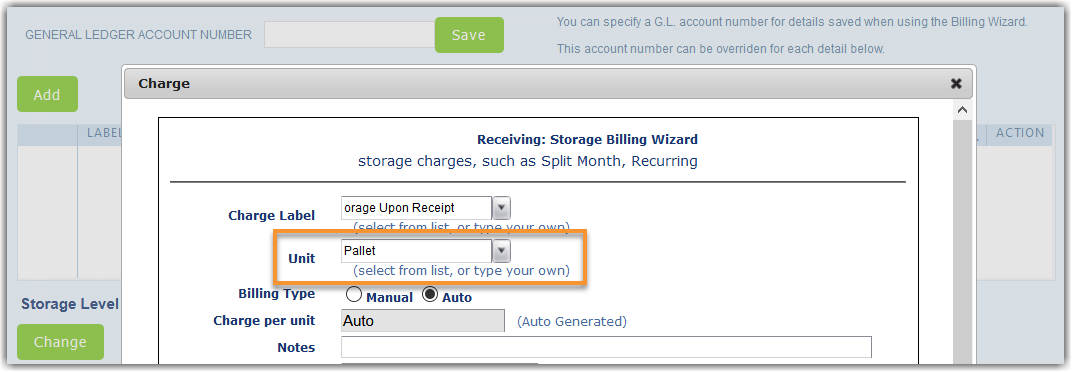
The type of unit varies depending on what you entered or selected at the time of setup. Because these values are not always predetermined by the system (you can enter your own value), this is the most common pain point for billing setup in QuickBooks. - For system-calculated recurring storage charges, QuickBooks maps the counting unit defined in the Recurring Storage section of your item setup.
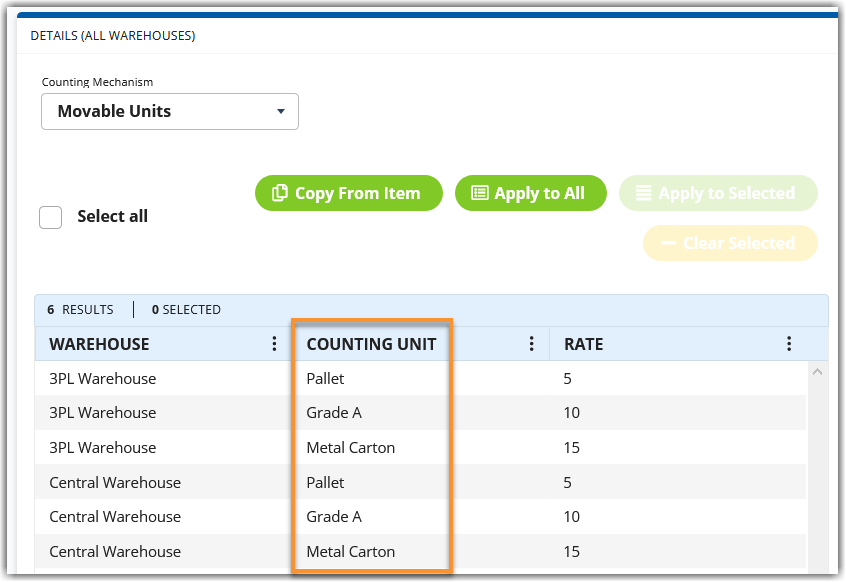
- For system-calculated storage and handling charges, QuickBooks maps the unit type defined in the Storage/Handling Charges section of your item setup or on the System-Calculated Storage and Handling Charge Setup page in the Billing Wizard.
Once you set up your billing charges in QuickBooks, they can apply to all of your customers. However, if you have units defined as "pallets" for one customer and "Pallets" for another customer, you would have to create separate setups for these in QuickBooks because of their strict case-sensitivity. That's why it's critical to keep your billing scripts consistent across all of your customers in 3PL Warehouse Manager.
Step 3: Set up your Services for each level of detail
Before setting up your services for transactional and system-calculated charges, it's important to understand each level of detail available when exporting an invoice from 3PL Warehouse Manager into QuickBooks.
- Simple invoice exports send over the billing field only and groups all charges into one line in QuickBooks.
- Detailed invoice exports send over a transactional level of the invoice, including the billing field and transaction type, and groups all charges into two lines by transaction type.
- Ultra Detailed invoice exports send over the most level of detail on an invoice, including the billing field, transaction type, and billing unit. This level of detail is necessary for ensuring your BOL fee goes to a specific General Ledger account in QuickBooks.
- Units Only invoice exports send over the billing unit only and groups all charges into one line in QuickBooks.
Once you understand the different levels of detail, you can create your services depending on the level of detail you need to export into QuickBooks. The number of services you need to create varies depending on how many levels of detail you anticipate on utilizing, as well as the number of different billing charges set up in 3PL Warehouse Manager.
If you're unsure which level of detail to utilize, we recommend setting up your services as Ultra Detailed. This is the most common level of detail since it pulls over the most information. Because this is the highest level of detail, completing the setup for Ultra Detailed enables you to export any level of detail.
Transactional charges
The steps below use the following billing script example to review how to map transactional charges, which are set up in the WMS under Customers > Billing Wizard > Per Transaction Billing Setup, to QuickBooks:
- Navigate to Lists > Item List in QuickBooks.
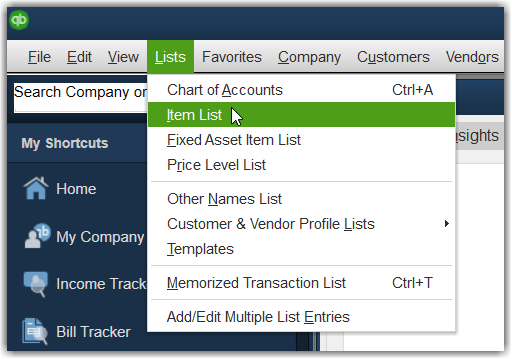
- If needed, maximize the Item List window for easier viewing.
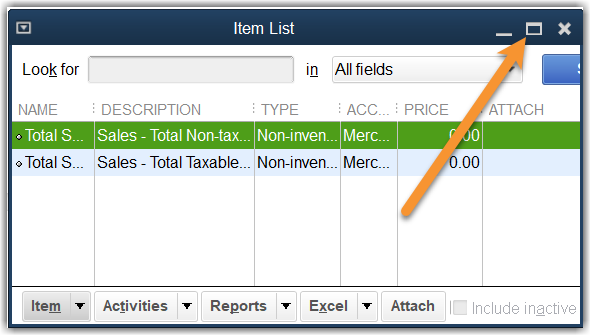
- At the bottom-left of the window, click Item > New, then select Service as the item 'Type'.
- For 'Item Name/Number', enter the billing field exactly as it is displayed in the definitions above (e.g., Handling), then assign an 'Account'.
- Note: QuickBooks requires you to specify an 'Account' value. This can be changed at a later time.
- If you want to only export Simple invoices, click OK to complete your setup, then proceed to Step 10. Otherwise, continue following the steps below to set up additional levels of detail.
- If you want to only perform Units Only exports, enter the billing unit exactly as it displays in the WMS as the 'Item Name/Number', click OK to complete your setup, then proceed to Step 10.
- Click Next, then enter the transaction type exactly as it displayed in the definitions above (e.g., Order) for 'Item Name/Number'.
- Click the Subitem of selection box, then select the service you entered in Step 4 from the drop-down list (e.g., Handling).
- If you do not want to export Ultra Detailed invoices, click OK to complete your setup, then proceed to Step 10.
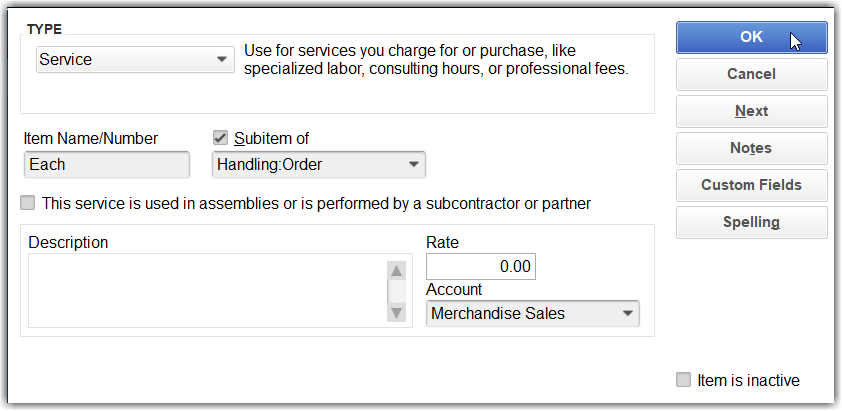
- Click Next, then enter the billing unit exactly as it appears in the WMS (e.g., Each) for 'Item Name/Number'.
- Click the Subitem of selection box, then select the service you entered in Step 6 from the drop-down list (e.g., Order—which displays as "Handling:Order" once selected).
- Click OK to complete your detail setups.
- Repeat Steps 3–9 for each unique transaction type, billing field, and billing unit set up for each of your customers being billed through QuickBooks.
Once you set up each of the unique billing configurations as items in QuickBooks, you can export transactional invoices at your preferred level of detail.
System-calculated recurring storage charges
Before you can set up recurring storage charges in QuickBooks, you want to make sure these charges are already set up in 3PL Warehouse Manager at the customer-level under Customers > Billing Wizard > System-Calculated Storage and Handling Setup > Recur. Storage, as well as at the item-level under Items > Manage Items.
The customer-level setup in the Billing Wizard defines when your customers are charged for recurring storage, whereas the item-level setup defines the rates at which your customers are charged.
- At the bottom-left of the Item List window, click Item > New, then select Service as the item 'Type'.
- For 'Item Name/Number', enter Auto-calc Storage, then assign an 'Account'.
- Note: QuickBooks requires you to specify an 'Account' value. This can be changed at a later time.
- If you want to only export Simple invoices, click OK to complete your setup, then proceed to Step 8. Otherwise, continue following the steps below to set up additional levels of detail.
- Click Next, then enter Adjust for 'Item Name/Number'.
- Click the Subitem of selection box, then select Auto-calc Storage from the drop-down list.
- If you do not want to export Ultra Detailed invoices, click OK to complete your setup, then proceed to Step 8.
- Click Next, then enter the billing unit exactly as it appears in the WMS (e.g., Each) for 'Item Name/Number'.
- Click the Subitem of selection box, then select Auto-calc Storage > Adjust from the drop-down list.
- Click OK to complete your detail setups.

- Repeat Steps 1–7 for each unique billing unit set up for each of your customers being billed for recurring storage.
Once you set up each of the unique billing configurations as items in QuickBooks, you can export recurring storage invoices at your preferred level of detail.
After you confirm your recurring storage charges via Admin > Recurring Storage Charges, you can find your recurring storage charges as an adjustment invoice on the Manage Invoices page using the 'Adj. and Storage' filter.
System-calculated storage and handling charges
Storage and handling charges are often not utilized if you have already configured transactional charges that account for the storage and handling of your customer's items.
If you do utilize storage and handling charges, you must have them configured in 3PL Warehouse Manager before you can proceed with setting them up in QuickBooks. These charges are set up at both the customer-level and the item-level.
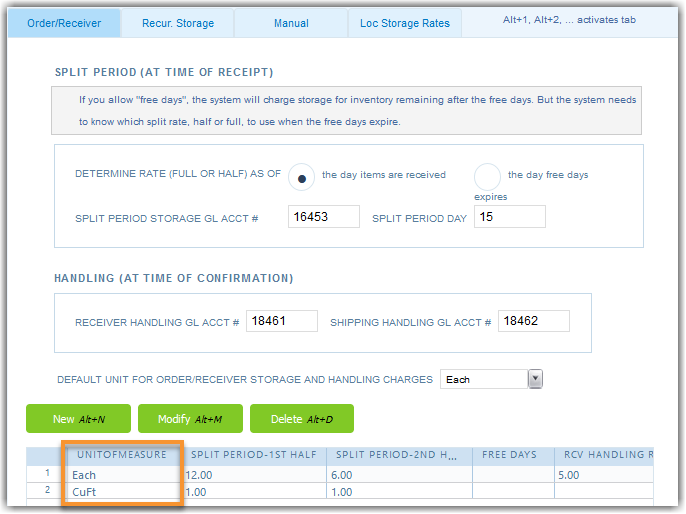
Customer-level storage and handling charges are set up under Customers > Billing Wizard > System-Calculated Storage and Handling Setup > Order/Receiver. If you select an existing billing unit and click Modify or click New to create a new billing unit, you can see the values that map to QuickBooks.
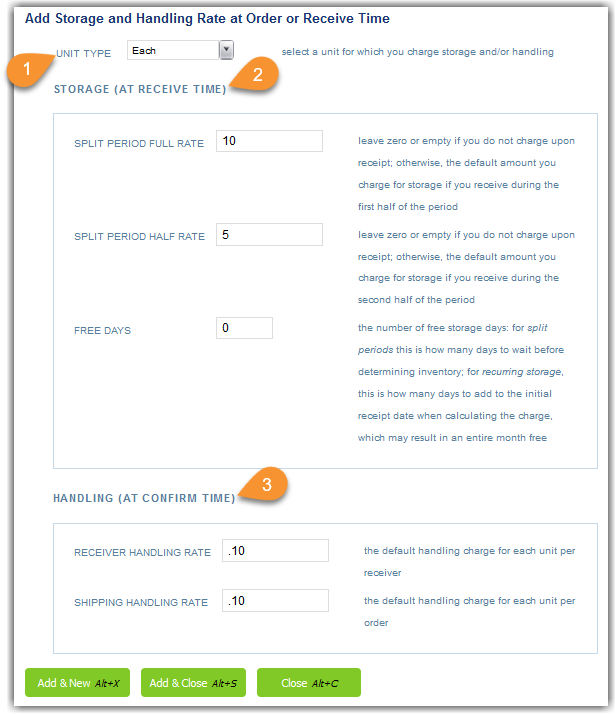
- The 'Unit Type' is considered the service charge. For the examples below, we use the 'Each' unit.
- The Storage (At Receive Time) section is used to define storage charges that apply when your warehouse receives the specified unit. Once set up in QuickBooks, this would display as 3PL:Auto-calc Storage:Inbound:Each Charge for an Ultra Detailed export.
- The Handling (At Confirm Time) section is used to define handling charges that apply when your warehouse ships the specified unit. Once set up in QuickBooks, this would display as 3PL:Auto-calc Handling:Order:Each Charge for an Ultra Detailed export.
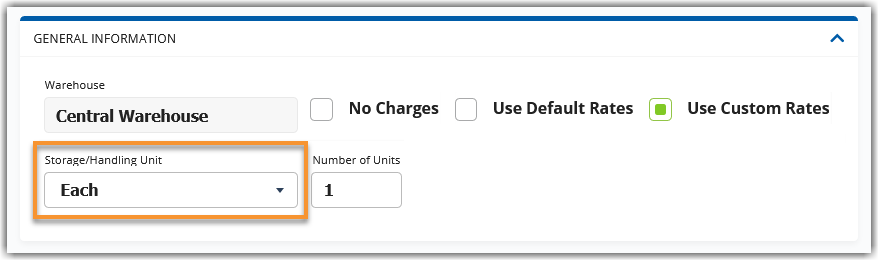
These QuickBooks mappings also apply to the item-level setup under Items > Manage Items > Storage/Handling Charges, except the billing unit is captured in the 'Storage/Handling Unit' field.
A handling charge set up for the Each billing unit is used for the example below.
- At the bottom-left of the Item List window, click Item > New, then select Service as the item 'Type'.
- For 'Item Name/Number', enter Auto-calc Handling, then assign an 'Account'.
- Note: QuickBooks requires you to specify an 'Account' value. This can be changed at a later time.
- If you want to only export Simple invoices, click OK to complete your setup, then proceed to Step 8. Otherwise, continue following the steps below to set up additional levels of detail.
- Click Next, then enter Order for 'Item Name/Number'.
- Click the Subitem of selection box, then select Auto-calc Handling from the drop-down list.
- If you do not want to export Ultra Detailed invoices, click OK to complete your setup, then proceed to Step 8.
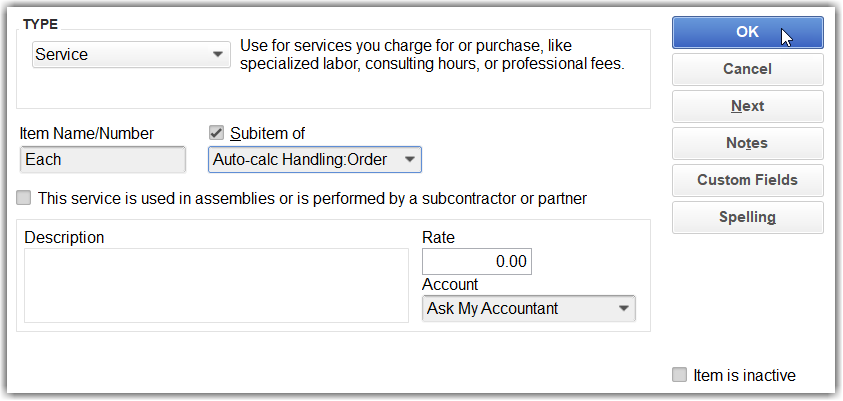
- Click Next, then enter the billing unit exactly as it appears in the WMS (e.g., Each) for 'Item Name/Number'.
- Click the Subitem of selection box, then select Auto-calc Handling > Order from the drop-down list.
- Click OK to complete your detail setups.
- Repeat Steps 1–7 for each unique billing unit set up for each of your customers being billed for storage and handling.
Once you set up each of the unique billing configurations as items in QuickBooks, you can export storage and handling invoices at your preferred level of detail.