
Getting Started with Credential Management
A REST API credential consists of a set of unique keys, known as Client ID and Client Secret values, and is required to access our external REST API. The REST API Credentials page in 3PL Warehouse Manager's Support Portal allows you to provision your own REST API keys so that external developers can access the WMS instantly without having to send a request to Extensiv.
This article reviews how to generate a REST API credential in the Support Portal and provide your developer with REST API access keys.
Before proceeding with the instructions below, you must create a customer user in 3PL Warehouse Manager for each set of keys with a name that reflects the respective credential (e.g., TechDinamics Integration). You must assign the relevant customers to this user, but the level of access you assign to this user does not impact the permissions of the API keys.
This helps provide visibility to which specific connection created a transaction for auditing purposes, and the 3PL Warehouse Manager ID associated with this user.
To find the 3PL Warehouse Manager ID, follow these steps:
- Go to Users in Extensiv Hub.
- Search for the user in the Users list.
- Locate the 3PL Warehouse Manager ID on the right side of the page.

If you don't have access to this page or would like to grant Support Portal access to additional warehouse users, please contact your Customer Success Manager and reference our Support Portal FAQs to learn more.
Step 1: Create REST API keys
- Log in to Extensiv.
- Open 3PL Warehouse Manager.

- Click Support in the upper-right corner.

- In the Support Portal, select Manage Credentials (Beta). The Manage Credentials grid displays all existing REST API credentials.

- To generate new REST API keys, click Create New Credential, select External REST/Developer from the drop-down list, then click Continue.

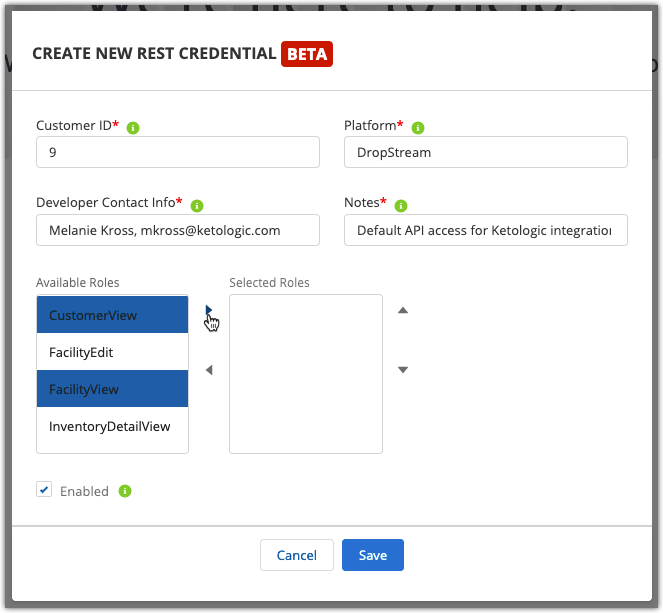
- Complete each field.
-
Customer ID: Specifies which customer this set of keys is used for—this value must match the Customer ID listed in the Manage Customers grid within the WMS
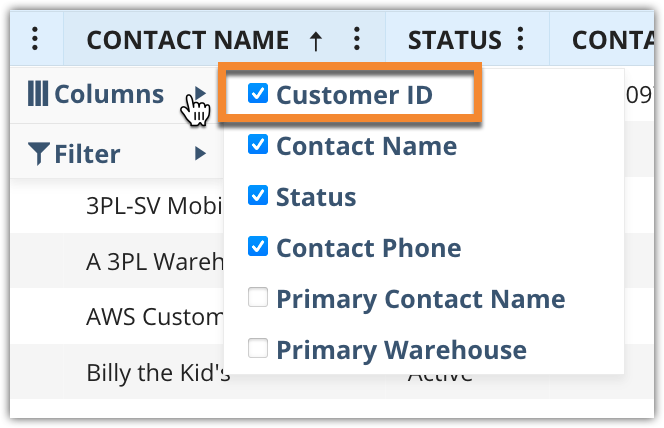
If you don't see the Customer ID values displayed in the Manage Customers grid, you can add this column by clicking the ellipsis next to a column header, selecting Columns, then choosing Customer ID.
- Platform: Specifies the platform for which the credential will be used
- Developer Contact Info: Specifies the contact information for the developer responsible for using the credential
- Notes: Requires you to enter additional information associated with the keys, such as additional contact information, context, or anything else helpful to your operations
- Enabled: When checked, indicates that the credential is active (or will be active once saved)
-
Customer ID: Specifies which customer this set of keys is used for—this value must match the Customer ID listed in the Manage Customers grid within the WMS
- Choose which roles you wish to assign to the developer by selecting one or more roles from the 'Available Roles' list (using < Ctrl > to multi-select), then clicking the top arrow pointing to the 'Selected Roles' list. Each role is defined below.
If you're unsure which roles to assign, the following combination of roles is typically assigned to developers: CustomerView, FacilityView, InventoryDetailView, ItemView, OrderEdit, OrderView, OrderWrite, ReadPropertiesThirdParty, and ReceiverView.
- C2CTransfer: Allows for inventory transfers between customers
- CustomerEdit: Allows for modification of customer details
- CustomerNotifyEdit: Allows for modification of customer notifications
- CustomerNotifyView: Allows for retrieval of customer notifications
- CustomerView: Allows for retrieval of customer details
- FacilityEdit: Allows for modification of warehouse details
- FacilityView: Allows for retrieval of warehouse details
- InventoryDetailView: Allows for retrieval of inventory details
- InventoryEdit: Allows for modification of inventory availability
- InventoryRead: Allows for retrieval of inventory availability
- ItemEdit: Allows for modification of item details
- ItemView: Allows for retrieval of item details
- OrderConfirm: Allows for closing of orders
- OrderEdit: Allows for modification of Open and Complete orders
- OrderImport: Allows for importing of orders
- OrderView: Allows for retrieval of order details
- OrderWrite: Allows for canceling and splitting of orders
- PoEdit: Allows for modification of purchase order transactions
- PoView: Allows for retrieval of purchase order transactions
- ReadPropertiesThirdParty: Allows for retrieval of carriers, items, and capacity types
- ReceiverEdit: Allows for modification of receipt details
- ReceiverView: Allows for retrieval of receipt details
- WritePropertiesThirdParty: Allows for retrieval of detailed carrier information
- Once you've selected the appropriate roles, click Save to generate the REST API keys.
Step 2: Distribute keys to your developer
Once saved, the REST API keys populate in the Credentials Management grid and you can distribute the credential to your developer for immediate use.
- Select the newly generated credential from the grid, then copy the Client ID and Client Secret values. Be sure to also take note of the Customer ID noted for the credential and the relevant Warehouse ID (found in the WMS under Warehouse > Manage Warehouse).
- Review our article on Providing REST API Access.
- Provide your developer with the newly generated API keys; the relevant 3PL Warehouse Manager ID, Customer ID, and Warehouse ID values; and the article linked in Step 2.
Deprovisioning REST APIs
In order to deprovision REST API access you need to email API@extensiv.com with the connection you want to deactivate.
Contact your CSM about any invoicing matters caused by deactivating connections.