Order Management

Updated on July 4th, 2023

  • Extensiv Hub
    Popular Articles Getting Started Using Hub Technical Issues & FAQs Extensiv's Ideas Portal
  • 3PL Warehouse Manager
    Receiving Operations Inventory Management Shipping Operations System Configuration Scanning Operations Integrations Content Best Practice Resources Release Notes Popular Articles Troubleshooting Guides
  • Warehouse Management
    Getting Started Admin Console Shipping Order Picking & Packing Receiving Customer Portal Cycle Counting Kit Building Managing Users Barcode Scanner Import/Export Integrations Barcoding Wave Picking Bin Move Mobile Receiving and Picking Settings Popular Articles Reporting
  • Order Management
    Dashboard Orders Inventory Purchase Orders Shipments Customers Products Analytics Settings API API Integrations Accessing and Navigating Order Manager Error Messages Order Manager Popular Articles Accounting Integrations
  • Integration Management
    Getting Started with Integration Manager General Support Troubleshooting Extras & Addons API Documentation Popular Articles Order Sources Order Destinations
  • FAQs
  • Network Manager
    Getting Started Order Routing Management Technical Issues Shopping Carts Settings Settings, Products, and Orders
  • Billing Manager
    Getting Started Using Billing Manager
  • Release Notes
    Extensiv Sandbox Extensiv Extensiv Hub 3PL Warehouse Manager Integration Management Warehouse Management Order Management Billing Manager
  • Fulfillment Marketplace
    Getting Started
  • Sandbox
    Getting Started
+ More
  • Help Center
  • Order Management
  • Settings
  • Sales Channels
  • Settings
    • General
        • Tax Identifiers
        • Company Time Zone Setting
        • Ruby Has 3PL Integration
        • Disable the Inventory Update From Extensiv Order Manager to All Sales Channels
        • Update My Profile
        • How to Enable Out of Stock Control for eBay Sales Channels
        • Company Info and Additional Account Settings
        • How to View Your Extensiv Order Manager Invoices
        • Installing an App from the Order Manager App Store
        • How To Remove an App in Order Manager
        • Configuring Shipping Presets
    • Sales Channels
        • Walmart Fulfillment Services - WFS
        • Setting Up Shipment & Carrier Mappings for Your Sales Channels
        • WFS Workflow
        • Amazon Cancellation Settings
        • Amazon Pacific Time Orderbot Setting
        • Shopify Locations
        • Shopify Tags
        • Enable or Disable Extensiv Order Manager Email Notifications to Your Customers
        • Deactivating a Sales Channel
        • Adding Shopify as a Sales Channel
        • Viewing a Sales Edit Channel's History
        • Adding Amazon as a Sales Channel
        • Adding eBay as a Sales Channel
        • Adding Newegg as a Sales Channel
        • Steps in Adding Walmart as a Sales Channel
        • Editing Sales Channels
        • Adding a Manual Sales Channel
        • How to Exclude a Warehouse From Pushing Inventory to a Sales Channel
        • Assigning a Packing Slip and/or Email Template to your Sales Channel
        • Adding Sales Channels
        • Reactivating Sales Channels
    • Webhooks
        • Order Payment Webhook
        • Shopify Auto-Subscribing Webhooks
        • Shopify Product Update / Product Edit Webhook
        • Shopify Refund Webhook (e-commerce Orders)
        • Order Creation Webhook
        • Shopify Cancellation Webhook
        • Shopify Fulfillment Webhook
        • Shopify Refund Webhook - POS Orders
        • Shopify Product Deletion Webhook
        • BigCommerce Webhook
    • Shipping Providers
        • Adding Shipping Providers
        • Adding DHL eCommerce as a Shipping Provider
        • How to Add Express 1 as a Shipping Provider
        • Adding Amazon Buy Shipping as a Shipping Provider
        • UPS Mail Innovations Services
        • Customizing Shipping Services and Package Types Per Shipping Provider
        • FedEx ETD
        • Deactivate or Reactivate a Shipping Provider
        • Adding FedEx as a Shipping Provider
        • Adding Stamps.com as a Shipping Provider
    • Vendors
        • Adding a Dropship Vendor to Extensiv Order Manager
        • How to Automatically Create Purchase Orders For Dropship Orders
        • Creating or Updating Vendors
    • Warehouses & Vendors
        • Instructional Video - Creating Warehouses & Warehouse Settings
        • Use Component Inventory Setting for Bundles and Kits
        • Setting a Dropship Template and Fulfilling Orders with a P.O.
        • Configuring Dropship Vendor FTP
        • Configuring Shipping Label Print Format Options
        • Can I have additional order information populated on my Shipping label?
        • Configuring a Dropship Vendor
        • How to Configure the Order Export File for FTP Connections
        • Search for Vendors
        • Inventory Dependent Warehouses
        • Updating the Address/Return Address for Your Warehouse
        • Deactivating a Warehouse in Extensiv Order Management
        • Creating and Configuring Warehouses in Extensiv Order Manager
        • Pick List Settings
        • Setting Up Document Print Settings
        • Setting Up Domestic Backup Warehouses
        • FTP Inventory Import for a 3PL
        • Setting Up a Warehouse's International Rank
        • How do I connect Extensiv Order Manager with Deliver?
        • Setting Up a 3PL Warehouse
        • Creating an In-House Warehouse
    • Orderbots
        • Adding Order Item to Order Orderbot Action
        • Understanding Apply Best Rate vs Cheapest Rate Orderbots
        • Support for Shopify's Additional Details
        • Orderbots filtered by zip code range
        • Postal Zones in Extensiv Order Manager
        • Mark Order as Shipped Orderbot
        • Automating Orders to Fulfill from a Specific Warehouse
        • Editing an Orderbot
        • Deactivating an Orderbot in Extensiv Order Manager
        • Replace Address Orderbot
        • Creating an Orderbot
        • Orderbots - Complete List of Filters & Actions
        • Orderbot: Set order weight and dimensions based on products
        • Orderbot: Using Hold the order for and Mark Order as Shipped
        • Commonly Used Orderbots
    • Templates
        • Email Verification Process for P.O. & E-mail Templates
        • Email Templates
        • Setting up Packing Slip Templates
        • Setting up Purchase Order (PO) Templates

WFS Workflow

WFS Workflows can only be created for Walmart sales channels enabled for Walmart Fulfillment Services. Learn about the WFS integration and how to set it up here.

How to Create a WFS Workflow (Walmart Inbound Shipment)

1.Navigate to the Orders Module.

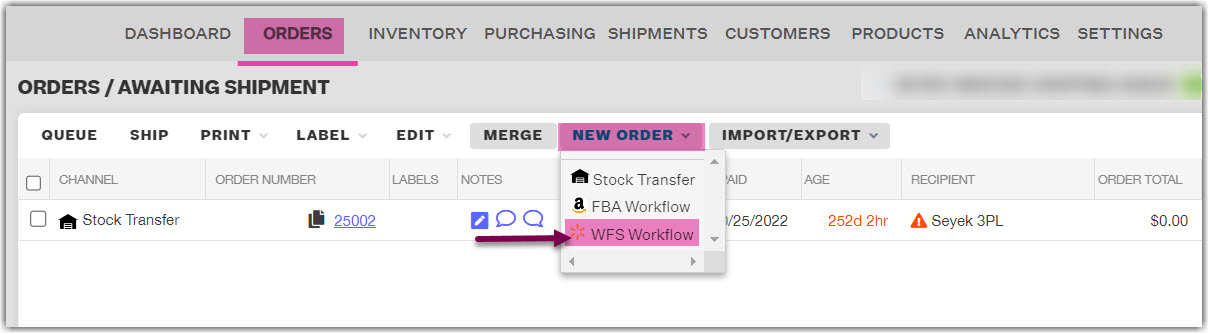
2. Click New Order. Select WFS Workflow from the dropdown list.

3. Fill out all fields in the WFS Workflow Order window. All are required and can be edited in the next window up until the workflow is created.

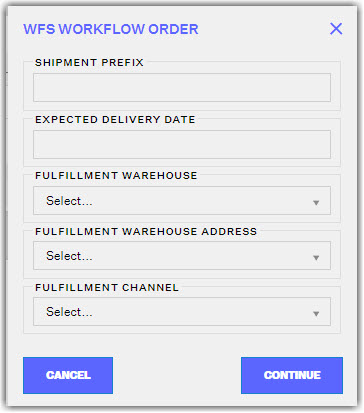
4. The Shipment Prefix input is required and will populate before the automatically assigned shipment name Walmart generates. This value must be unique from past shipments - you cannot create two shipments with the same prefix. Currently, only US-based warehouses are supported as the "Fulfillment Warehouse" or the Source Warehouse.

5. Click Continue.

6. In the Edit WFS Workflow Order window you will need to indicate which products you want to ship, what quantity of each, and how you want to package them. The Forecast Filters allow you to customize the options available to only show a certain range of products. Only FBW-enabled products that Order Manager has successfully connected with will show here. These are the products that have a Fulfilled by Channel value of "Yes".

7. Use the checkboxes to select items from the top half of the window to Add to your shipment shown in the bottom half of the window. Use the checkboxes and the Remove button if you no longer want to include an item shown in the shipment.

8. Ensure that the Qty indicates how many total units you will send of the product. The Qty/Case amount should be "1" for individually-packaged items or another number for items that are not packaged individually. ie: "2" for items that are packaged 2 together instead of individually.

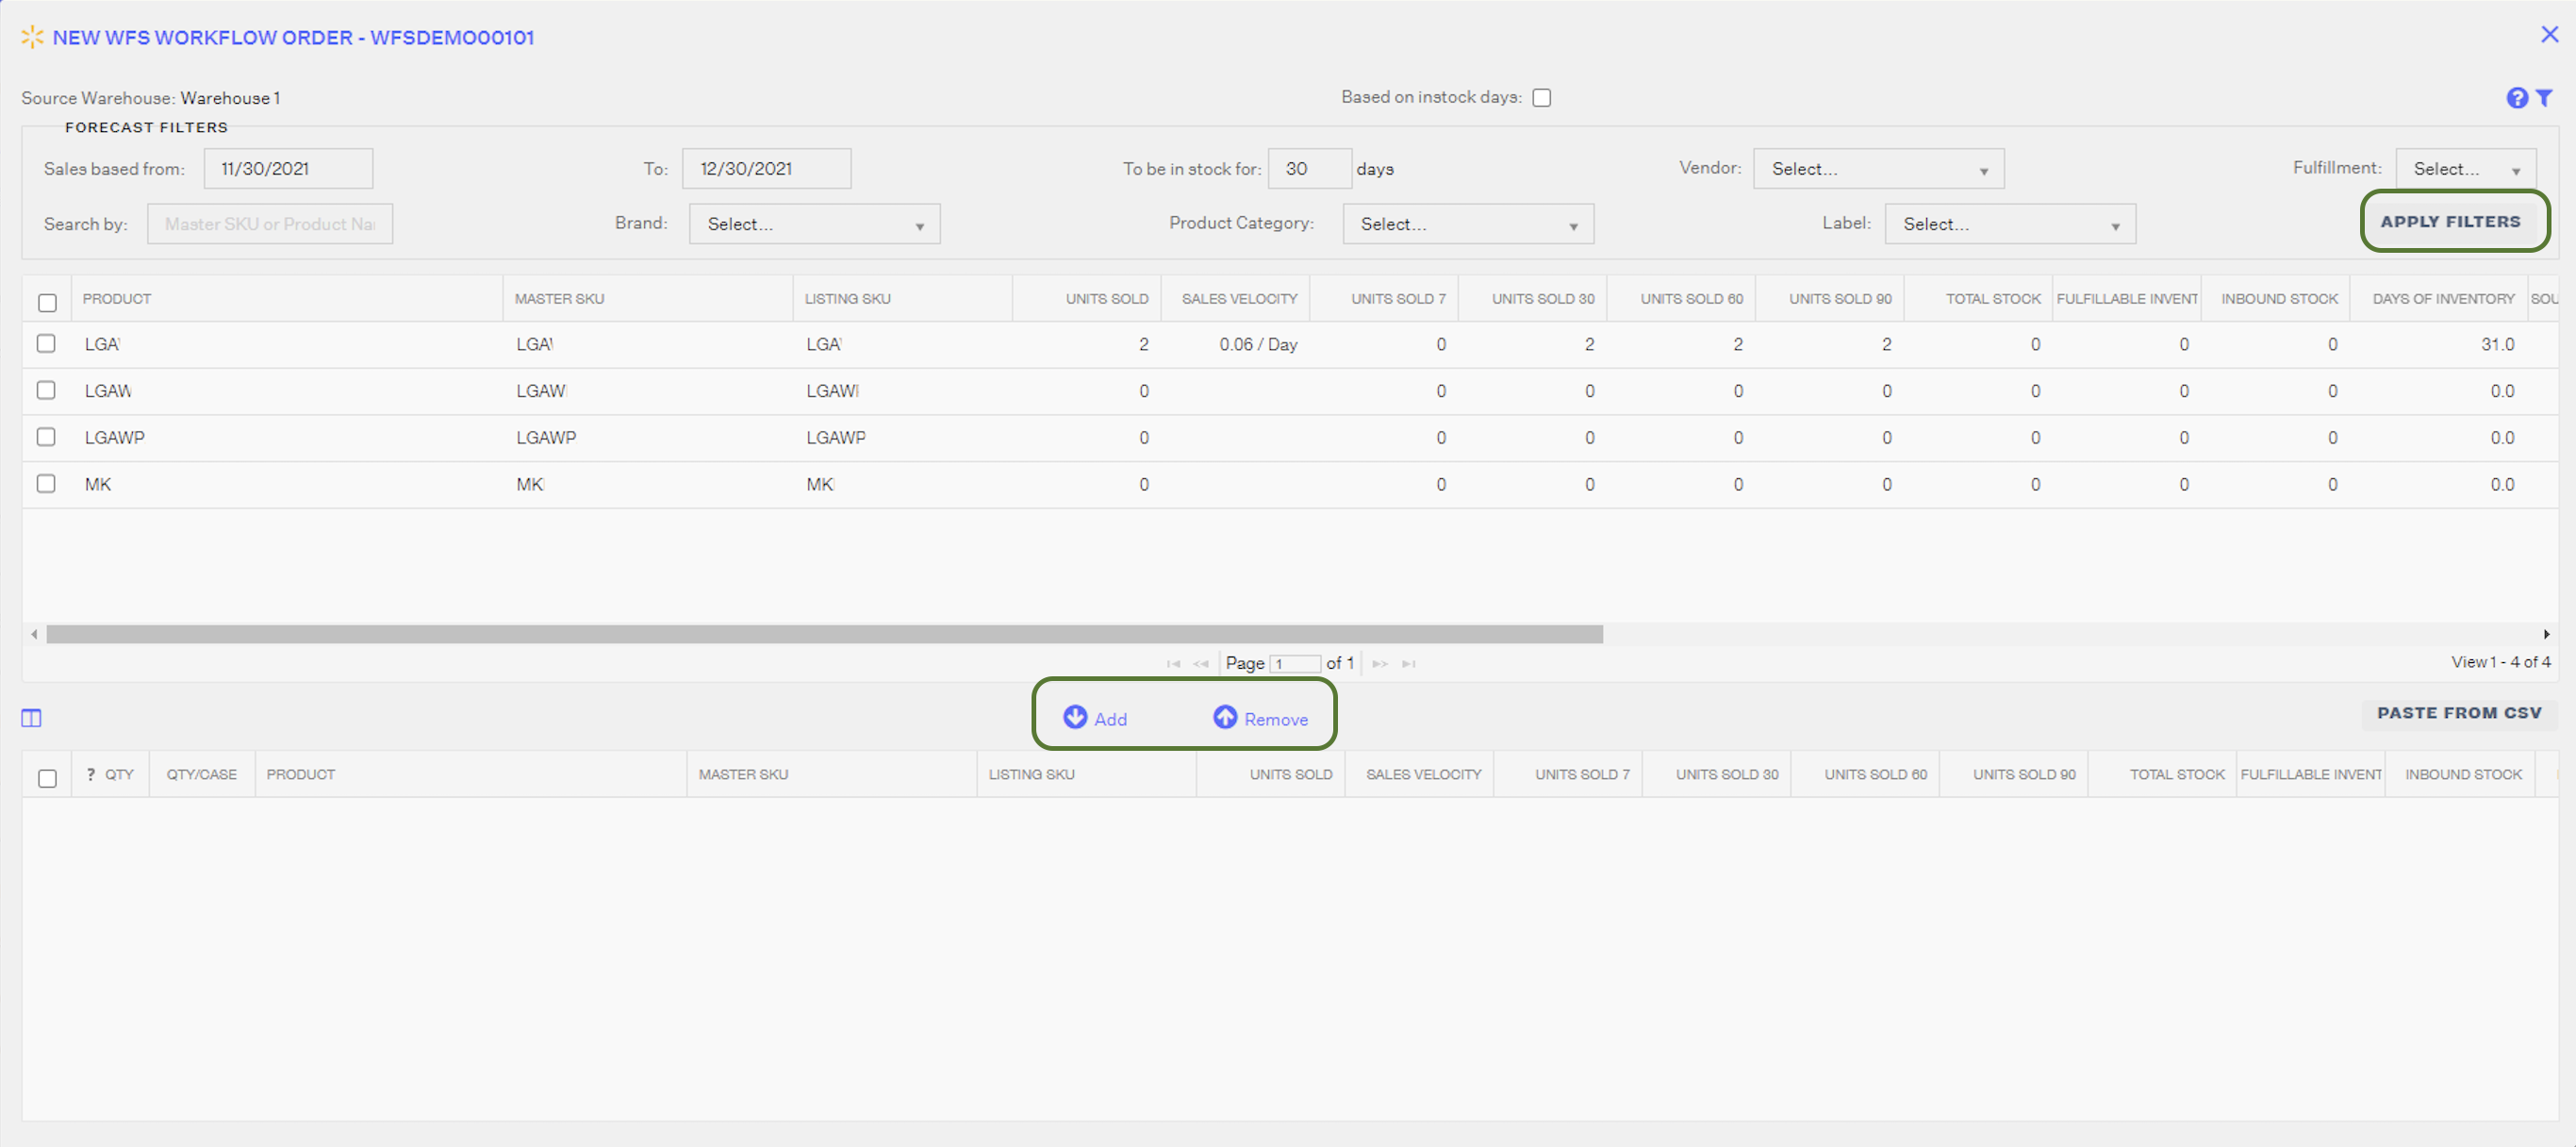
Click Create if you are ready to submit and create your shipment workflow now. Otherwise, click Save & Close to save your progress and return to it later.

  1. Saved but not Created workflows can be found under the Pending Shipment Plan order status.
  2. Inventory will be allocated to your workflow order if you Save & Close or if you click Create.
  3. After clicking the Create button, an inbound shipment will be created. Your workflow order can be found under the Awaiting Shipment order status.
    1. It is possible that Walmart will dictate the shipment to split into multiple shipments destined for different fulfillment center locations. This is entirely up to Walmart's API.
    2. Before shipping a WFS Workflow, you can edit its order item quantity - to either add a maximum of 6 units added or remove all units of an item.)
  4. You can cancel a workflow if you no longer intend to ship it. If you need to cancel a shipped workflow, you can still void its shipment and then cancel the original workflow order.
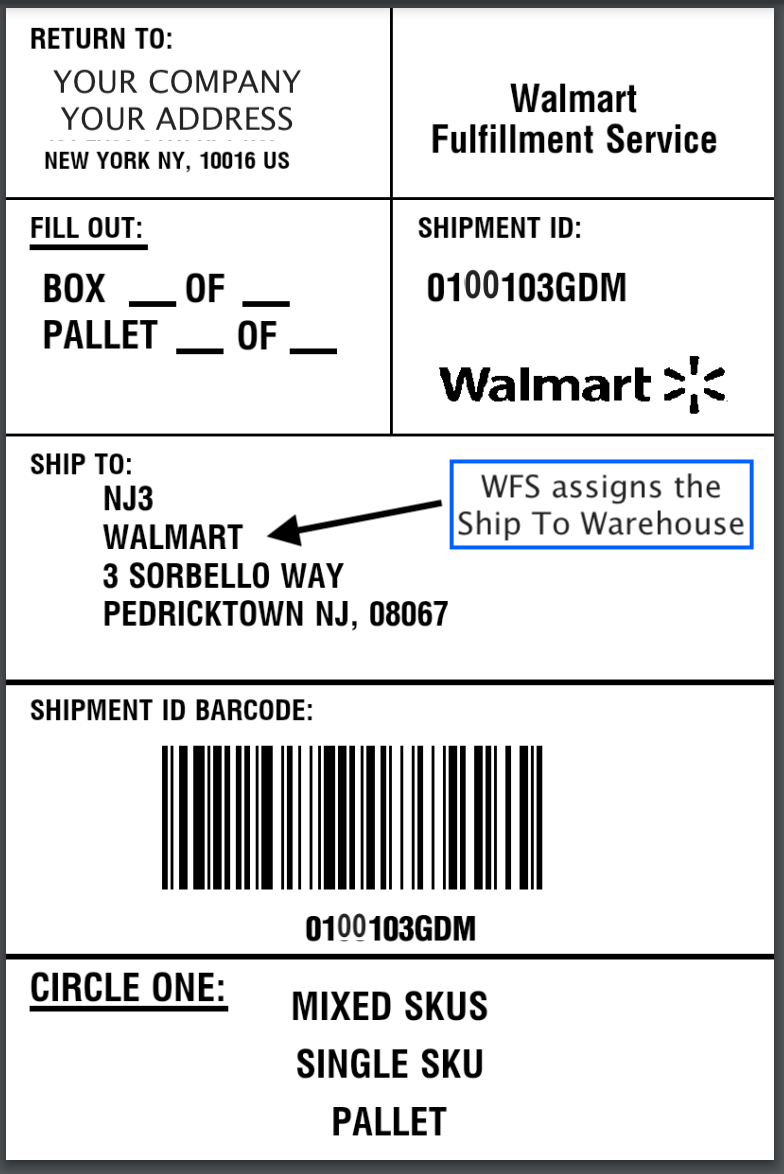
  5. For WFS Workflow orders in an Awaiting Shipment or Shipped status, you can download and print the inbound shipment label provided by Order Manager. This is not a shipping label. It is used for receiving purposes in Walmart's receiving warehouse.
  6. Ship the workflow, either directly from Order Manager or externally. If your workflow is shipped externally, make sure to mark the workflow order in Order Manager as shipped. After shipping your workflow, tracking information will be sent to WFS.
  7. The shipped workflow order/inbound shipment's status will be monitored in Order Manager in the Inventory Module in the Transfers tab.


Extensiv University

Gain deeper insights and learn more about Order Manager with our online course at Extensiv University.
process automation workflow automation

Was this article helpful?

Yes
No
Share additional feedback about this article

Related Articles

  • Adding DHL eCommerce as a Shipping Provider
  • Setting Up Billing/Inventory Allocation Zones
  • Uploading Inventory via Spreadsheet

Not finding the help you need?

Contact Support
Solutions
  • Solutions for Brands
  • Solutions for 3PLs
  • Solutions for 4PLs
  • Solutions for B2B
Products
  • Extensiv 3PL Warehouse Manager
  • Extensiv Warehouse Manager
  • Extensiv Order Manager
  • Extensiv Integration Manager
  • Extensiv Network Manager
Products
  • Customer Success
  • Implementation
  • Consulting
Ecosystem
  • Fulfillment Marketplace
  • Integrations
  • Partners
  • Become a Partner
Resources
  • Resource Library
  • Blog
  • Market Insights
  • What is a 3PL?
  • What is a 4PL?
  • What is a WMS?
  • Why a Cloud-based WMS?
  • Glossary
Help
  • Help Center
  • API Documentation
  • Extensiv Univerisity
  • Community
  • System Status
  • Extensiv Logo
  • 100 N Pacific Coast Hwy, Suite 1100, El Segundo, CA 90245
  • |
  • Contact Us:
  • 83-EXTENSIV 888.375.2368 (main)
  • |
  • 310.844.7570 (local)
  • Copyright © 2023 Extensiv
  • |
  • All rights reserved.
  • Privacy Policy
  • |
  • Terms of Service
  • Follow Us:
Expand