Order Management

Updated on February 1st, 2024

  • Extensiv Hub
    Popular Articles Getting Started Using Hub Technical Issues & FAQs Extensiv's Ideas Portal
  • 3PL Warehouse Manager
    Receiving Operations Inventory Management Shipping Operations System Configuration Scanning Operations Integrations Content Best Practice Resources Release Notes Popular Articles Troubleshooting Guides
  • Warehouse Management
    Getting Started Admin Console Shipping Order Picking & Packing Receiving Customer Portal Cycle Counting Kit Building Managing Users Barcode Scanner Import/Export Integrations Barcoding Wave Picking Bin Move Mobile Receiving and Picking Settings Popular Articles Reporting
  • Order Management
    Dashboard Orders Inventory Purchase Orders Shipments Customers Products Analytics Settings API API Integrations Accessing and Navigating Order Manager Error Messages Order Manager Popular Articles Accounting Integrations
  • Integration Management
    Getting Started with Integration Manager General Support Troubleshooting Extras & Addons API Documentation Popular Articles Order Sources Order Destinations
  • FAQs
  • Network Manager
    Getting Started Order Routing Management Technical Issues Shopping Carts Settings Settings, Products, and Orders
  • Billing Manager
    Getting Started Using Billing Manager
  • Release Notes
    Extensiv Sandbox Extensiv Extensiv Hub 3PL Warehouse Manager Integration Management Warehouse Management Order Management Billing Manager
  • Fulfillment Marketplace
    Getting Started
  • Sandbox
    Getting Started
+ More
  • Help Center
  • Order Management
  • Settings
  • Warehouses & Vendors
  • Settings
    • General
        • Tax Identifiers
        • Company Time Zone Setting
        • Ruby Has 3PL Integration
        • Disable the Inventory Update From Extensiv Order Manager to All Sales Channels
        • Update My Profile
        • How to Enable Out of Stock Control for eBay Sales Channels
        • Company Info and Additional Account Settings
        • How to View Your Extensiv Order Manager Invoices
        • Installing an App from the Order Manager App Store
        • How To Remove an App in Order Manager
        • Configuring Shipping Presets
    • Sales Channels
        • Walmart Fulfillment Services - WFS
        • Setting Up Shipment & Carrier Mappings for Your Sales Channels
        • WFS Workflow
        • Amazon Cancellation Settings
        • Amazon Pacific Time Orderbot Setting
        • Shopify Locations
        • Shopify Tags
        • Enable or Disable Extensiv Order Manager Email Notifications to Your Customers
        • Deactivating a Sales Channel
        • Adding Shopify as a Sales Channel
        • Viewing a Sales Edit Channel's History
        • Adding Amazon as a Sales Channel
        • Adding eBay as a Sales Channel
        • Adding Newegg as a Sales Channel
        • Steps in Adding Walmart as a Sales Channel
        • Editing Sales Channels
        • Adding a Manual Sales Channel
        • How to Exclude a Warehouse From Pushing Inventory to a Sales Channel
        • Assigning a Packing Slip and/or Email Template to your Sales Channel
        • Adding Sales Channels
        • Reactivating Sales Channels
    • Webhooks
        • Order Payment Webhook
        • Shopify Auto-Subscribing Webhooks
        • Shopify Product Update / Product Edit Webhook
        • Shopify Refund Webhook (e-commerce Orders)
        • Order Creation Webhook
        • Shopify Cancellation Webhook
        • Shopify Fulfillment Webhook
        • Shopify Refund Webhook - POS Orders
        • Shopify Product Deletion Webhook
        • BigCommerce Webhook
    • Shipping Providers
        • Adding Shipping Providers
        • Adding DHL eCommerce as a Shipping Provider
        • How to Add Express 1 as a Shipping Provider
        • Adding Amazon Buy Shipping as a Shipping Provider
        • UPS Mail Innovations Services
        • Customizing Shipping Services and Package Types Per Shipping Provider
        • FedEx ETD
        • Deactivate or Reactivate a Shipping Provider
        • Adding FedEx as a Shipping Provider
        • Adding Stamps.com as a Shipping Provider
    • Vendors
        • Adding a Dropship Vendor to Extensiv Order Manager
        • How to Automatically Create Purchase Orders For Dropship Orders
        • Creating or Updating Vendors
    • Warehouses & Vendors
        • Instructional Video - Creating Warehouses & Warehouse Settings
        • Use Component Inventory Setting for Bundles and Kits
        • Setting a Dropship Template and Fulfilling Orders with a P.O.
        • Configuring Dropship Vendor FTP
        • Configuring Shipping Label Print Format Options
        • Can I have additional order information populated on my Shipping label?
        • Configuring a Dropship Vendor
        • How to Configure the Order Export File for FTP Connections
        • Search for Vendors
        • Inventory Dependent Warehouses
        • Updating the Address/Return Address for Your Warehouse
        • Deactivating a Warehouse in Extensiv Order Management
        • Creating and Configuring Warehouses in Extensiv Order Manager
        • Pick List Settings
        • Setting Up Document Print Settings
        • Setting Up Domestic Backup Warehouses
        • FTP Inventory Import for a 3PL
        • Setting Up a Warehouse's International Rank
        • How do I connect Extensiv Order Manager with Deliver?
        • Setting Up a 3PL Warehouse
        • Creating an In-House Warehouse
    • Orderbots
        • Adding Order Item to Order Orderbot Action
        • Understanding Apply Best Rate vs Cheapest Rate Orderbots
        • Support for Shopify's Additional Details
        • Orderbots filtered by zip code range
        • Postal Zones in Extensiv Order Manager
        • Mark Order as Shipped Orderbot
        • Automating Orders to Fulfill from a Specific Warehouse
        • Editing an Orderbot
        • Deactivating an Orderbot in Extensiv Order Manager
        • Replace Address Orderbot
        • Creating an Orderbot
        • Orderbots - Complete List of Filters & Actions
        • Orderbot: Set order weight and dimensions based on products
        • Orderbot: Using Hold the order for and Mark Order as Shipped
        • Commonly Used Orderbots
    • Templates
        • Email Verification Process for P.O. & E-mail Templates
        • Email Templates
        • Setting up Packing Slip Templates
        • Setting up Purchase Order (PO) Templates

Creating and Configuring Warehouses in Extensiv Order Manager

Creating and configuring your warehouses in Extensiv Order Manager is one of the first – and most important – steps in getting your account ready to go live.

For an instructional video of how to create an in-house or 3PL warehouse as well as instructions about warehouse settings, please click here.

Order Manager supports multiple kinds of warehouses, including:

  • In-house
  • 3PL
  • FBA
  • Dropship
  • Retail

This guide will be broken into five sections to explain how to integrate all five of these warehouses.

Direct (In-House) Fulfillment

Please refer to this article on Creating an In-House Warehouse.

Third Party Logistics (3PL)

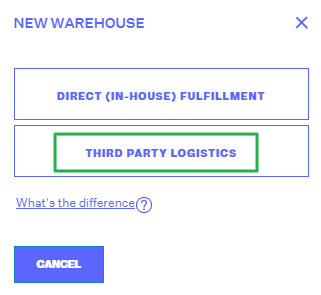
To begin, go to the Settings module and click “Warehouses” on the left-hand navigation. Then click “+ New Warehouse” and select “Third Party Logistics”.

In the new window, you’ll have to complete several required fields, including:

  • Warehouses Name
  • Address
  • City
  • State
  • Zip Code
  • Country
  • Contact Phone

If you’d like, you can also arrange domestic back-up warehouses, similar to the in-house set-up process.

Once you’ve created the warehouse, you can click the wrench icon next to its name and select from a number of options, including:

  • Basic Info & I.D. Color: you can revise basic warehouse contact information here.
  • Returns Location: this is the location where returned items will go, assuming they were originally fulfilled by this factory. This does not have to match the original address of the warehouse itself.
  • Communication Print Settings: this is where you’d set up the FTP connection to your 3PL, assuming it uses FTP.
  • International Rank: this is the order in which international orders should be fulfilled, and can be “activated” by creating an Orderbot.
  • Domestic Backup Order: helps you decide the order in which inventory is pulled from if this particular warehouse is out of stock.
  • Inventory Dependents: these are the warehouses that source new inventory from this Master (Parent) Warehouse.
  • Deactivate: this will deactivate the warehouse.
  • History: this tracks the history of actions performed on the warehouse.

FBA

Your FBA warehouses are set up in a different area than In-house and 3PL warehouses. To begin, go to the Settings module and click “Sales Channels”.

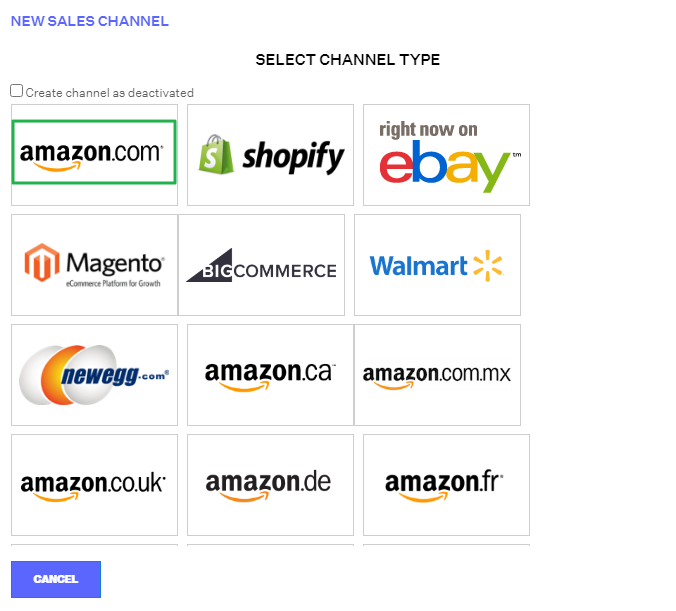
Once there, click “+ New Channel” and select the Amazon channel relevant to your business (e.g. Amazon.com, Amazon.ca, Amazon.com.mx, etc.).

On the next window, follow the integration steps, which are also outlined below:

  1. Go to http://developer.amazonservices.com.
  2. Click the Sign up for MWS button.
  3. Log into your Amazon seller account.
  4. On the MWS registration page, click the button for I want to use an application to access my Amazon seller account with MWS.
  5. In the Application Name text box, enter: Extensiv Order Manager.
  6. In the Application's Developer Account Number text box, enter: 7141-7907-6733.
  7. Click the Next button.
  8. Accept the Amazon MWS License Agreement and click Next.
  9. Enter your MWS Auth Token and Seller ID below, then click 'Verify Integration'.

Secondly, you must also select from among the FBA options in the top-right corner, which are:

  • Enable FBA orders, inventory & MCF: checking this box is common if you use FBA, want to track FBA inventory and/or have channels requiring multi-channel fulfillment (MCF).
  • Push FBA inventory to FBM listings: checking this box off will push FBA inventory to your FBM listings on other channels, which aids in MCF.
  • Toggle inventory between FBA/FBM: checking this box off is useful if you have FBA listings that go out of stock, and want FBM inventory to fulfill those orders until your FBA inventory is refilled.

Note

If you use Amazon unified accounts, then you should still select the appropriate Amazon channel and just enter in the same credentials for each integration that’s considered unified. Order Manager will recognize that the account is unified, but on separate country pages.


Dropship

Your dropship warehouses are set up in a different area than In-house, 3PL and FBA warehouses. To begin, go to the Settings module and click “Vendors”.

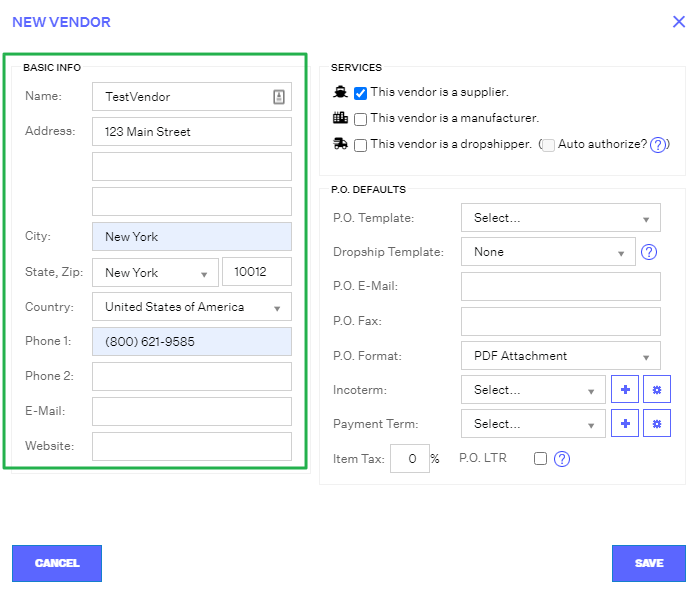
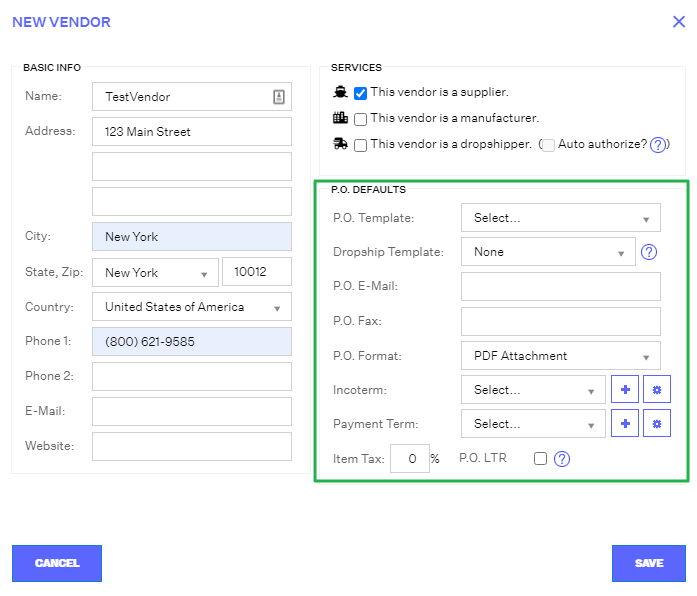
Once there, click “New Vendor” and complete all the required “Basic Info”, including:

  • Name
  • Address
  • City
  • State
  • Zip code
  • Country
  • Phone 1

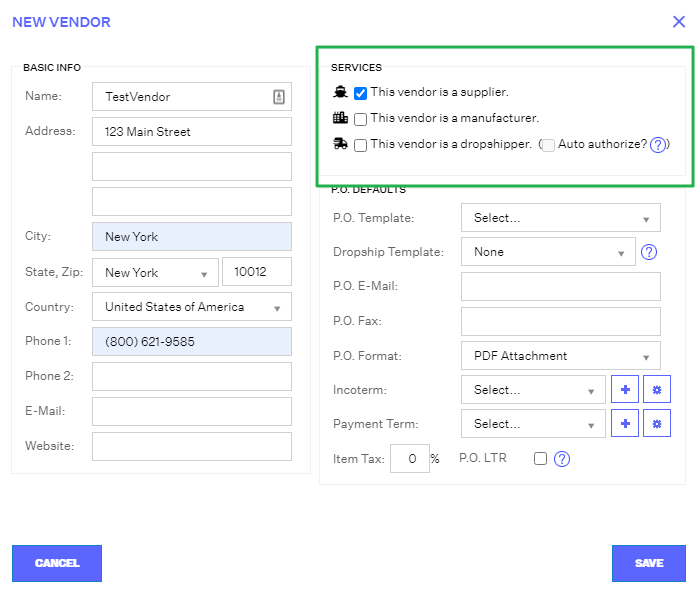
Then complete the “Services” section fields, including:

  • This vendor is a supplier: this is an organizational denotation for your records.
  • This vendor is a manufacturer: this is an organizational denotation for your records.
  • This vendor is a dropshipper: checking off this box will trigger the creation of the dropship warehouse once you click “Save”.

Finally, complete the “P.O. Defaults” section fields, which indicate the format of the information that will appear on PO, including:

  • P.O. Template: customized PO template per vendor.
  • Dropship Template: customized dropship template for dropship orders.
  • P.O. E-Mail: contact email for the person receiving POs.
  • P.O. Fax: vendor’s fax number.
  • P.O. Format: the file format that you would like the PO to be generated in.
  • Incoterm: a series of 3-letter trade terms related to common contractual sales practices.
  • Payment: how you will pay the vendor.

After all fields have been completed, click “Save”. At this point, you may select your recently created vendor and be able to view vendor details on the right-hand side of the “Vendors” sub-section of the Settings Module. 

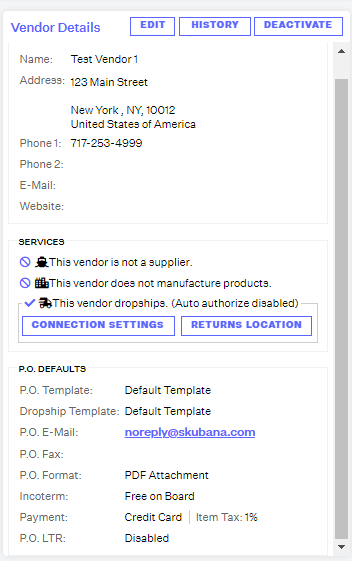
You’ll now be able to click on a few other buttons, including:

  • Edit: allows you to edit the "Basic Info", "Services" and "P.O. Defaults" fields for the vendor.
  • History: this tracks the history of actions performed on the vendor.
  • Deactivate: clicking will deactivate the vendor.
  • Connection Settings: this is where you’d set up the FTP connection to your dropship warehouse.
  • Returns Location: this is the location where returned items will go, assuming they were originally fulfilled by this factory. This does not have to match the original address of the warehouse itself.

Retail

Retail warehouses are set up similarly to how FBA warehouses are set up. This warehouse is only beneficial in Order Manager if your ecommerce inventory and retail inventory are kept separate. In other words, you’ll only need this warehouse if you have a store where customers can shop and purchase merchandise on the spot.

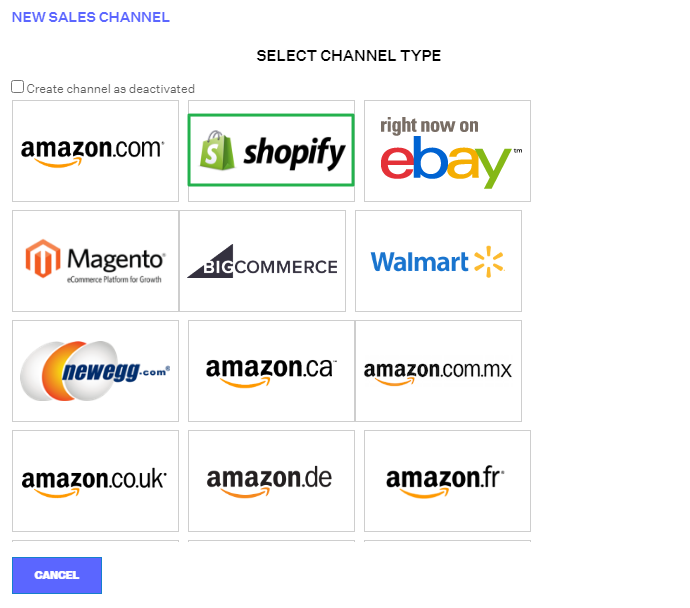
To begin, go to the Settings module and click “Sales Channels”. Once there, click “New Channel” and select Shopify.

Shopify is the only point-of-sale (POS) that Order Manager supports.

On the next window, prior to completing the integration, check off the boxes for “Enable Shopify POS” and “Enable Webhooks” if they are relevant for your business.

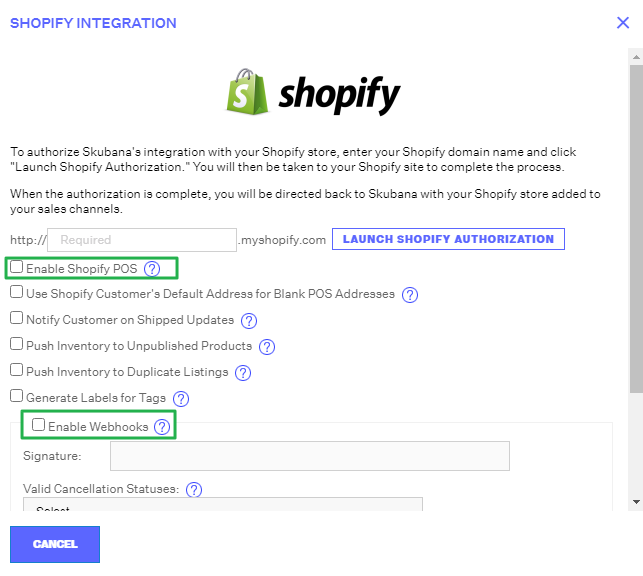
Then follow the integration steps found in Order Manager, which are also outlined below:

  • To authorize Order Manager's integration with your Shopify store, enter your Shopify domain name and click "Launch Shopify Authorization." 
  • You will then be taken to your Shopify site to complete the process.
  • When the authorization is complete, you will be directed back to Order Manager with your Shopify store added to your sales channels
configuring warehouses

Was this article helpful?

Yes
No
Share additional feedback about this article

Related Articles

  • Orderbots - Complete List of Filters & Actions
  • Uploading Inventory Through the UI

Not finding the help you need?

Contact Support
Solutions
  • Solutions for Brands
  • Solutions for 3PLs
  • Solutions for 4PLs
  • Solutions for B2B
Products
  • Extensiv 3PL Warehouse Manager
  • Extensiv Warehouse Manager
  • Extensiv Order Manager
  • Extensiv Integration Manager
  • Extensiv Network Manager
Products
  • Customer Success
  • Implementation
  • Consulting
Ecosystem
  • Fulfillment Marketplace
  • Integrations
  • Partners
  • Become a Partner
Resources
  • Resource Library
  • Blog
  • Market Insights
  • What is a 3PL?
  • What is a 4PL?
  • What is a WMS?
  • Why a Cloud-based WMS?
  • Glossary
Help
  • Help Center
  • API Documentation
  • Extensiv Univerisity
  • Community
  • System Status
  • Extensiv Logo
  • 100 N Pacific Coast Hwy, Suite 1100, El Segundo, CA 90245
  • |
  • Contact Us:
  • 83-EXTENSIV 888.375.2368 (main)
  • |
  • 310.844.7570 (local)
  • Copyright © 2023 Extensiv
  • |
  • All rights reserved.
  • Privacy Policy
  • |
  • Terms of Service
  • Follow Us:
Expand