Adding Order Item to Order Orderbot Action
3.7 min read
|This article provides instructions on adding an order item to your Order Orderbot Action.
Please ensure that the Master SKU and the listing SKU are already created before selecting the product you wish to add from the dropdown.
How To Set up this Orderbot Action
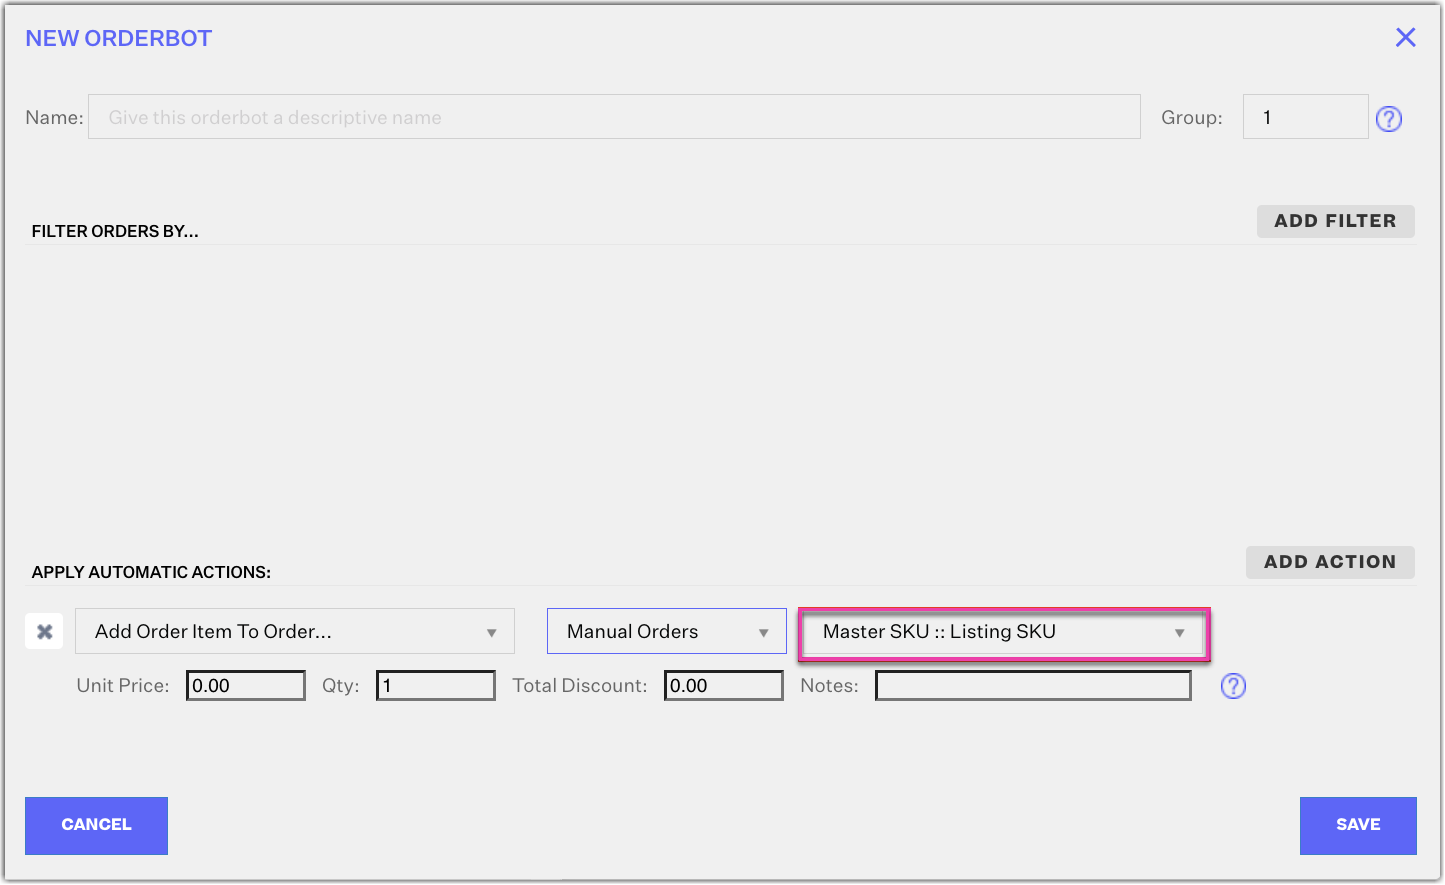
- Click + Add Action.
- Select “Add Order Item To Order”
- From the second dropdown, select a sales channel option. The only channels that will populate are ones that this action can apply to. If your sales channel is not listed there, it is not eligible for this action.
- Specify the Listing SKU for the sales channel to add to the order.
- Set the Unit Price that will be included in the order.
- Set the Quantity to add for the SKU
- Optional: Set any Discount for the product added
- Optional: Add Notes for the Order Item
Note: You can but do not need to set up a filter for this action to apply. If you do set up a filter that filters for a SKU/item, see the next note below.
Behavior: When the action applies, it will compile all fields from the orderbot action page to generate an order item and add it to the order as long as the sales channel for the order equals the sales channel from the orderbot action, otherwise it will simply skip over. Continue reading to understand how this action performs in terms of the sequence of orderbot application.
Limitation: At this time, this orderbot will only be supported for channels that allow editing order items, which are Manual Channels and Shopify.
Action Sequence
The "Add Order Item to Order" orderbot has a specified place in the sequence in which orderbots apply to qualifying orders.
- This article refers to this orderbot as the "Add Item" orderbot. This article also refers to the Mark Order as Shipped orderbot action as the "Mark Shipped" orderbot.
- Orderbot group application always starts with the lowest group number first. For example, Group 1 always applies first, then Group 2, then Group 3, etc.
- If there is more than one Add Item orderbot, they will be handled according to group.
- As with any orderbot action, the orderbot will only apply if its filters are met.
Why does a specified sequence in orderbot processing matter?
This matters because orderbot flows are extremely customizable. In an orderbot flow, orders are edited with each orderbot that applies. Therefore, if you had a flow that was contingent on a certain product being a part of the order or not, and you use the Add Item orderbots to make sure that product is included in an order, then you might expect your full flow to apply after the Add Item orderbot takes effect. Given the following details, that would not be the case, so you should customize your workflow with a different strategy.
Note: All Item/SKU filters trying to find SKUs that were added by Add item action will not work. As an alternative, we recommend the use of order labels to track when any items are added to an order. To set this up, you need to use the Add Label action along with the Add Item action. To determine if an item was added to the order, you can employ the “Order Label” filter instead of theItem/SKU filters. So if your orderbot workflow decides whether or not to apply any action based on the presence (or lack thereof) of another product, you can set up an orderbot that Adds an order label. And then have your orderbot filter for that same order label.
There are two ways to understand the sequence in which this particular orderbot will apply.
First Sequence- If there ISN'T a Mark Shipped orderbot in the flow
- Orderbots in any group will apply, according to Group, completely ignoring the Add Item orderbot(s).
- The Add Item orderbot applies. If there is more than one Add Item orderbot, they will apply according to group.
- Orderbot processing ends.
Example: I have a Group 1 Add Label orderbot, Group 10 Add Item orderbot, Group 15 Set Warehouse orderbot, and Group 20 Add Item orderbot.

In this case, if all orderbots qualify to apply, then the sequence would be:
- Add Label applies
- Set Warehouse applies
- Add Item applies (Group 10)
- Add Item applies (Group 20)
This example shows that although the Group 10 Add Item orderbot has a lower number group than the Group 15 Set Warehouse orderbot, the Set Warehouse action will apply before it because the Add Item orderbot is completely ignored until after all other orderbots have applied.
Second Sequence- If there IS a Mark Shipped orderbot in the flow
- Orderbots in any group that come before the Mark Shipped orderbotwill apply according to Group, completely ignoring the Add Item orderbot(s).
- Now the process considers which Add Item orderbots to apply.
- IF the group of the Add Item orderbot is the same group or a lower number than the group of the Mark Shipped orderbot, then the Add Item orderbot will apply.
- IF the Add Item & Mark Shipped orderbots are in the same group, then the Add Item orderbot will apply first. (Any other orderbots in the same group will apply before both the Add Item & Mark Shipped ones.)
- IF the group of the Add Item orderbot comes after the group of the Mark Shipped orderbot, then the Add Item orderbot will NOT apply.
- IF the group of the Add Item orderbot is the same group or a lower number than the group of the Mark Shipped orderbot, then the Add Item orderbot will apply.
- Finally, the Mark Shipped orderbot applies. This automatically ends all orderbot processing, regardless of if there are more orderbots of any kind in any group that come after.
Example: I have a Group 1 Add Label orderbot, Group 10 Add Item orderbot, Group 15 Set Warehouse orderbot, Group 20 Mark Shipped orderbot, Group 25 Add Label orderbot, and Group 25 Add Item orderbot.
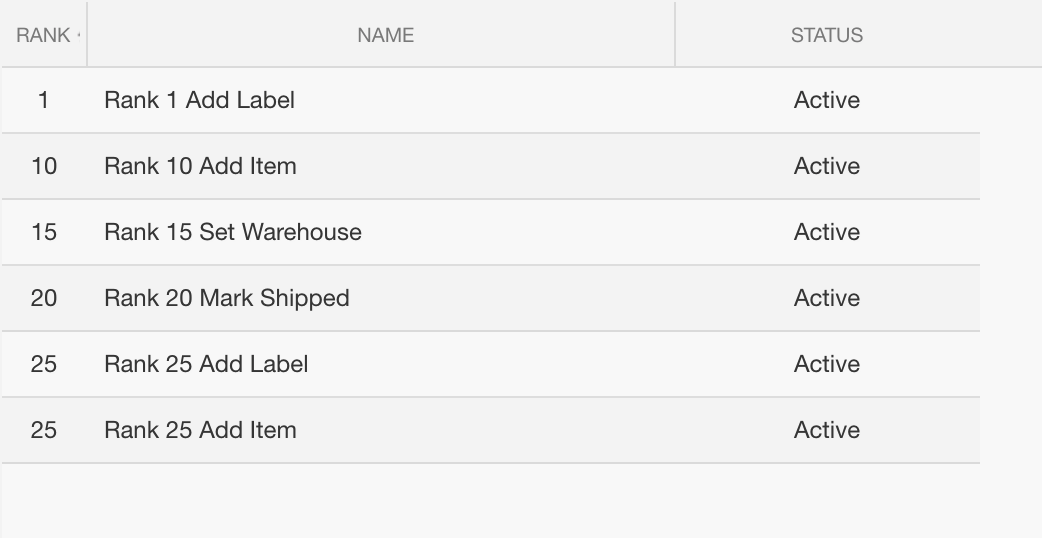
In this case, if all orderbots qualify to apply, then the sequence would be:
- Add Label applies
- Set Warehouse applies
- Item applies (Group 10)
- Mark Shipped applies (Group 20)
This example also shows that although the Group 10 Add Item orderbot has a lower number group than the Group 15 Set Warehouse orderbot, the Set Warehouse action will apply before it because the Add Item orderbot is completely ignored until after all other orderbots have applied.
However, it also shows that both the Group 25 Add Item orderbot and the Group 25 Add Label orderbot do NOT get applied. This is because any orderbot whose group comes after the Mark Shipped orderbot does not get to apply since the Mark Shipped orderbot ends all orderbot processing.

Extensiv University
Was this article helpful?
Share additional feedback about this article