Order Management

Updated on September 19th, 2023

  • Extensiv Hub
    Popular Articles Getting Started Using Hub Technical Issues & FAQs Extensiv's Ideas Portal
  • 3PL Warehouse Manager
    Receiving Operations Inventory Management Shipping Operations System Configuration Scanning Operations Integrations Content Best Practice Resources Release Notes Popular Articles Troubleshooting Guides
  • Warehouse Management
    Getting Started Admin Console Shipping Order Picking & Packing Receiving Customer Portal Cycle Counting Kit Building Managing Users Barcode Scanner Import/Export Integrations Barcoding Wave Picking Bin Move Mobile Receiving and Picking Settings Popular Articles Reporting
  • Order Management
    Dashboard Orders Inventory Purchase Orders Shipments Customers Products Analytics Settings API API Integrations Accessing and Navigating Order Manager Error Messages Order Manager Popular Articles Accounting Integrations
  • Integration Management
    Getting Started with Integration Manager General Support Troubleshooting Extras & Addons API Documentation Popular Articles Order Sources Order Destinations
  • FAQs
  • Network Manager
    Getting Started Order Routing Management Technical Issues Shopping Carts Settings Settings, Products, and Orders
  • Billing Manager
    Getting Started Using Billing Manager
  • Release Notes
    Extensiv Sandbox Extensiv Extensiv Hub 3PL Warehouse Manager Integration Management Warehouse Management Order Management Billing Manager
  • Fulfillment Marketplace
    Getting Started
  • Sandbox
    Getting Started
+ More
  • Help Center
  • Order Management
  • Settings
  • Warehouses & Vendors
  • Settings
    • General
        • Tax Identifiers
        • Company Time Zone Setting
        • Ruby Has 3PL Integration
        • Disable the Inventory Update From Extensiv Order Manager to All Sales Channels
        • Update My Profile
        • How to Enable Out of Stock Control for eBay Sales Channels
        • Company Info and Additional Account Settings
        • How to View Your Extensiv Order Manager Invoices
        • Installing an App from the Order Manager App Store
        • How To Remove an App in Order Manager
        • Configuring Shipping Presets
    • Sales Channels
        • Walmart Fulfillment Services - WFS
        • Setting Up Shipment & Carrier Mappings for Your Sales Channels
        • WFS Workflow
        • Amazon Cancellation Settings
        • Amazon Pacific Time Orderbot Setting
        • Shopify Locations
        • Shopify Tags
        • Enable or Disable Extensiv Order Manager Email Notifications to Your Customers
        • Deactivating a Sales Channel
        • Adding Shopify as a Sales Channel
        • Viewing a Sales Edit Channel's History
        • Adding Amazon as a Sales Channel
        • Adding eBay as a Sales Channel
        • Adding Newegg as a Sales Channel
        • Steps in Adding Walmart as a Sales Channel
        • Editing Sales Channels
        • Adding a Manual Sales Channel
        • How to Exclude a Warehouse From Pushing Inventory to a Sales Channel
        • Assigning a Packing Slip and/or Email Template to your Sales Channel
        • Adding Sales Channels
        • Reactivating Sales Channels
    • Webhooks
        • Order Payment Webhook
        • Shopify Auto-Subscribing Webhooks
        • Shopify Product Update / Product Edit Webhook
        • Shopify Refund Webhook (e-commerce Orders)
        • Order Creation Webhook
        • Shopify Cancellation Webhook
        • Shopify Fulfillment Webhook
        • Shopify Refund Webhook - POS Orders
        • Shopify Product Deletion Webhook
        • BigCommerce Webhook
    • Shipping Providers
        • Adding Shipping Providers
        • Adding DHL eCommerce as a Shipping Provider
        • How to Add Express 1 as a Shipping Provider
        • Adding Amazon Buy Shipping as a Shipping Provider
        • UPS Mail Innovations Services
        • Customizing Shipping Services and Package Types Per Shipping Provider
        • FedEx ETD
        • Deactivate or Reactivate a Shipping Provider
        • Adding FedEx as a Shipping Provider
        • Adding Stamps.com as a Shipping Provider
    • Vendors
        • Adding a Dropship Vendor to Extensiv Order Manager
        • How to Automatically Create Purchase Orders For Dropship Orders
        • Creating or Updating Vendors
    • Warehouses & Vendors
        • Instructional Video - Creating Warehouses & Warehouse Settings
        • Use Component Inventory Setting for Bundles and Kits
        • Setting a Dropship Template and Fulfilling Orders with a P.O.
        • Configuring Dropship Vendor FTP
        • Configuring Shipping Label Print Format Options
        • Can I have additional order information populated on my Shipping label?
        • Configuring a Dropship Vendor
        • How to Configure the Order Export File for FTP Connections
        • Search for Vendors
        • Inventory Dependent Warehouses
        • Updating the Address/Return Address for Your Warehouse
        • Deactivating a Warehouse in Extensiv Order Management
        • Creating and Configuring Warehouses in Extensiv Order Manager
        • Pick List Settings
        • Setting Up Document Print Settings
        • Setting Up Domestic Backup Warehouses
        • FTP Inventory Import for a 3PL
        • Setting Up a Warehouse's International Rank
        • How do I connect Extensiv Order Manager with Deliver?
        • Setting Up a 3PL Warehouse
        • Creating an In-House Warehouse
    • Orderbots
        • Adding Order Item to Order Orderbot Action
        • Understanding Apply Best Rate vs Cheapest Rate Orderbots
        • Support for Shopify's Additional Details
        • Orderbots filtered by zip code range
        • Postal Zones in Extensiv Order Manager
        • Mark Order as Shipped Orderbot
        • Automating Orders to Fulfill from a Specific Warehouse
        • Editing an Orderbot
        • Deactivating an Orderbot in Extensiv Order Manager
        • Replace Address Orderbot
        • Creating an Orderbot
        • Orderbots - Complete List of Filters & Actions
        • Orderbot: Set order weight and dimensions based on products
        • Orderbot: Using Hold the order for and Mark Order as Shipped
        • Commonly Used Orderbots
    • Templates
        • Email Verification Process for P.O. & E-mail Templates
        • Email Templates
        • Setting up Packing Slip Templates
        • Setting up Purchase Order (PO) Templates

Configuring Dropship Vendor FTP

Overview

This article provides details on how to configure your dropshipper through FTP.

Background

Extensiv Order Manager allows you to communicate with dropshippers through FTP. These steps should only be undertaken after you have configured your vendor as a dropshipper.

Server Connection

In the Settings module, navigate to the Vendors tab in the left-hand sidebar. Select the Vendor you would like to connect to. Click on Connections Settings under services in the Vendor Details sidebar.

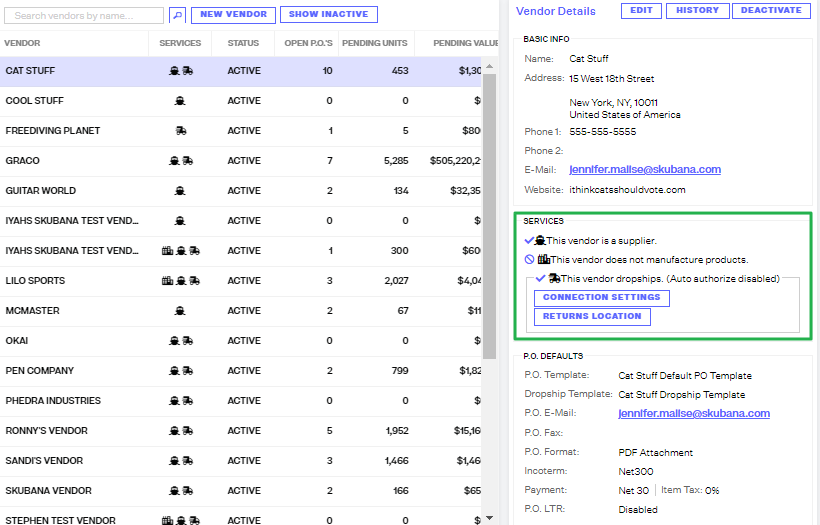
Similar to a 3PL Warehouse, you will be able to set-up an FTP connection with the vendor. Enter the Server URL, User ID, and Password for the FTP Connection. If you will be exporting/importing CSV/TXT files, click the Wrap Values in Double Quotes box. Once complete, click Test Connection to verify the credentials are correct.

Orders Export

Here you will set-up how your export files will be delivered and the information it will include.
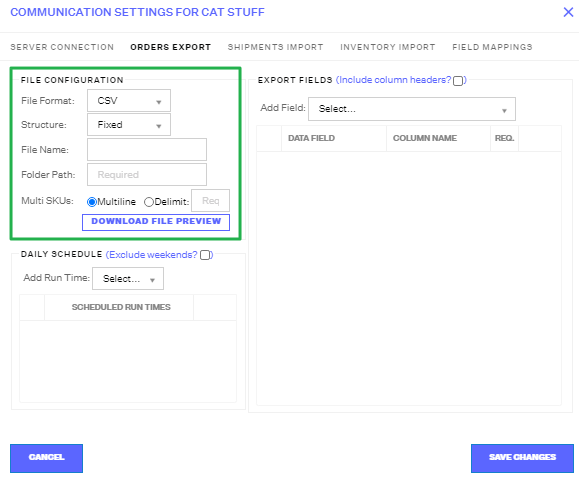
In the File Configuration section, you determine the structural format and folder path for the file. Once configured, you can download a File Preview.

  • File Format: The type of file being exported (CSV, Excel, or TXT)
  • Structure: Indicate if the type of data included in columns are FIXED (they don’t change) or FLEXIBLE (they may change between file uploads). Note: if you choose FLEXIBLE, you will be required to include column headers in the file.
  • File Name: The name of the file. This will be included as a prefix in the file name which will be directly followed by a timestamp.
    Folder path: Where in the FTP the file should be dropped into. This should be confirmed by your vendor.
  • Multi-SKUs: Indicates how orders with multiple items should be listed. There are two options:
    • Multiline: The order is broken into individual rows, with each item getting its own row (the order number is repeated for each row).
    • Delimit: The order is only listed on one row, and delimiting characters (comma, semi-colon, pipeline) are used to differentiate items in the SKU column.

In the Export Fields section, you will define the column names and what information from Order Manager each column will have.

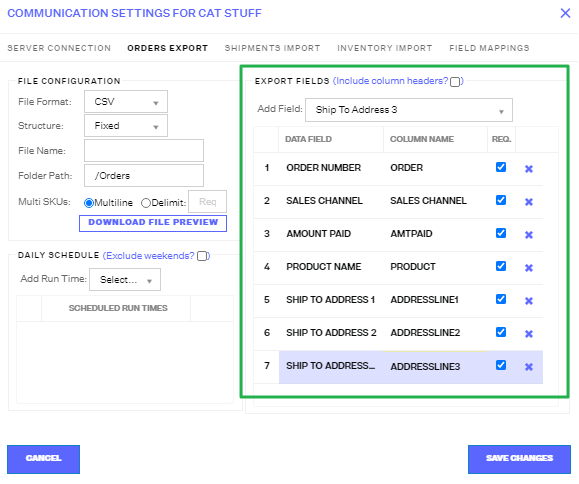
The number of the export field indicates the number of the column in the file (i.e. #1 Export Field = 1st Column). From here, you can choose the following:

  • Data Fields: Indicates the specific data from Order Manager that will get pulled into the column.
  • Column Names: The name of the column as requested by the vendor.
    Note: If the vendor has a column/field that Order Manager doesn’t provide, you can use the “Blank Empty” option so Order Manager knows to leave that column blank.
  • Required: Check this box if the specified field/column is required by the vendor to process an order.
    Note 1: Order Number and Sales Channel are required fields by Order Manager.
    Note 2: If you make a data field required, that means the field must always have data in it. If it doesn’t, it will prevent exports from occurring. Similarly, you shouldn’t make Blank/Empty fields required.

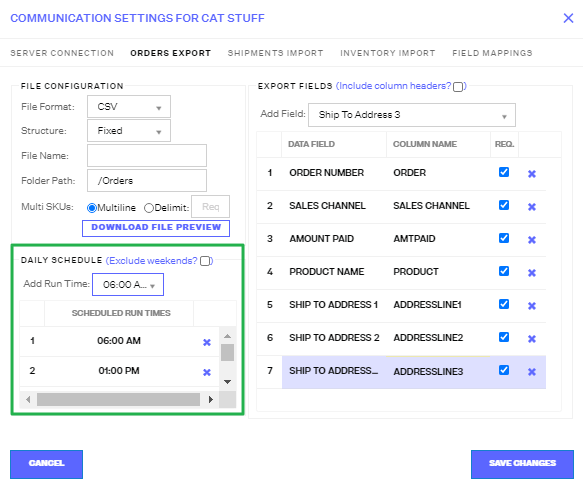
In the Daily Schedule section, you will choose when the exports should be sent to the vendor. Times can only be entered in hourly intervals.
Note: Export times should not overlap with the scheduled run times for the Shipment and Inventory Imports.
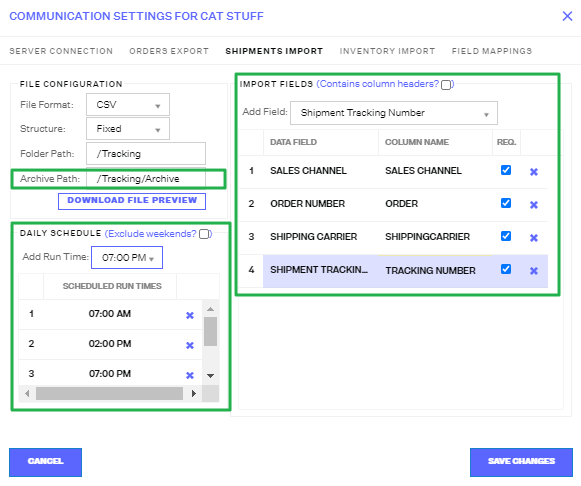
Shipments Import

You will use this section to determine the file configuration and settings for the file the vendor will provide with the orders' shipping information. While the set-up is very similar to the Order Exports, there are a few specific requirements for Shipment Imports:

  • File Configuration: You must include an Archive Path provided by your vendor. This is a folder Order Manager will use to archive the Shipment Imports files once they have been processed.
  • Import Fields: There are four required fields that must be included in order for Order Manager to process the files from the vendors:
    1. Sales Channel
    2. Order Number
    3. Shipping Carrier
    4. Shipment Tracking Number
  • Daily Schedule: Times can only be entered in hourly intervals. Please remember that the times indicated in this window cannot be the same as the Orders Export Daily Schedule or the exports/imports will cancel each other out.

You will use this section to determine the file configuration and settings for the inventory imports. While the set-up is very similar to the Order Exports and Shipment Imports, there are a few specific requirements for Inventory Imports:

  • Import Fields: There are two required fields that must be included in order for Order Manager to process the files from the vendors. This includes the Master SKU and the On-Hand Stock.
  • Daily Schedule: Times can only be entered in hourly intervals. Please remember that the times indicated in this window cannot be the same as the Export Daily Schedule or the exports/imports will cancel each other out.
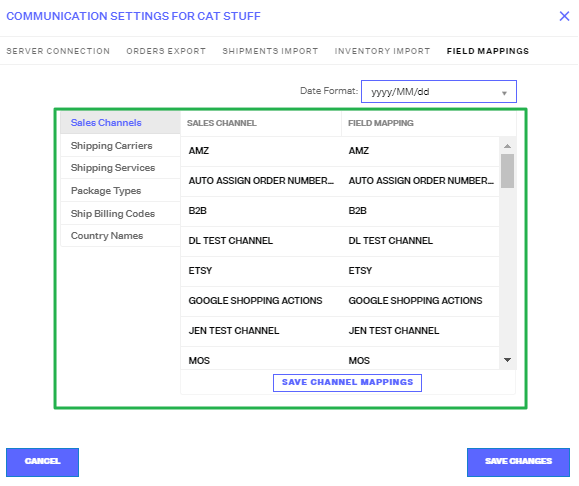
Field Mappings

This tab is used to indicate what the data within your export documents means to your vendor and vice versa. You can develop mappings for the sales channels, shipping services, package types, billing codes, and country names sections.

At the top of the page, you can choose the specific date format that your 3PL prefers. Feel free to choose a preset format or develop your own. Note: (M = Month, m = minute, d = Day, y= Year).

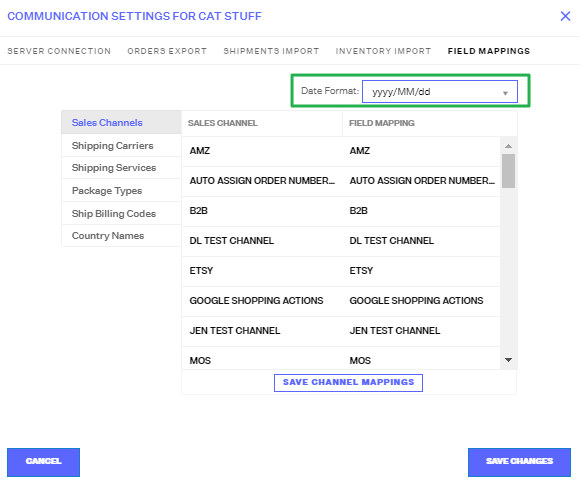
The left column in the grid (Sales Channel in the screenshot) is how the data appears in Order Manager. This is auto-generated based on your Order Manager set-up. The right column (Field Mapping) is how the vendor will understand that data as and capture in their system. This is customizable and should be confirmed with the vendor before entering.

Save each mapping before moving onto the next mapping section. Any changes you make will be erased if not saved first.


Once all sections are completed, click Save Changes and you will finalize your FTP connection.

ftp dropship

Was this article helpful?

Yes
No
Share additional feedback about this article

Related Articles

  • Automating Orders to Fulfill from a Specific Warehouse
  • How to Create a Manual PO

Not finding the help you need?

Contact Support
Solutions
  • Solutions for Brands
  • Solutions for 3PLs
  • Solutions for 4PLs
  • Solutions for B2B
Products
  • Extensiv 3PL Warehouse Manager
  • Extensiv Warehouse Manager
  • Extensiv Order Manager
  • Extensiv Integration Manager
  • Extensiv Network Manager
Products
  • Customer Success
  • Implementation
  • Consulting
Ecosystem
  • Fulfillment Marketplace
  • Integrations
  • Partners
  • Become a Partner
Resources
  • Resource Library
  • Blog
  • Market Insights
  • What is a 3PL?
  • What is a 4PL?
  • What is a WMS?
  • Why a Cloud-based WMS?
  • Glossary
Help
  • Help Center
  • API Documentation
  • Extensiv Univerisity
  • Community
  • System Status
  • Extensiv Logo
  • 100 N Pacific Coast Hwy, Suite 1100, El Segundo, CA 90245
  • |
  • Contact Us:
  • 83-EXTENSIV 888.375.2368 (main)
  • |
  • 310.844.7570 (local)
  • Copyright © 2023 Extensiv
  • |
  • All rights reserved.
  • Privacy Policy
  • |
  • Terms of Service
  • Follow Us:
Expand