Order Management

Updated on July 10th, 2023

  • Extensiv Hub
    Popular Articles Getting Started Using Hub Technical Issues & FAQs Extensiv's Ideas Portal
  • 3PL Warehouse Manager
    Receiving Operations Inventory Management Shipping Operations System Configuration Scanning Operations Integrations Content Best Practice Resources Release Notes Popular Articles Troubleshooting Guides
  • Warehouse Management
    Getting Started Admin Console Shipping Order Picking & Packing Receiving Customer Portal Cycle Counting Kit Building Managing Users Barcode Scanner Import/Export Integrations Barcoding Wave Picking Bin Move Mobile Receiving and Picking Settings Popular Articles Reporting
  • Order Management
    Dashboard Orders Inventory Purchase Orders Shipments Customers Products Analytics Settings API API Integrations Accessing and Navigating Order Manager Error Messages Order Manager Popular Articles Accounting Integrations
  • Integration Management
    Getting Started with Integration Manager General Support Troubleshooting Extras & Addons API Documentation Popular Articles Order Sources Order Destinations
  • FAQs
  • Network Manager
    Getting Started Order Routing Management Technical Issues Shopping Carts Settings Settings, Products, and Orders
  • Billing Manager
    Getting Started Using Billing Manager
  • Release Notes
    Extensiv Sandbox Extensiv Extensiv Hub 3PL Warehouse Manager Integration Management Warehouse Management Order Management Billing Manager
  • Fulfillment Marketplace
    Getting Started
  • Sandbox
    Getting Started
+ More
  • Help Center
  • Order Management
  • Settings
  • Vendors
  • Settings
    • General
        • Tax Identifiers
        • Company Time Zone Setting
        • Ruby Has 3PL Integration
        • Disable the Inventory Update From Extensiv Order Manager to All Sales Channels
        • Update My Profile
        • How to Enable Out of Stock Control for eBay Sales Channels
        • Company Info and Additional Account Settings
        • How to View Your Extensiv Order Manager Invoices
        • Installing an App from the Order Manager App Store
        • How To Remove an App in Order Manager
        • Configuring Shipping Presets
    • Sales Channels
        • Walmart Fulfillment Services - WFS
        • Setting Up Shipment & Carrier Mappings for Your Sales Channels
        • WFS Workflow
        • Amazon Cancellation Settings
        • Amazon Pacific Time Orderbot Setting
        • Shopify Locations
        • Shopify Tags
        • Enable or Disable Extensiv Order Manager Email Notifications to Your Customers
        • Deactivating a Sales Channel
        • Adding Shopify as a Sales Channel
        • Viewing a Sales Edit Channel's History
        • Adding Amazon as a Sales Channel
        • Adding eBay as a Sales Channel
        • Adding Newegg as a Sales Channel
        • Steps in Adding Walmart as a Sales Channel
        • Editing Sales Channels
        • Adding a Manual Sales Channel
        • How to Exclude a Warehouse From Pushing Inventory to a Sales Channel
        • Assigning a Packing Slip and/or Email Template to your Sales Channel
        • Adding Sales Channels
        • Reactivating Sales Channels
    • Webhooks
        • Order Payment Webhook
        • Shopify Auto-Subscribing Webhooks
        • Shopify Product Update / Product Edit Webhook
        • Shopify Refund Webhook (e-commerce Orders)
        • Order Creation Webhook
        • Shopify Cancellation Webhook
        • Shopify Fulfillment Webhook
        • Shopify Refund Webhook - POS Orders
        • Shopify Product Deletion Webhook
        • BigCommerce Webhook
    • Shipping Providers
        • Adding Shipping Providers
        • Adding DHL eCommerce as a Shipping Provider
        • How to Add Express 1 as a Shipping Provider
        • Adding Amazon Buy Shipping as a Shipping Provider
        • UPS Mail Innovations Services
        • Customizing Shipping Services and Package Types Per Shipping Provider
        • FedEx ETD
        • Deactivate or Reactivate a Shipping Provider
        • Adding FedEx as a Shipping Provider
        • Adding Stamps.com as a Shipping Provider
    • Vendors
        • Adding a Dropship Vendor to Extensiv Order Manager
        • How to Automatically Create Purchase Orders For Dropship Orders
        • Creating or Updating Vendors
    • Warehouses & Vendors
        • Instructional Video - Creating Warehouses & Warehouse Settings
        • Use Component Inventory Setting for Bundles and Kits
        • Setting a Dropship Template and Fulfilling Orders with a P.O.
        • Configuring Dropship Vendor FTP
        • Configuring Shipping Label Print Format Options
        • Can I have additional order information populated on my Shipping label?
        • Configuring a Dropship Vendor
        • How to Configure the Order Export File for FTP Connections
        • Search for Vendors
        • Inventory Dependent Warehouses
        • Updating the Address/Return Address for Your Warehouse
        • Deactivating a Warehouse in Extensiv Order Management
        • Creating and Configuring Warehouses in Extensiv Order Manager
        • Pick List Settings
        • Setting Up Document Print Settings
        • Setting Up Domestic Backup Warehouses
        • FTP Inventory Import for a 3PL
        • Setting Up a Warehouse's International Rank
        • How do I connect Extensiv Order Manager with Deliver?
        • Setting Up a 3PL Warehouse
        • Creating an In-House Warehouse
    • Orderbots
        • Adding Order Item to Order Orderbot Action
        • Understanding Apply Best Rate vs Cheapest Rate Orderbots
        • Support for Shopify's Additional Details
        • Orderbots filtered by zip code range
        • Postal Zones in Extensiv Order Manager
        • Mark Order as Shipped Orderbot
        • Automating Orders to Fulfill from a Specific Warehouse
        • Editing an Orderbot
        • Deactivating an Orderbot in Extensiv Order Manager
        • Replace Address Orderbot
        • Creating an Orderbot
        • Orderbots - Complete List of Filters & Actions
        • Orderbot: Set order weight and dimensions based on products
        • Orderbot: Using Hold the order for and Mark Order as Shipped
        • Commonly Used Orderbots
    • Templates
        • Email Verification Process for P.O. & E-mail Templates
        • Email Templates
        • Setting up Packing Slip Templates
        • Setting up Purchase Order (PO) Templates

Creating or Updating Vendors

Before you Begin

If you are setting up a new vendor, it is recommended you work directly with the vendor before moving forward. You should confirm the types of connections they support, credentials needed, required fields to reorder, and any additional requirements they may have.

To set up your vendors, follow the procedure below.

  1. Navigate to the Settings Module.
  2. On the left sidebar, click Vendors.
  3. On the Vendors page, click + New Vendor.

Basic Info

  1. In the New Vendor window, under the Basic Info section, enter the vendor's name, complete address, and telephone number. To allow Order Manager to send auto-generated POs to the vendor directly via email, enter the vendor's email address as well in the P.O. E-Mail field. Otherwise, you may leave this blank.

Note: You can add multiple email addresses in the P.O. E-Mail field, as long as the total number of characters including the comma to separate them is under 100 characters. Make sure there are no spaces in between email addresses, or any addresses after a space will not receive the PO email.
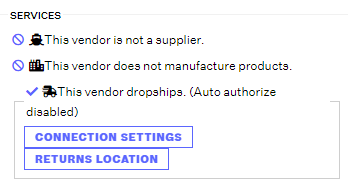
 

Services

Under the Services section, check the applicable boxes to indicate that the vendor is a supplier, manufacturer, and/or dropshipper. Suppliers do not produce any product, manufacturers can both produce and supply your products, and drop-shippers supply and fulfill their products to your customers in your name.

If you indicate your vendor as a dropshipper, Order Manager will automatically create a dropship warehouse in the Inventory module where you can set inventory available for purchase through the dropshipper. This Warehouse will not appear in the Settings – Warehouses page. Note: Some accounts may list these dropship warehouses as Excluded Warehouses under the Sales Channels tab if the inventory at the dropship warehouse is intentionally inflated to indicate infinite availability.

If your vendor is a dropshipper, select the Auto Authorize checkbox if you would like your dropship purchase orders created through Order Manager to automatically skip the Awaiting Authorization status in the POs module and send an email to the dropship vendor once the order is in the Awaiting Dropship status in the Orders module. If you do not check this setting, then dropship POs will need to be manually authorized before the vendor is contacted.

P.O. Defaults

Under the P.O. Defaults section, click the dropdown menu for P.O. Template and Dropship Template to select from the options available in the PO Templates tab where you can create customized PO templates according to your preferences. If your vendor isn't a dropshipper, you don't need to select a Dropship Template.

To give Order Manager the capability to seamlessly communicate purchase orders between your account and your vendor, enter the P.O. Email, P.O. Fax, and P.O. Format. The P.O. email is the address to which Order Manager will send POs; you may enter your email address here if you do not want Order Manager to send the PO directly to the vendor. The P.O. Fax is a fax number to which the auto-generated PO can be sent. For the P.O file format, you can choose to send the PO as a PDF, e-mail, or HTML attachment.

Still under the P.O. Defaults section, enter the Incoterm, Payment method, and Item Tax. For Incoterm, use DAP (Delivered At Place), unless your vendor communicated to you otherwise. The item tax is a percentage of the total product cost.

Lastly, the P.O. LTR checkbox is a feature you can select depending on how you would like product variations to be shown on a PO PDF. If you'd like variations to be grouped together under their parent SKU, select this setting. Otherwise, leave it unchecked to have variants ordered on their own lines.

Once you are done entering the required vendor information, click Save to close the New Vendor window. On the Vendors page, the new vendor will be added to your vendor list. From this point on, you can Edit existing vendors, view their Edit History, and/or Deactivate them in the top right corner after highlighting a vendor.

Updating Dropshipper Information

If you created a dropshipping vendor that will receive POs via FTP, you will need to define the FTP Connection Settings under the Services section seen below. For more information on how to do this, see this article.

You can also update the Returns Location for the vendor. If the Returns Location is different than the vendor’s Basic Info address, please click the Returns Location button and enter the preferred return address.

Additional Info

  • Currently, you cannot bulk import vendors into Order Manager.
vendor update vendor build

Was this article helpful?

Yes
No
Share additional feedback about this article

Related Articles

  • Analytics - Most Recent Customers
  • FBA Workflow Box Contents & Secondary "Ship From" Address

Not finding the help you need?

Contact Support
Solutions
  • Solutions for Brands
  • Solutions for 3PLs
  • Solutions for 4PLs
  • Solutions for B2B
Products
  • Extensiv 3PL Warehouse Manager
  • Extensiv Warehouse Manager
  • Extensiv Order Manager
  • Extensiv Integration Manager
  • Extensiv Network Manager
Products
  • Customer Success
  • Implementation
  • Consulting
Ecosystem
  • Fulfillment Marketplace
  • Integrations
  • Partners
  • Become a Partner
Resources
  • Resource Library
  • Blog
  • Market Insights
  • What is a 3PL?
  • What is a 4PL?
  • What is a WMS?
  • Why a Cloud-based WMS?
  • Glossary
Help
  • Help Center
  • API Documentation
  • Extensiv Univerisity
  • Community
  • System Status
  • Extensiv Logo
  • 100 N Pacific Coast Hwy, Suite 1100, El Segundo, CA 90245
  • |
  • Contact Us:
  • 83-EXTENSIV 888.375.2368 (main)
  • |
  • 310.844.7570 (local)
  • Copyright © 2023 Extensiv
  • |
  • All rights reserved.
  • Privacy Policy
  • |
  • Terms of Service
  • Follow Us:
Expand