Order Management

Updated on July 6th, 2023

  • Extensiv Hub
    Popular Articles Getting Started Using Hub Technical Issues & FAQs Extensiv's Ideas Portal
  • 3PL Warehouse Manager
    Receiving Operations Inventory Management Shipping Operations System Configuration Scanning Operations Integrations Content Best Practice Resources Release Notes Popular Articles Troubleshooting Guides
  • Warehouse Management
    Getting Started Admin Console Shipping Order Picking & Packing Receiving Customer Portal Cycle Counting Kit Building Managing Users Barcode Scanner Import/Export Integrations Barcoding Wave Picking Bin Move Mobile Receiving and Picking Settings Popular Articles Reporting
  • Order Management
    Dashboard Orders Inventory Purchase Orders Shipments Customers Products Analytics Settings API API Integrations Accessing and Navigating Order Manager Error Messages Order Manager Popular Articles Accounting Integrations
  • Integration Management
    Getting Started with Integration Manager General Support Troubleshooting Extras & Addons API Documentation Popular Articles Order Sources Order Destinations
  • FAQs
  • Network Manager
    Getting Started Order Routing Management Technical Issues Shopping Carts Settings Settings, Products, and Orders
  • Billing Manager
    Getting Started Using Billing Manager
  • Release Notes
    Extensiv Sandbox Extensiv Extensiv Hub 3PL Warehouse Manager Integration Management Warehouse Management Order Management Billing Manager
  • Fulfillment Marketplace
    Getting Started
  • Sandbox
    Getting Started
+ More
  • Help Center
  • Order Management
  • Settings
  • Webhooks
  • Settings
    • General
        • Tax Identifiers
        • Company Time Zone Setting
        • Ruby Has 3PL Integration
        • Disable the Inventory Update From Extensiv Order Manager to All Sales Channels
        • Update My Profile
        • How to Enable Out of Stock Control for eBay Sales Channels
        • Company Info and Additional Account Settings
        • How to View Your Extensiv Order Manager Invoices
        • Installing an App from the Order Manager App Store
        • How To Remove an App in Order Manager
        • Configuring Shipping Presets
    • Sales Channels
        • Walmart Fulfillment Services - WFS
        • Setting Up Shipment & Carrier Mappings for Your Sales Channels
        • WFS Workflow
        • Amazon Cancellation Settings
        • Amazon Pacific Time Orderbot Setting
        • Shopify Locations
        • Shopify Tags
        • Enable or Disable Extensiv Order Manager Email Notifications to Your Customers
        • Deactivating a Sales Channel
        • Adding Shopify as a Sales Channel
        • Viewing a Sales Edit Channel's History
        • Adding Amazon as a Sales Channel
        • Adding eBay as a Sales Channel
        • Adding Newegg as a Sales Channel
        • Steps in Adding Walmart as a Sales Channel
        • Editing Sales Channels
        • Adding a Manual Sales Channel
        • How to Exclude a Warehouse From Pushing Inventory to a Sales Channel
        • Assigning a Packing Slip and/or Email Template to your Sales Channel
        • Adding Sales Channels
        • Reactivating Sales Channels
    • Webhooks
        • Order Payment Webhook
        • Shopify Auto-Subscribing Webhooks
        • Shopify Product Update / Product Edit Webhook
        • Shopify Refund Webhook (e-commerce Orders)
        • Order Creation Webhook
        • Shopify Cancellation Webhook
        • Shopify Fulfillment Webhook
        • Shopify Refund Webhook - POS Orders
        • Shopify Product Deletion Webhook
        • BigCommerce Webhook
    • Shipping Providers
        • Adding Shipping Providers
        • Adding DHL eCommerce as a Shipping Provider
        • How to Add Express 1 as a Shipping Provider
        • Adding Amazon Buy Shipping as a Shipping Provider
        • UPS Mail Innovations Services
        • Customizing Shipping Services and Package Types Per Shipping Provider
        • FedEx ETD
        • Deactivate or Reactivate a Shipping Provider
        • Adding FedEx as a Shipping Provider
        • Adding Stamps.com as a Shipping Provider
    • Vendors
        • Adding a Dropship Vendor to Extensiv Order Manager
        • How to Automatically Create Purchase Orders For Dropship Orders
        • Creating or Updating Vendors
    • Warehouses & Vendors
        • Instructional Video - Creating Warehouses & Warehouse Settings
        • Use Component Inventory Setting for Bundles and Kits
        • Setting a Dropship Template and Fulfilling Orders with a P.O.
        • Configuring Dropship Vendor FTP
        • Configuring Shipping Label Print Format Options
        • Can I have additional order information populated on my Shipping label?
        • Configuring a Dropship Vendor
        • How to Configure the Order Export File for FTP Connections
        • Search for Vendors
        • Inventory Dependent Warehouses
        • Updating the Address/Return Address for Your Warehouse
        • Deactivating a Warehouse in Extensiv Order Management
        • Creating and Configuring Warehouses in Extensiv Order Manager
        • Pick List Settings
        • Setting Up Document Print Settings
        • Setting Up Domestic Backup Warehouses
        • FTP Inventory Import for a 3PL
        • Setting Up a Warehouse's International Rank
        • How do I connect Extensiv Order Manager with Deliver?
        • Setting Up a 3PL Warehouse
        • Creating an In-House Warehouse
    • Orderbots
        • Adding Order Item to Order Orderbot Action
        • Understanding Apply Best Rate vs Cheapest Rate Orderbots
        • Support for Shopify's Additional Details
        • Orderbots filtered by zip code range
        • Postal Zones in Extensiv Order Manager
        • Mark Order as Shipped Orderbot
        • Automating Orders to Fulfill from a Specific Warehouse
        • Editing an Orderbot
        • Deactivating an Orderbot in Extensiv Order Manager
        • Replace Address Orderbot
        • Creating an Orderbot
        • Orderbots - Complete List of Filters & Actions
        • Orderbot: Set order weight and dimensions based on products
        • Orderbot: Using Hold the order for and Mark Order as Shipped
        • Commonly Used Orderbots
    • Templates
        • Email Verification Process for P.O. & E-mail Templates
        • Email Templates
        • Setting up Packing Slip Templates
        • Setting up Purchase Order (PO) Templates

Shopify Refund Webhook (e-commerce Orders)

Current Additional Shopify Webhooks Options:

  • Shopify Order Creation Webhook
  • Shopify Order Payment Webhook
  • Shopify Fulfillment Webhook
  • Shopify POS Refund Webhook
  • Shopify e-commerce Refund Webhook
  • Shopify Cancellation Webhook
  • Shopify Product Deletion Webhook
  • Shopify Product Update / Product Edit Webhook

When an e-commerce order on Shopify is refunded fully or partially, a Refund object on Shopify is created and if configured, a webhook endpoint will be triggered in Extensiv Order Manager and we will automatically create a RMA for the refunded items sent by Shopify.

NOTE

This webhook will only create an RMA for orders in Shipped status in Order Manager. This webhook works for both Shopify e-commerce and POS orders. For information on how the POS refund webhook will work, see this article.


WARNING

Webhooks are not retroactive, so if they were not configured properly at the time of an event in Shopify, the event will not apply in Order Manager.


NOTE

This Refund Create webhook will work for both POS and non-POS orders. For information on how the POS refunds will operate, see the Order Manager RMA Creation Details (specific to POS orders) section of the article here.


How to set up the Refund Webhook

  • In Order Manager, navigate to the Settings Module, click Sales Channels, select the Shopify sales channel and click the Edit button. From here, go to the Connection tab and click Edit Integration.
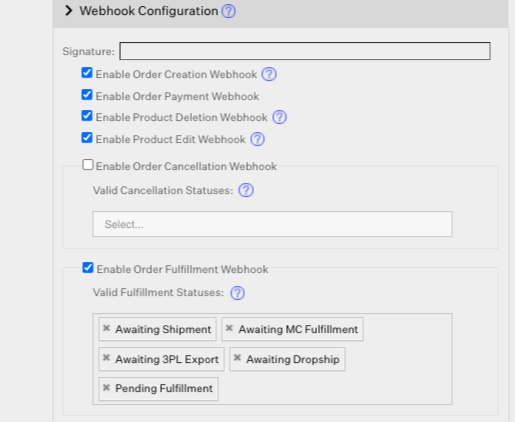
  • Expand the Webhook Configuration view.
  • Check the box for the Refund Webhook.
  • Here you can also choose the option “Restock items from Refund based on Shopify’s restock value”, which will allow Shopify and Order Manager to communicate if inventory will be restocked into Order Manager.
  • If this setting is enabled AND the return in Shopify has a restock value of true, Order Manager will set the action on the RMA as Reinsert.
  • If this setting is enabled AND the return in Shopify has a restock value of false, Order Manager will set the action on the RMA as Write Off
  • If this setting is disabled, Order Manager ignores the restock value from Shopify and the RMA action will have to be manually selected
  • Click the Save button.

Order Manager RMA Creation Details (specific to e-commerce orders)

When a refund is created in Shopify, the webhook will be hit and we will create an RMA for all the items involved. This works across splits and bundle breakdowns. The RMA in Order Manager will be automatically created with the below default information from Shopify.

If an RMA is created in this flow, it will NOT automatically be set to a Received status. You can mark the RMA as received whenever you see fit.

  • RMA Number = RMA-REFUND-[order-number]
  • RMA Notes = Created from Shopify Refund Webhook:[refund-reason-from-shopify]


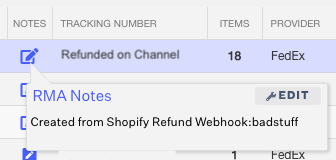
  • Tracking Number = Refunded on Channel
  • RMA Type = Refund
  • RMA Reason = Other
  • Loss to Seller = $0.00
  • RMA Item Action = IF the Restock items from Refund based on Shopify's restock value checkbox is enabled AND Shopify says to restock, then this value will be "Reinsert". Otherwise, it will be set to “Write Off”
  • The Returns Location can actually be configured using Shopify Location Warehouse Mappings. If we have a mapping for the Location ID we receive from the refund, then we will choose that warehouse’s returns location. If there are multiple warehouses pointing to this location, then we will choose the first one we find. If that warehouse does not have a returns location, then we will use the original order fulfillment source’s returns location.
  • Additionally, we have a feature in beta that would allow you to dictate a single Default Warehouse (as long as it's active) in place of the Returns Location via Warehouse Mappings for all of your RMAs created via returns webhooks after enabling this feature.
refunds e-commerce

Was this article helpful?

Yes
No
Share additional feedback about this article

Related Articles

  • Order Creation Webhook
  • Deactivating a Warehouse in Extensiv Order Management
  • Order Export Configuration in the UI- Complete List of Order Export Fields

Not finding the help you need?

Contact Support
Solutions
  • Solutions for Brands
  • Solutions for 3PLs
  • Solutions for 4PLs
  • Solutions for B2B
Products
  • Extensiv 3PL Warehouse Manager
  • Extensiv Warehouse Manager
  • Extensiv Order Manager
  • Extensiv Integration Manager
  • Extensiv Network Manager
Products
  • Customer Success
  • Implementation
  • Consulting
Ecosystem
  • Fulfillment Marketplace
  • Integrations
  • Partners
  • Become a Partner
Resources
  • Resource Library
  • Blog
  • Market Insights
  • What is a 3PL?
  • What is a 4PL?
  • What is a WMS?
  • Why a Cloud-based WMS?
  • Glossary
Help
  • Help Center
  • API Documentation
  • Extensiv Univerisity
  • Community
  • System Status
  • Extensiv Logo
  • 100 N Pacific Coast Hwy, Suite 1100, El Segundo, CA 90245
  • |
  • Contact Us:
  • 83-EXTENSIV 888.375.2368 (main)
  • |
  • 310.844.7570 (local)
  • Copyright © 2023 Extensiv
  • |
  • All rights reserved.
  • Privacy Policy
  • |
  • Terms of Service
  • Follow Us:
Expand