-
Settings
-
General
- Tax Identifiers
- Company Time Zone Setting
- Ruby Has 3PL Integration
- Disable the Inventory Update From Extensiv Order Manager to All Sales Channels
- Update My Profile
- How to Enable Out of Stock Control for eBay Sales Channels
- Company Info and Additional Account Settings
- How to View Your Extensiv Order Manager Invoices
- Installing an App from the Order Manager App Store
- How To Remove an App in Order Manager
- Configuring Shipping Presets
-
Sales Channels
- Walmart Fulfillment Services - WFS
- Setting Up Shipment & Carrier Mappings for Your Sales Channels
- WFS Workflow
- Amazon Cancellation Settings
- Amazon Pacific Time Orderbot Setting
- Shopify Locations
- Shopify Tags
- Enable or Disable Extensiv Order Manager Email Notifications to Your Customers
- Deactivating a Sales Channel
- Adding Shopify as a Sales Channel
- Viewing a Sales Edit Channel's History
- Adding Amazon as a Sales Channel
- Adding eBay as a Sales Channel
- Adding Newegg as a Sales Channel
- Steps in Adding Walmart as a Sales Channel
- Editing Sales Channels
- Adding a Manual Sales Channel
- How to Exclude a Warehouse From Pushing Inventory to a Sales Channel
- Assigning a Packing Slip and/or Email Template to your Sales Channel
- Adding Sales Channels
- Reactivating Sales Channels
-
Webhooks
- Order Payment Webhook
- Shopify Auto-Subscribing Webhooks
- Shopify Product Update / Product Edit Webhook
- Shopify Refund Webhook (e-commerce Orders)
- Order Creation Webhook
- Shopify Cancellation Webhook
- Shopify Fulfillment Webhook
- Shopify Refund Webhook - POS Orders
- Shopify Product Deletion Webhook
- BigCommerce Webhook
-
Shipping Providers
- Adding Shipping Providers
- Adding DHL eCommerce as a Shipping Provider
- How to Add Express 1 as a Shipping Provider
- Adding Amazon Buy Shipping as a Shipping Provider
- UPS Mail Innovations Services
- Customizing Shipping Services and Package Types Per Shipping Provider
- FedEx ETD
- Deactivate or Reactivate a Shipping Provider
- Adding FedEx as a Shipping Provider
- Adding Stamps.com as a Shipping Provider
- Vendors
-
Warehouses & Vendors
- Instructional Video - Creating Warehouses & Warehouse Settings
- Use Component Inventory Setting for Bundles and Kits
- Setting a Dropship Template and Fulfilling Orders with a P.O.
- Configuring Dropship Vendor FTP
- Configuring Shipping Label Print Format Options
- Can I have additional order information populated on my Shipping label?
- Configuring a Dropship Vendor
- How to Configure the Order Export File for FTP Connections
- Search for Vendors
- Inventory Dependent Warehouses
- Updating the Address/Return Address for Your Warehouse
- Deactivating a Warehouse in Extensiv Order Management
- Creating and Configuring Warehouses in Extensiv Order Manager
- Pick List Settings
- Setting Up Document Print Settings
- Setting Up Domestic Backup Warehouses
- FTP Inventory Import for a 3PL
- Setting Up a Warehouse's International Rank
- How do I connect Extensiv Order Manager with Deliver?
- Setting Up a 3PL Warehouse
- Creating an In-House Warehouse
-
Orderbots
- Adding Order Item to Order Orderbot Action
- Understanding Apply Best Rate vs Cheapest Rate Orderbots
- Support for Shopify's Additional Details
- Orderbots filtered by zip code range
- Postal Zones in Extensiv Order Manager
- Mark Order as Shipped Orderbot
- Automating Orders to Fulfill from a Specific Warehouse
- Editing an Orderbot
- Deactivating an Orderbot in Extensiv Order Manager
- Replace Address Orderbot
- Creating an Orderbot
- Orderbots - Complete List of Filters & Actions
- Orderbot: Set order weight and dimensions based on products
- Orderbot: Using Hold the order for and Mark Order as Shipped
- Commonly Used Orderbots
- Templates
-
General
Creating an Orderbot
Orderbots, a trademarked functionality of Extensiv Order Manager, are essentially if-then statements. (i.e. if an action is taken, then another action occurs in reaction to the first action.) Orderbots help automate your ordering process, making them more efficient and effective, and helping you save on both time and money.
For more information on orderbots, see What are Orderbots?
To Create an Orderbot
Step 1: Navigate to the SettingsModule.
Step 2: On the left sidebar, click Orderbots.
Step 3: On the Orderbots page, click New Orderbot.
Step 4: In the New Orderbot window, enter a name for the Orderbot.
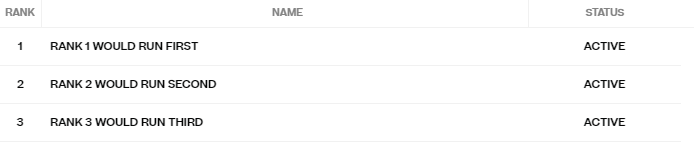
Step 5: Set an Orderbot Group. Orderbot Group allows you to visualize and specify the order in which your orderbots will apply when you have multiple.
NOTE
Bundle Breakdown orderbot actions will always apply first, regardless of Group, followed by Split orderbot actions.
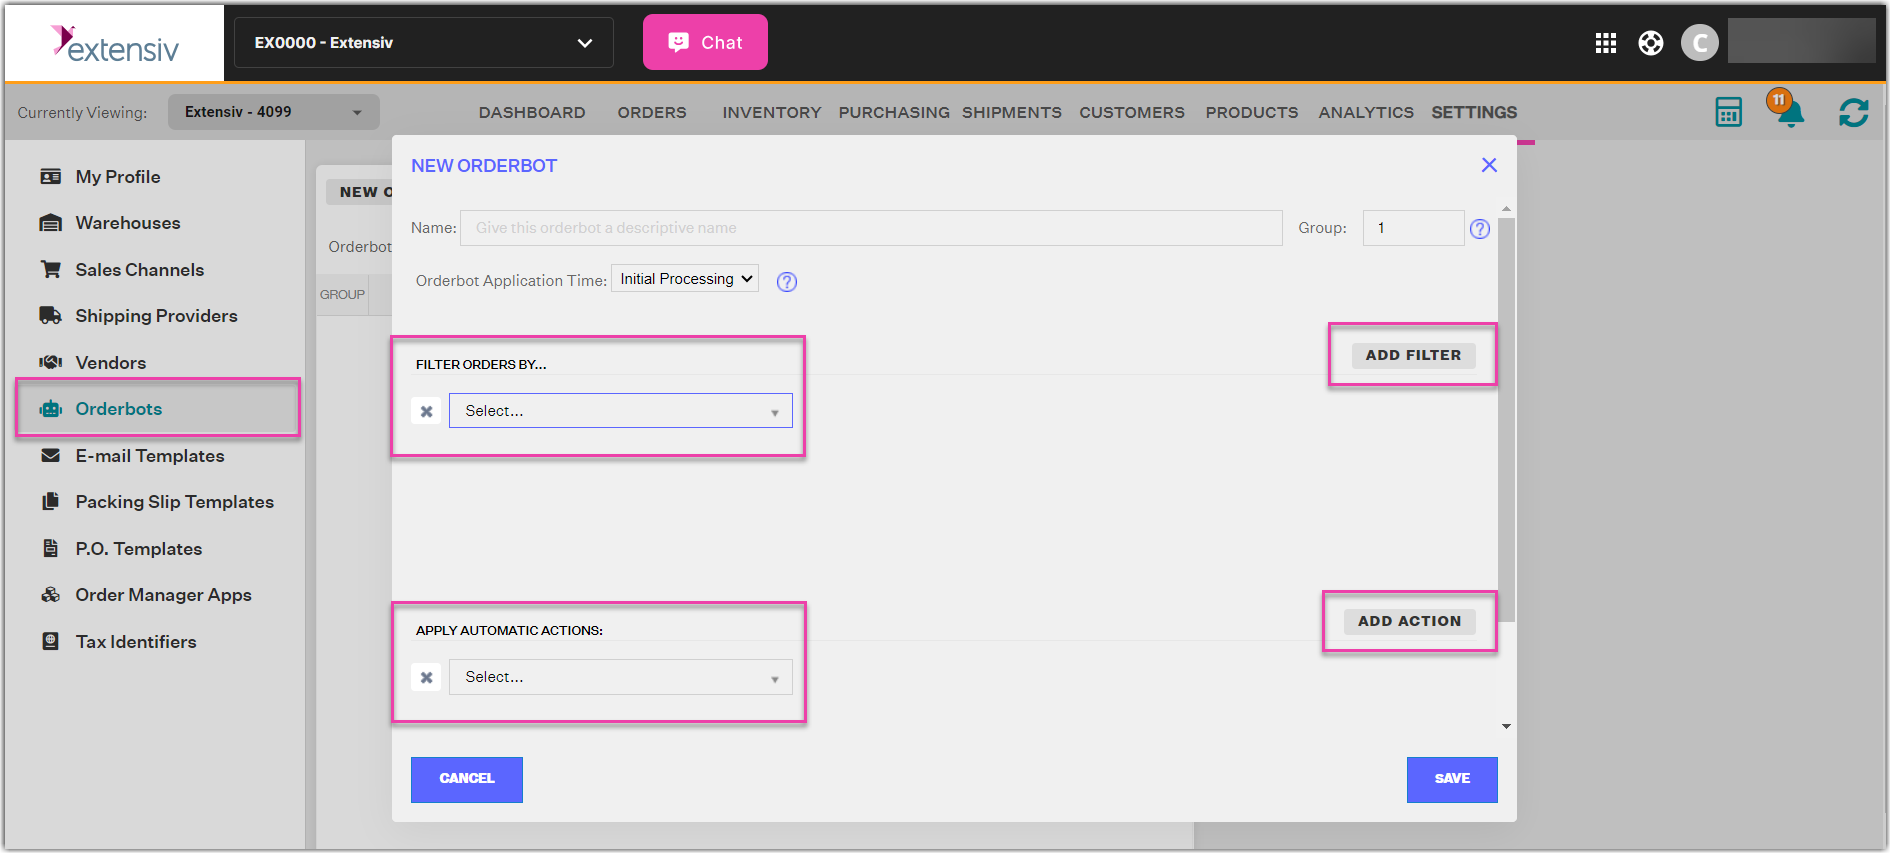
Step 6: Click Add Filter in the Filter Orders By section.
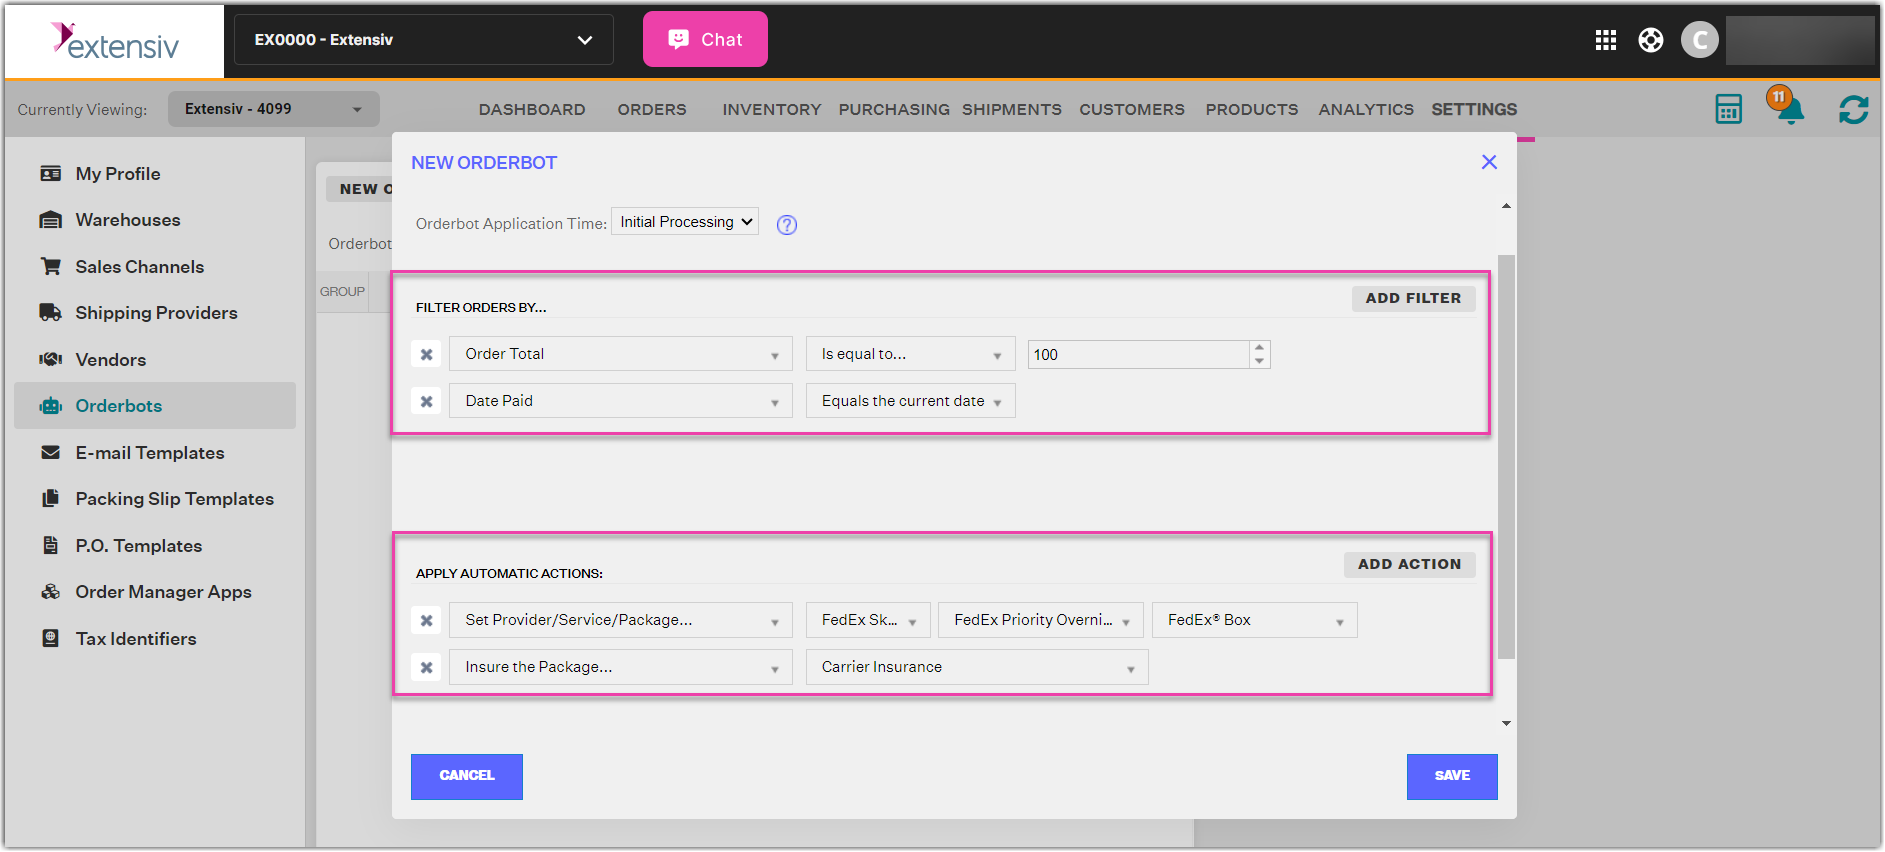
Select from among the available filter categories. As an example, for orders worth $100 and above, you can set set Order Total is equal to $100 as a filter category.
You can add as many filter categories as you want. Say you want to ensure that goods worth $100 and above are already paid for prior to shipping. You can add Date Paid is Equals the current date as an additional filter.
Step 7: On the Apply Automatic Actions section, click Add Action, then enter the automatic actions to apply to the records filtered according to your criteria in Step 4.
NOTE
actions with an ellipsis (...) after them will require you to input additional values in a field that will become visible after selecting the action.
The field that pops up will be unique for each action. Some actions will require multiple additional fields.
To continue with our example in Step 3, we select Set Carrier/Service/Package, then choose the appropriate shipping service and packaging options. In this case, we set the carrier to FedEx, the service to FedEx Priority Shipping, and the packaging to FedEx Box.
Just like you are able to add multiple filters for precision in automation, you are able to apply multiple actions to an orderbot. Thus, say you want to insure the package considering the high order amount, you can add Insure the package as an action, then select Carrier Insurance as the insurer.
Step 8: Click Save. Back on the Orderbots page, you will then see the orderbot added to your list of active orderbots.
Continuing with our example, once you save the orderbot, subsequent orders worth $100 and above and already paid for as of the current date will be shipped via FedEx Priority Shipping using a FedEx Box, and insured using Carrier Insurance. The orderbot will look like the screenshot below.

Â
Â