Understanding Automatic Package Generation
2.1 min read
|There are a number of ways you can automatically pack an order, namely the Recalculate Packages and Consolidate Packages features. These automatic packing methods allow you to place order contents in the fewest number of packages, either in a single package or using the dimensions defined in an item's setup.
This article reviews what to expect when using automatic packing methods in 3PL Warehouse Manager.
Automatic packing logic
When recalculating or consolidating packages on an order, default package generation logic is as follows.
- The system pulls from the amount defined as 'Primary Units Per Packaging Unit' on an item's setup when determining how many packages to create.
- When recalculating packages, partial quantities are rounded up to the nearest package quantity.
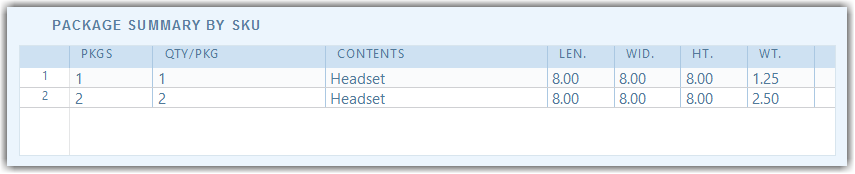
- For example, if you have a SKU that uses 2 primary units per packaging UOM and an order line item calls for a quantity of 5, the Recalculate Packages feature places this line item into three packages.
- We recommend that you do not attempt to use Recalculate Packages on orders where the package quantity would exceed 2,000 default packages, as doing so runs the risk of the request timing out.
- When consolidating packages, the full order quantity is placed into one specified package.
- It's important to note that the system accepts your package selection without performing an active pre-check.
- In order to use this feature, you must have fully defined packaging materials in the system.
- If you use the Process Packages feature after recalculating or consolidating packages, you can edit or confirm package contents from the Package Summary by SKU grid.
- If sending an ASN via FTP, the Send ASN functionality automatically generates packages to then apply them to the file that is sent to the FTP.
- If you do not have packages already assigned, then clicking Documents > Send ASN from the Find Orders or Edit Order pages generates the default packages.
- If you do have packages added via SmartPack, Process Packages, or Consolidate Packages, then clicking Documents > Send ASN from the Find Orders or Edit Order pages generates the file with those packages.
- To avoid unintended timeouts, please ensure the selected orders contain less than 10,000 packages.
What to expect when utilizing an automatic packing method
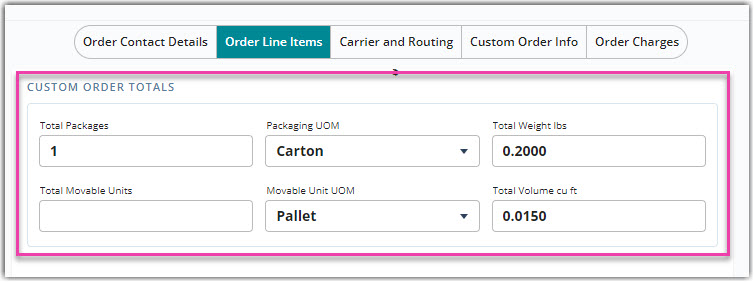
Custom order totals are relevant if you want to bill by weight or package count. Once you complete an automatic packing method for an order, all custom entries are overwritten.
-
Total Packages: Number of packaging units on an order
- You must complete one of the automatic packing methods detailed above or create an order via import template to automatically populate a value in this field.
-
Packaging UOM: Type of packaging unit on an order
- This optional field contains standard measurement options and is typically used on custom bills of lading or for labeling purposes.
-
Total Weight: Default weight of an order, measured in Imperial or Metric
- This field populates automatically based on an order's line items.
-
Total Movable Units: Number of movable units on an order
- You must manually enter a value for this field.
-
Movable Unit UOM: Type of movable unit on an order
- This optional field contains standard measurement options and is typically used on custom bills of lading or for labeling purposes.
- Total Volume: Default volume of an order, measured in cubic feet
- This field populates automatically based on an order's line items.
If you add/edit/remove a line item or edit allocations, the 'Total Weight' and 'Total Volume' values adjust accordingly, but any custom values defined for 'Total Packages' and 'Total Movable Units' remain unchanged. To adjust the total packages and MUs, you must use an automatic packing method or manually enter these values.