3PL Warehouse Manager

Updated on April 24th, 2025

  • Extensiv Hub
    Popular Articles Getting Started Using Hub Technical Issues & FAQs Extensiv's Ideas Portal
  • 3PL Warehouse Manager
    Receiving Operations Inventory Management Shipping Operations System Configuration Scanning Operations Integrations Content Best Practice Resources Release Notes Popular Articles Troubleshooting Guides
  • Warehouse Management
    Getting Started Admin Console Shipping Order Picking & Packing Receiving Customer Portal Cycle Counting Kit Building Managing Users Barcode Scanner Import/Export Integrations Barcoding Wave Picking Bin Move Mobile Receiving and Picking Settings Popular Articles Reporting
  • Order Management
    Dashboard Orders Inventory Purchase Orders Shipments Customers Products Analytics Settings API API Integrations Accessing and Navigating Order Manager Error Messages Order Manager Popular Articles Accounting Integrations
  • Integration Management
    Getting Started with Integration Manager General Support Troubleshooting Extras & Addons API Documentation Popular Articles Order Sources Order Destinations
  • FAQs
  • Network Manager
    Getting Started Order Routing Management Technical Issues Shopping Carts Settings Settings, Products, and Orders
  • Billing Manager
    Getting Started Using Billing Manager
  • Release Notes
    Extensiv Sandbox Extensiv Extensiv Hub 3PL Warehouse Manager Integration Management Warehouse Management Order Management Billing Manager
  • Fulfillment Marketplace
    Getting Started
  • Sandbox
    Getting Started
+ More
  • Help Center
  • 3PL Warehouse Manager
  • Shipping Operations
  • Small Parcel Carriers
  • Shipping Operations
    • Order Creation
        • Creating Orders
        • Importing Orders
        • Entering Order Contact Details
        • Entering Order Line Items
        • Entering Carrier and Routing Information
        • Entering Custom Order Info
        • Entering Order Charges
        • Cloning an Order
    • Order Management
        • Understanding Order Statuses
        • Navigating the Find Orders Page
        • Generating Order Documents
        • Batch Order Processing
        • Adjusting Order Charges
    • Shipping Setups
        • Understanding the Parcel API
        • Connecting Carriers to Providers
        • Understanding Carrier Account Logic
        • Configuring Zebra Browser Print
        • Configuring Small Parcel Settings
        • Using Address Validation
        • Connecting Multiple Accounts for the Same Carrier
        • Managing Carrier Accounts
        • Configuring Fulfillment Invoicing
        • Using a Flat File Carrier Integration
        • Managing Shipping Carriers
        • Configuring a Drop Ship Address
        • Managing Ship-to Contacts
        • Managing Retailers
        • Importing Ship-to Contacts
        • Managing Ship Method Mappings
        • Managing 3rd-Party-Billing Contacts
        • Shipping Hazardous Materials
    • Small Parcel Carriers
        • Shipping in Small Parcel Suite
        • Shipping with Amazon Buy
        • Shipping with APC
        • Shipping with Australia Post
        • Shipping with Canada Post
        • Shipping with Canpar
        • Shipping with DHL eCommerce
        • Shipping with DHL Express (AU)
        • Shipping with DHL Express (US)
        • Shipping with ePost Global
        • Shipping with FedEx
        • Shipping with FirstMile
        • Shipping With Flexport
        • Shipping with Globegistics
        • Shipping with Landmark
        • Shipping with OnTrac
        • Shipping with PARCLL
        • Shipping with Passport
        • Shipping with Pitney Bowes Cross-Border Delivery
        • Shipping with Pitney Bowes Standard
        • Shipping with Purolator
        • Shipping with RR Donnelley
        • Shipping with SEKO Ecommerce
        • Shipping with Sendle
        • Shipping with Stallion Express
        • Shipping with Tusk Logistics
        • Shipping with UPS
        • Shipping with USPS (BUKU Ship)
        • Shipping with USPS (Endicia)
        • Shipping with USPS (Stamps.com)
        • Shipping with UPS Mail Innovations®
        • Shipping with FedEx One Rate®
        • Shipping with USPS (Pitney Bowes Expedited)
        • Connecting Small Parcel to UPS
    • Packing Basics
        • Packing Orders
        • Managing Packing Materials
        • Configuring Scales for SmartPack
        • Creating Packing Slip Templates
        • Processing Packages
        • Understanding Automatic Package Generation
        • Consolidating Packages
        • Recalculating Packages
        • Using Packing Materials
        • Understanding Multi-Tier Packing in Process Packages
    • Order Processing
        • Navigating the Small Parcel Homepage
        • Packing in the Small Parcel Space
        • Shipping in the Small Parcel Space
        • Using High Volume Processing (HVP) with SmartParcel
        • Printing Return Labels
        • Printing Combo Labels
        • Voiding Shipping Labels
        • Troubleshooting Blank Shipping Labels
        • Creating End of Day Requests (Manifesting)
    • Billing Best Practices for Shipping
        • Common Transactional Shipping Charges
        • Flat Order Processing Fees
        • Item-Based Handling Fees
        • Freight Fees
    • International Shipping
        • Shipping Internationally with SmartParcel
        • Capturing Digital Assets for FedEx ETD
        • Tax Identifiers in Small Parcel Suite
        • Package Description for Mexico Shipments
      • Enabling Integrated Packing Slip

Shipping with UPS Mail Innovations®

UPS has partnered with the postal service to offer UPS Mail Innovations®, which offers UPS customers faster delivery times when you use qualified packaging to ship lightweight parcels and flat mail. 3PL Warehouse Manager has added these service levels under the UPS carrier options for Mail Innovations customers to use with SmartPack and SmartParcel.

This article reviews how to successfully ship using UPS Mail Innovations services.

Before you can proceed with the steps below, you must have the following completed:

  • UPS Mail Innovations authorized on your UPS shipping account—contact your UPS representative to activate
  • SmartParcel enabled for your account under Admin > Settings
 

Please note that UPS Mail Innovations does not support reference fields (label messages) and rate shopping. We currently also do not support rate returns for UPS Mail Innovations labels. The actual rates will appear on your bill from UPS.


Step 1: Specify Mail Innovations options in carrier setup

When you connect your UPS account to SmartParcel on the Small Parcel Settings page, you must enter the following information on the carrier setup:

  • Mail Innovations Endorsement: Specifies what the carrier should do in the event of non-delivery
  • Mail Innovations Cost Center: Specifies the cost center associated for billing on the UPS account
  • Use Consolidation Services: When checked, specifies your use of Mail Innovations
  • Use Order Number On Mail Innovations Label (optional): When checked, includes relevant order number on the Mail Innovations label

If you have not connected your UPS account to SmartParcel, please see Shipping with UPS for further guidelines.

If you have already set up your UPS account without specifying these Mail Innovations values, please contact Extensiv Technical Support and let them know you need to modify your UPS account to reflect the relevant Mail Innovations values.

Step 2: Define Mail Innovations packaging materials

For each package you want to use to pack an order, you must first set them up in 3PL Warehouse Manager. The instructions to do so are as follows:

  1. Navigate to Orders > Manage Packaging.
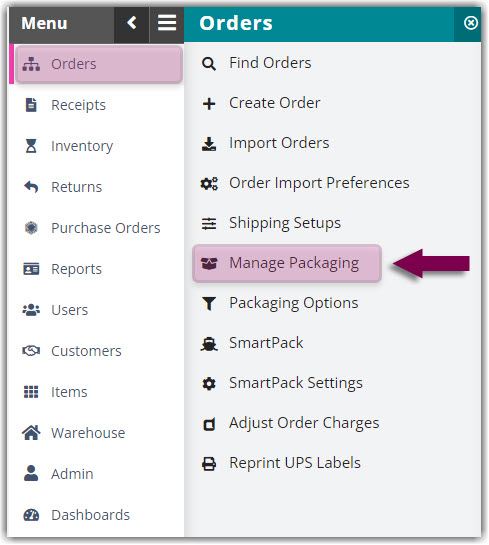
  2. Click Create to open the Create New Package Type dialog.

     
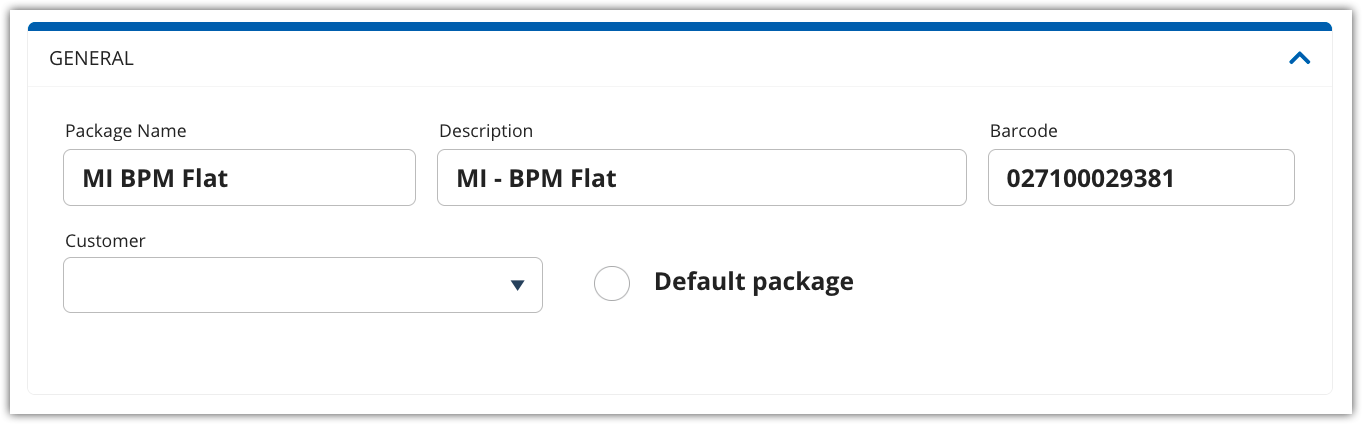
  3. Complete each field under General—Package Name and Description are required.

     
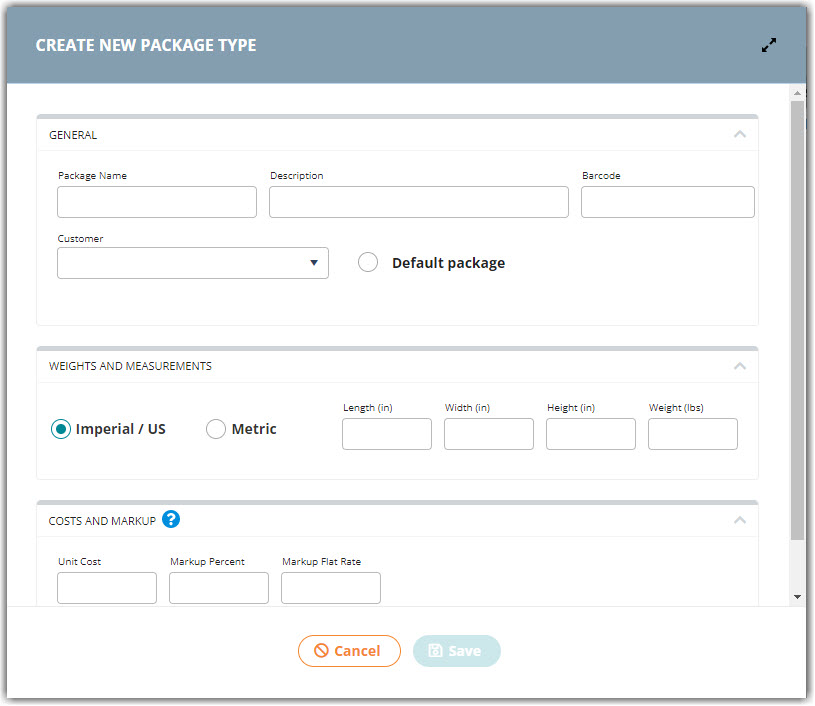
    • Package Name: Unique identifier for the new package type
    • Description: Value used to quickly reference the package details on the Manage Packaging page
       This value must match the package description exactly as listed below (feel free to copy and paste the package names):
      • MI - BPM Flat
      • MI - BPM Parcel
      • MI - First Class
      • MI - Irregulars (< 1 lb)
      • MI - Machinables (6 to 15 oz)
      • MI - Media Mail
      • MI - Parcel Post (1 to 70 lbs)
      • MI - Priority
      • MI - Standard Flat (< 1 lb)
      • MI Intl - BPM
      • MI Intl - Flats
      • MI Intl - Parcels
    • Barcode: Unique value users can scan during the packing process to identify the package type
    • Customer: Specifies the customer for which this package type is available—if no customer is selected, the package type is available for use with all customers
    • Default package: When checked, this package type is located at the top of the package list when shipping with SmartPack—note only one default package type is supported
  4. Enter the accurate dimensions of the package under Weights and Measurements. Please note that you may need to convert the measurements from fractions to decimal values.
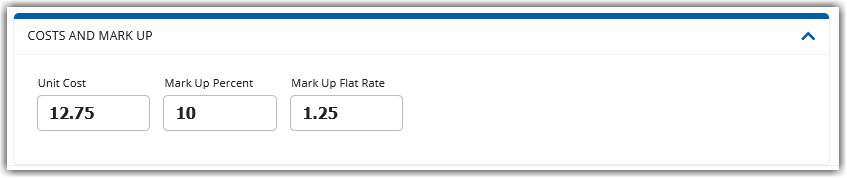
  5. Optional: Specify the cost and mark-up rates under Costs and Mark Up. If you specify both a percentage and flat rate for markups costs, both of these fees are calculated and accounted for in transactional package fees.
    • Unit Cost: Cost associated with package type
    • Mark Up Percent: Default markup percentage used to charge customers for package materials
    • Mark Up Flat Rate: Default markup rate used to charge customers for package materials
  6. Click Save to add this as an available package type.

Repeat Steps 2–6 for each Mail Innovations package you wish to define.

Please be aware that if UPS modifies a package's name or measurement, you must update the package in 3PL Warehouse Manager. To do this, select the package type from the grid, click Edit, make the necessary changes, then click Save.

Step 3: Select supported service level on order

Not every UPS service level is supported with UPS Mail Innovations, so you must ensure that the service level selected for an order is listed below. If one of these service levels are not selected, you will receive an error when attempting to print the shipping label:

  • Economy Mail Innovations – International
  • Expedited Mail Innovations
  • Mail Innovations – First Class
  • Mail Innovations – Priority Mail
  • Priority Mail Innovations – International

You can define a service level on an order by manually editing the order, uploading an order import template, or utilizing an integration.

Step 4: Pack order with Mail Innovations packaging

Once a supported service level is defined on the order, you can pack the order as you normally would using Mail Innovations packaging via SmartPack, SmartScan, or Consolidate Packages.

shipping ups mail

Was this article helpful?

Yes
No
Share additional feedback about this article

Related Articles

  • Understanding Allocation Logic
  • Creating Purchase Orders
  • Packing Orders with SmartScan
  • Shipping with UPS

Not finding the help you need?

Contact Support
Solutions
  • Solutions for Brands
  • Solutions for 3PLs
  • Solutions for 4PLs
  • Solutions for B2B
Products
  • Extensiv 3PL Warehouse Manager
  • Extensiv Warehouse Manager
  • Extensiv Order Manager
  • Extensiv Integration Manager
  • Extensiv Network Manager
Products
  • Customer Success
  • Implementation
  • Consulting
Ecosystem
  • Fulfillment Marketplace
  • Integrations
  • Partners
  • Become a Partner
Resources
  • Resource Library
  • Blog
  • Market Insights
  • What is a 3PL?
  • What is a 4PL?
  • What is a WMS?
  • Why a Cloud-based WMS?
  • Glossary
Help
  • Help Center
  • API Documentation
  • Extensiv Univerisity
  • Community
  • System Status
  • Extensiv Logo
  • 100 N Pacific Coast Hwy, Suite 1100, El Segundo, CA 90245
  • |
  • Contact Us:
  • 83-EXTENSIV 888.375.2368 (main)
  • |
  • 310.844.7570 (local)
  • Copyright © 2023 Extensiv
  • |
  • All rights reserved.
  • Privacy Policy
  • |
  • Terms of Service
  • Follow Us:
Expand