Order Management

Updated on March 20th, 2025

  • Extensiv Hub
    Popular Articles Getting Started Using Hub Technical Issues & FAQs Extensiv's Ideas Portal
  • 3PL Warehouse Manager
    Receiving Operations Inventory Management Shipping Operations System Configuration Scanning Operations Integrations Content Best Practice Resources Release Notes Popular Articles Troubleshooting Guides
  • Warehouse Management
    Getting Started Admin Console Shipping Order Picking & Packing Receiving Customer Portal Cycle Counting Kit Building Managing Users Barcode Scanner Import/Export Integrations Barcoding Wave Picking Bin Move Mobile Receiving and Picking Settings Popular Articles Reporting
  • Order Management
    Dashboard Orders Inventory Purchase Orders Shipments Customers Products Analytics Settings API API Integrations Accessing and Navigating Order Manager Error Messages Order Manager Popular Articles Accounting Integrations
  • Integration Management
    Getting Started with Integration Manager General Support Troubleshooting Extras & Addons API Documentation Popular Articles Order Sources Order Destinations
  • FAQs
  • Network Manager
    Getting Started Order Routing Management Technical Issues Shopping Carts Settings Settings, Products, and Orders
  • Billing Manager
    Getting Started Using Billing Manager
  • Release Notes
    Extensiv Sandbox Extensiv Extensiv Hub 3PL Warehouse Manager Integration Management Warehouse Management Order Management Billing Manager
  • Fulfillment Marketplace
    Getting Started
  • Sandbox
    Getting Started
+ More
  • Help Center
  • Order Management
  • Settings
  • General
  • Settings
    • General
        • Tax Identifiers
        • Company Time Zone Setting
        • Ruby Has 3PL Integration
        • Disable the Inventory Update From Extensiv Order Manager to All Sales Channels
        • Update My Profile
        • How to Enable Out of Stock Control for eBay Sales Channels
        • Company Info and Additional Account Settings
        • How to View Your Extensiv Order Manager Invoices
        • Installing an App from the Order Manager App Store
        • How To Remove an App in Order Manager
        • Configuring Shipping Presets
    • Sales Channels
        • Walmart Fulfillment Services - WFS
        • Setting Up Shipment & Carrier Mappings for Your Sales Channels
        • WFS Workflow
        • Amazon Cancellation Settings
        • Amazon Pacific Time Orderbot Setting
        • Shopify Locations
        • Shopify Tags
        • Enable or Disable Extensiv Order Manager Email Notifications to Your Customers
        • Deactivating a Sales Channel
        • Adding Shopify as a Sales Channel
        • Viewing a Sales Edit Channel's History
        • Adding Amazon as a Sales Channel
        • Adding eBay as a Sales Channel
        • Adding Newegg as a Sales Channel
        • Steps in Adding Walmart as a Sales Channel
        • Editing Sales Channels
        • Adding a Manual Sales Channel
        • How to Exclude a Warehouse From Pushing Inventory to a Sales Channel
        • Assigning a Packing Slip and/or Email Template to your Sales Channel
        • Adding Sales Channels
        • Reactivating Sales Channels
    • Webhooks
        • Order Payment Webhook
        • Shopify Auto-Subscribing Webhooks
        • Shopify Product Update / Product Edit Webhook
        • Shopify Refund Webhook (e-commerce Orders)
        • Order Creation Webhook
        • Shopify Cancellation Webhook
        • Shopify Fulfillment Webhook
        • Shopify Refund Webhook - POS Orders
        • Shopify Product Deletion Webhook
        • BigCommerce Webhook
    • Shipping Providers
        • Adding Shipping Providers
        • Adding DHL eCommerce as a Shipping Provider
        • How to Add Express 1 as a Shipping Provider
        • Adding Amazon Buy Shipping as a Shipping Provider
        • UPS Mail Innovations Services
        • Customizing Shipping Services and Package Types Per Shipping Provider
        • FedEx ETD
        • Deactivate or Reactivate a Shipping Provider
        • Adding FedEx as a Shipping Provider
        • Adding Stamps.com as a Shipping Provider
    • Vendors
        • Adding a Dropship Vendor to Extensiv Order Manager
        • How to Automatically Create Purchase Orders For Dropship Orders
        • Creating or Updating Vendors
    • Warehouses & Vendors
        • Instructional Video - Creating Warehouses & Warehouse Settings
        • Use Component Inventory Setting for Bundles and Kits
        • Setting a Dropship Template and Fulfilling Orders with a P.O.
        • Configuring Dropship Vendor FTP
        • Configuring Shipping Label Print Format Options
        • Can I have additional order information populated on my Shipping label?
        • Configuring a Dropship Vendor
        • How to Configure the Order Export File for FTP Connections
        • Search for Vendors
        • Inventory Dependent Warehouses
        • Updating the Address/Return Address for Your Warehouse
        • Deactivating a Warehouse in Extensiv Order Management
        • Creating and Configuring Warehouses in Extensiv Order Manager
        • Pick List Settings
        • Setting Up Document Print Settings
        • Setting Up Domestic Backup Warehouses
        • FTP Inventory Import for a 3PL
        • Setting Up a Warehouse's International Rank
        • How do I connect Extensiv Order Manager with Deliver?
        • Setting Up a 3PL Warehouse
        • Creating an In-House Warehouse
    • Orderbots
        • Adding Order Item to Order Orderbot Action
        • Understanding Apply Best Rate vs Cheapest Rate Orderbots
        • Support for Shopify's Additional Details
        • Orderbots filtered by zip code range
        • Postal Zones in Extensiv Order Manager
        • Mark Order as Shipped Orderbot
        • Automating Orders to Fulfill from a Specific Warehouse
        • Editing an Orderbot
        • Deactivating an Orderbot in Extensiv Order Manager
        • Replace Address Orderbot
        • Creating an Orderbot
        • Orderbots - Complete List of Filters & Actions
        • Orderbot: Set order weight and dimensions based on products
        • Orderbot: Using Hold the order for and Mark Order as Shipped
        • Commonly Used Orderbots
    • Templates
        • Email Verification Process for P.O. & E-mail Templates
        • Email Templates
        • Setting up Packing Slip Templates
        • Setting up Purchase Order (PO) Templates

Tax Identifiers

Overview


When shipping internationally, there are many cases where you need to provide a tax identifier for the customs documents. Extensiv Order Manager allows these Tax IDs to be added to any international order for both the shipper (you) and the buyer (your customer/the recipient of the order).


NOTE

This article covers tax identifier functionality for Shipper Tax ID, NOT Buyer Tax ID. Currently, there is no automation built for Buyer IDs.


Set-Up

Access

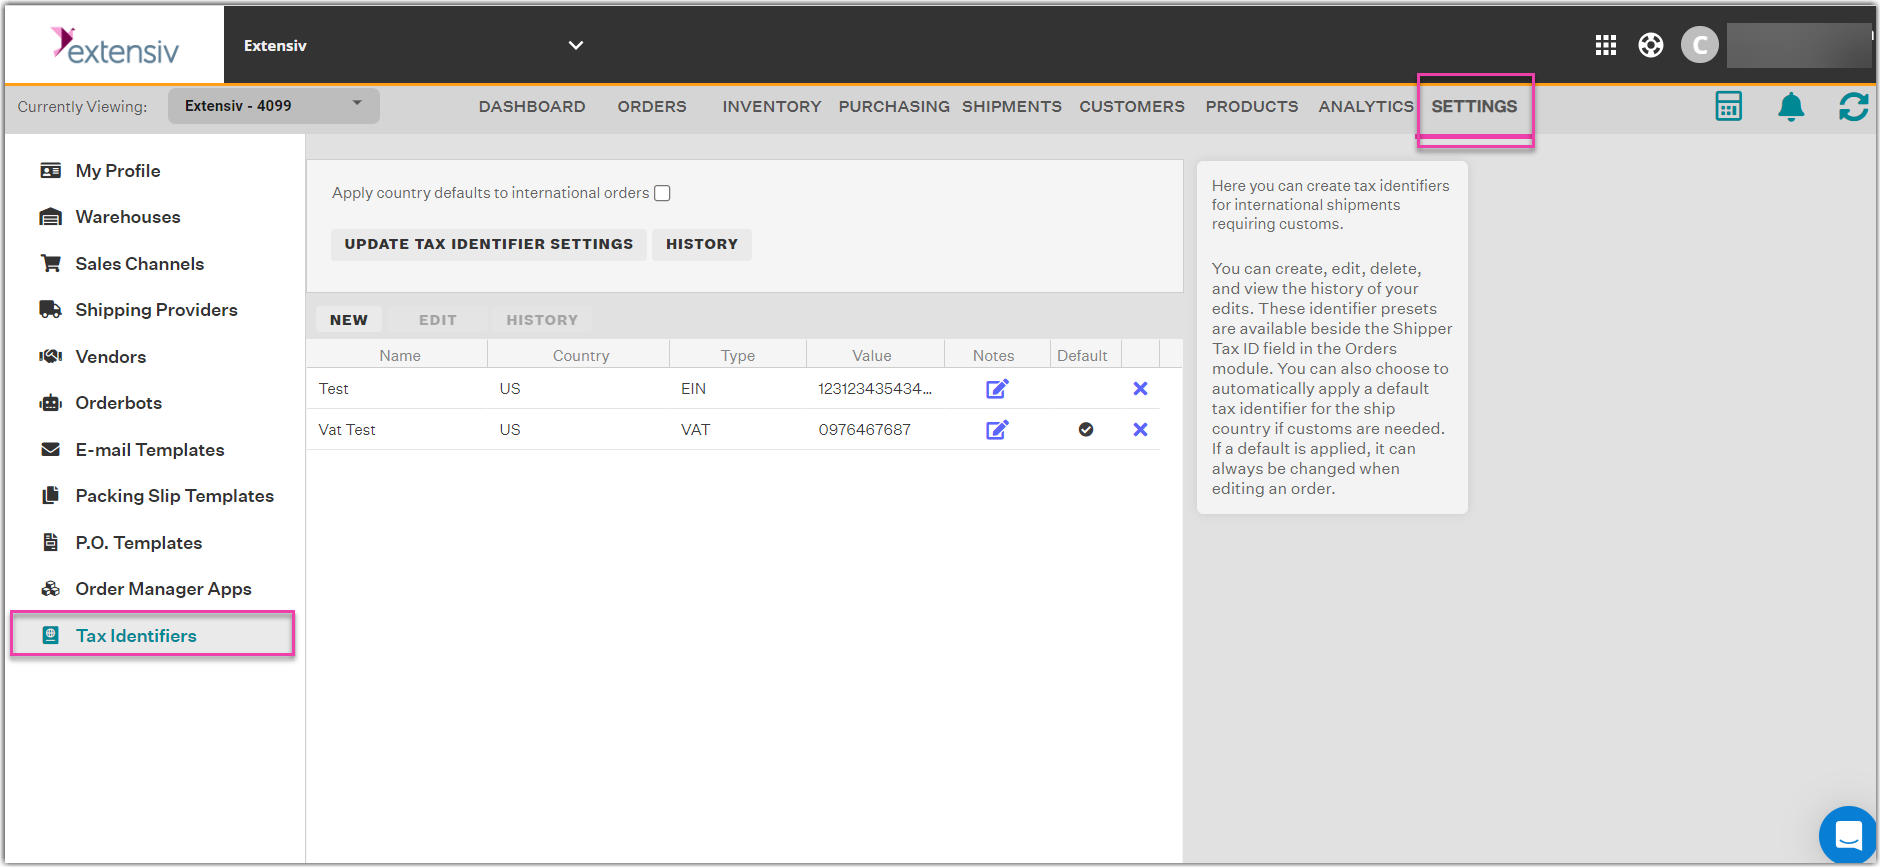
To access Tax Identifier settings, go to the Settings Module. At the bottom-left of the page, find Tax Identifiers and select it.


NOTE

You will need to have access to Shipping Providers in your User Administration / Permissions to view this page.


Settings


The only setting option is to Apply country defaults to international orders. After checking/unchecking this setting, you must click Update Tax Identifier Settings or your edit will not be saved.
 

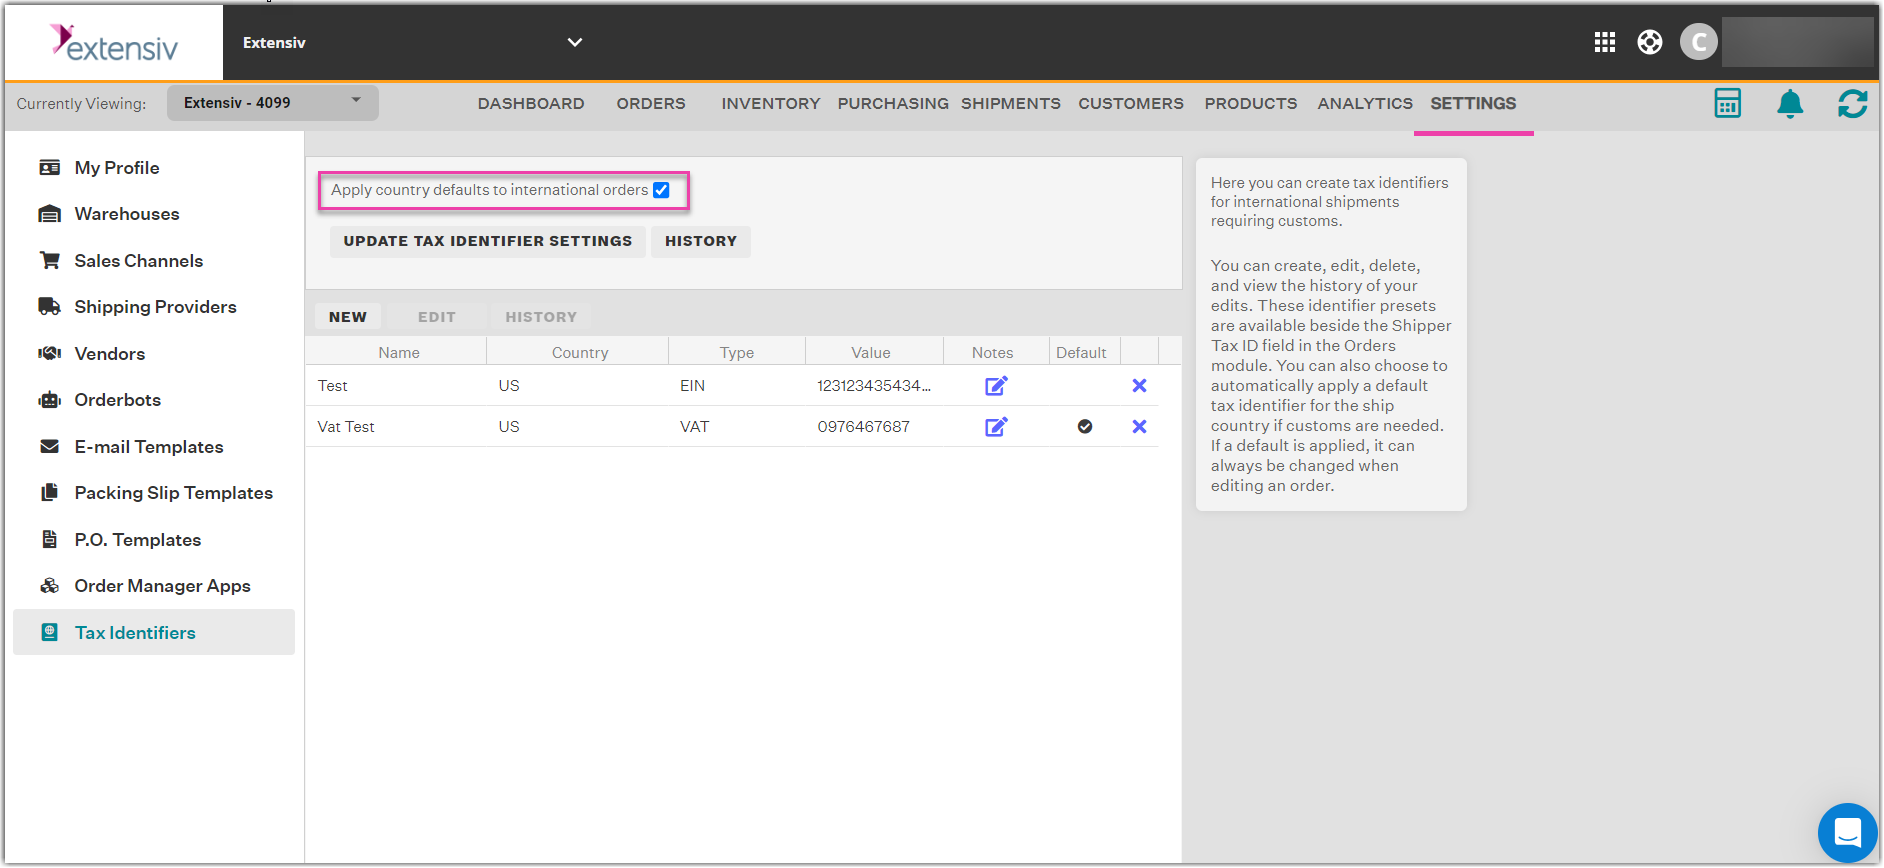
  • If selected, any Tax Identifier that is indicated as a Country Default in the grid will be utilized for shipments going to that Country. This is the Ship-To Country of an order.
     
  • If unchecked, no automation will apply to your orders. You can still set Tax Identifiers individually in an order edit window.


The Grid


You can create new tax identifiers, edit and delete existing ones, and view the history for each.

Adding a New Tax Identifier:

  1. Click New
     
  2. Give the Tax Identifier a Name
     
  3. Select the Ship-To Country this Tax ID will be used for.
     
  4. Select the ID Type from the dropdown menu options
     
  5. Input an ID Value
     
  6. Enter any Notes you want for this Tax Identifier that can be viewed in the Grid.
     
  7. Indicate whether this Tax Identifier should be the Country Default or not.
     
    Notes
  • You can have multiple tax identifiers of the same type for the same country.
     
  • You cannot have two identifiers with the same Name value regardless of Country or Type.
     
  • You do not need to have a country default selected for a country, but you can only have ONE default.
     
  • If you add/edit another tax identifier for the same country and mark it as the default, it will override the existing default.
     

ID Types

  • None
     
  • Other
     
  • GST (Goods and Services Tax number)
     
  • VAT (Value Added Tax number)
     
  • EORI (Economic Operators Registration and Identification number)
     
  • IOSS (Import One-Stop-Shop number)
     
  • PAN (Permanent Account Number)
     
  • EIN (Employer Identification Number)

Tax Identifiers in Action


In the Orders module, view an unshipped order with an international Ship-To Country. In the Processing tab, scroll to the bottom of the window. Here, you should see a section called Shipper Tax ID.


If the setting for Apply country defaults to international orders is checked on, then:

  • If the Ship-To Country is one that has a Country Default set, the Type and ID field should be filled out.
     
  • If the Ship-To Country is NOT one that has a Country Default set, then these fields will be blank.

Regardless of the setting, you can select from Preset options in the dropdown menu (Tax IDs), specifically for the Country that the order is set to ship to. You will not see any Preset options if you have not set up any Tax Identifiers in Settings for the Ship-To Country for the order. Buyer fields are NOT affected by the presets.

  • If the Ship-To Country is the United States (indicating a domestic order) OR if it is blank, the Shipper Tax ID section will not be filled out.
     
  • If the Ship-To Country is edited to a country you have a Country Default Tax Identifier for, then it will be filled in automatically.
     
  • Edits to Tax ID inputs will be recorded in the Order Edit History
     
tax code tax number

Was this article helpful?

Yes
No
Share additional feedback about this article

Related Articles

  • Channel Allocation Rules
  • Reactivating Sales Channels

Not finding the help you need?

Contact Support
Solutions
  • Solutions for Brands
  • Solutions for 3PLs
  • Solutions for 4PLs
  • Solutions for B2B
Products
  • Extensiv 3PL Warehouse Manager
  • Extensiv Warehouse Manager
  • Extensiv Order Manager
  • Extensiv Integration Manager
  • Extensiv Network Manager
Products
  • Customer Success
  • Implementation
  • Consulting
Ecosystem
  • Fulfillment Marketplace
  • Integrations
  • Partners
  • Become a Partner
Resources
  • Resource Library
  • Blog
  • Market Insights
  • What is a 3PL?
  • What is a 4PL?
  • What is a WMS?
  • Why a Cloud-based WMS?
  • Glossary
Help
  • Help Center
  • API Documentation
  • Extensiv Univerisity
  • Community
  • System Status
  • Extensiv Logo
  • 100 N Pacific Coast Hwy, Suite 1100, El Segundo, CA 90245
  • |
  • Contact Us:
  • 83-EXTENSIV 888.375.2368 (main)
  • |
  • 310.844.7570 (local)
  • Copyright © 2023 Extensiv
  • |
  • All rights reserved.
  • Privacy Policy
  • |
  • Terms of Service
  • Follow Us:
Expand