
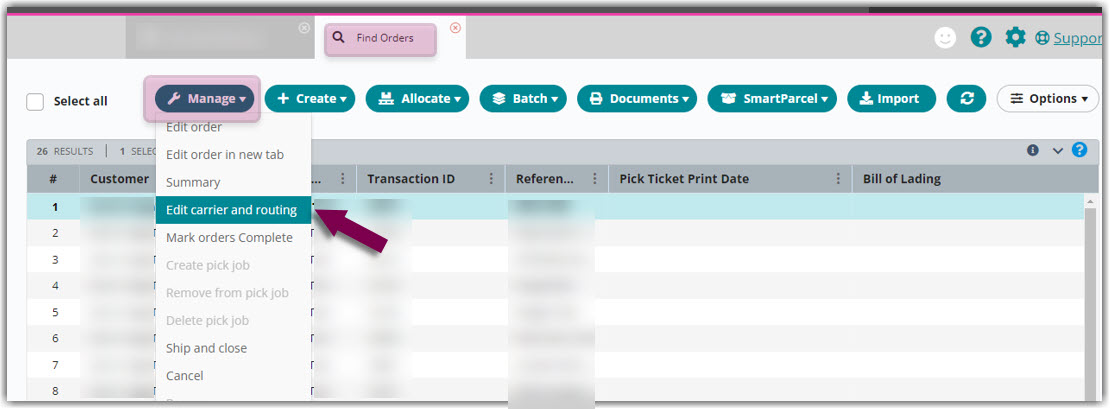
Entering Carrier and Routing Information
The Carrier and Routing section of an order allows you to identify shipping information for that order, such as the carrier, the service, and the billing type. If an order was created through an import file or pre-wired integration, these details should populate based upon your predetermined connection settings.
This article reviews how to enter carrier and routing information on an order.
Carrier
Carrier information is required to provide shipping details regarding which carrier is shipping an order to the designated recipient.
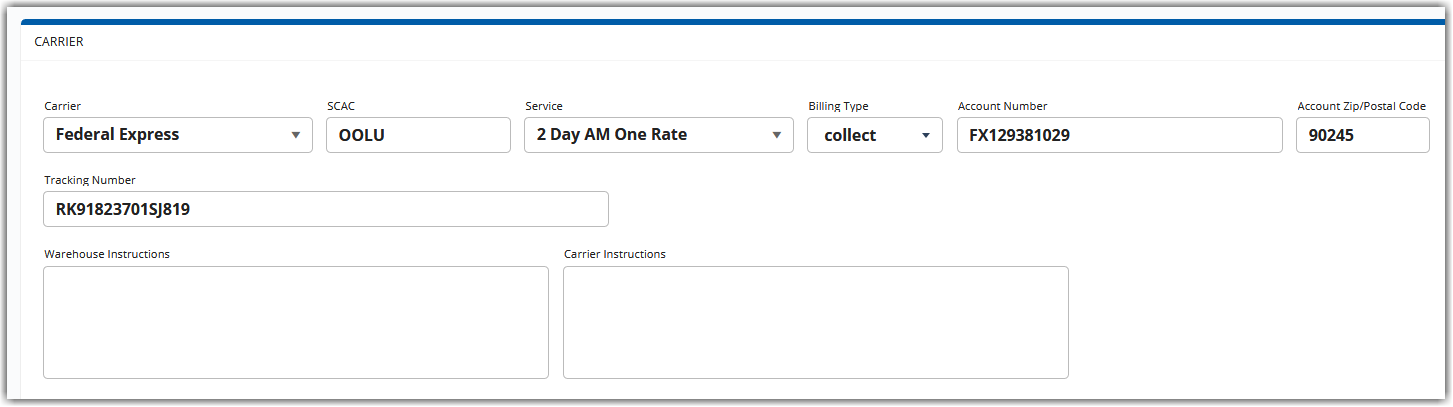
The carriers that auto-populate in the Carrier drop-down field are either system defaults or custom carriers that a warehouse admin user has set up under Admin > Manage Carriers. The relevant Account Number and Zip/Postal values also auto-populate if you have these values defined in the customer's setup.
To specify the carrier that is shipping the order, make a selection from the drop-down menu or select the field to manually enter a carrier's information for single use. Fill out the remaining fields as necessary.
Each billing type has slight variations in name (depending on the selected carrier) and is defined as follows:
- Collect or Consignee: The carrier bills shipping charges to the recipient
- Prepaid: The carrier bills shipping charges to the shipper's account
- Third-Party: The carrier bills shipping charges to a party other than the shipper or recipient—requires you to specify a valid account number and zip code
Below is additional information for the two bottom Carrier fields:
- Warehouse Instructions: Notes entered here are usually specific warehouse handling instructions pertinent to that transaction; these notes are printed on warehouse pick tickets
- Carrier Instructions: Notes entered here are usually specific handling instructions for the carrier; these notes are printed on the Bill of Lading and packing slip
Routing
When filled out, routing information is considered important information for the carrier and prints on delivery documentation or Bills of Lading. For LTL and FTF transactions, it is best practice to have this section completed.

Since it is best practice to create BOL numbers at the time of routing, we recommend generating a BOL prior to printing UCC labels. Otherwise, the label will not include the BOL number.
Small Parcel Shipping
The Small Parcel Shipping container allows you to specify delivery and insurance options on the order. These fields are also available under Manage > Edit Shipping Info on the Small Parcel homepage and under Manage > Edit Carrier and Routing on the Find Orders page.
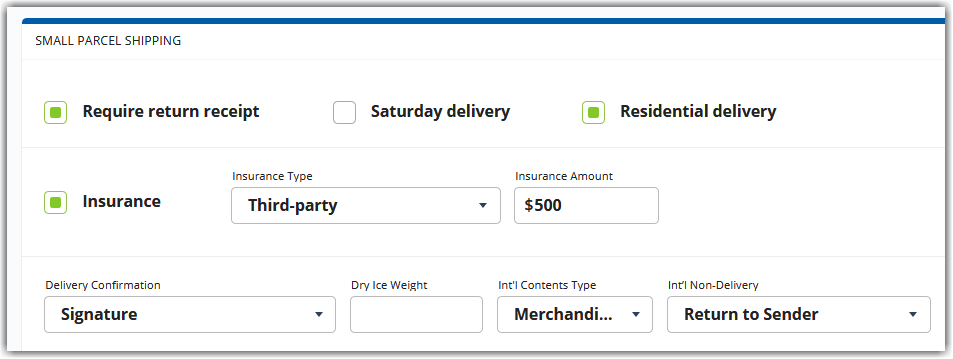
Each field is detailed below—please note that those which contain asterisks (*) indicate that not all carriers and service levels support the delivery option. If one of these options are selected with an unsupported carrier/service, you will receive an error message when you print your shipping labels.
- Require return receipt: When checked, requires a recipient's signature upon delivery (not currently supported)
- Saturday delivery*: When checked, indicates that you require Saturday delivery for this shipment
- Residential delivery*: When checked, indicates that the delivery address is residential
-
Insurance: When checked and completed, includes insurance amount in the final shipping charge
-
Insurance Type: Identifies where insurance is being purchased
- None: Indicates that no insurance will be applied to the order
- Carrier: Indicates that insurance will be purchased from the carrier
- Third-party: Indicates that a third party will provide the insurance
- Insurance Amount: Specifies the total charges associated with the insurance
-
Insurance Type: Identifies where insurance is being purchased
-
Delivery Confirmation: Indicates what type of confirmation an order requires—choose from the following options:
- None: No confirmation required
- Delivery: Recipient receives a text or email notification upon delivery
- Signature: Recipient must sign for the delivery
- Adult Signature: Recipient must sign for the delivery and be at least 21 years old
- Direct Signature: Someone at the delivery address must sign for the delivery (specific to FedEx)
- Dry Ice Weight*: Indicates the amount of dry ice contained in the shipment
- Int'l Contents Type: Identifies the contents of the order (if no selection is made, the system defaults to 'Merchandise')
-
Int'l Non-Delivery: Specifies the action a shipping carrier should take if they are unable to deliver an order to the specified recipient—choose from the following options:
- Treat as Abandoned: Leave the package in the most secure location at the specified address (defaults to this option if no selection is made)
- Return to Sender: Return the package to the shipping facility or the defined return address (see Printing Return Labels for more information)
Once you've entered the order's carrier and routing information, you can continue to the next section—Custom Order Info. If you'd like to come back and edit the order at a later time, don't forget to click Save!