3PL Warehouse Manager

Updated on November 6th, 2023

  • Extensiv Hub
    Popular Articles Getting Started Using Hub Technical Issues & FAQs Extensiv's Ideas Portal
  • 3PL Warehouse Manager
    Receiving Operations Inventory Management Shipping Operations System Configuration Scanning Operations Integrations Content Best Practice Resources Release Notes Popular Articles Troubleshooting Guides
  • Warehouse Management
    Getting Started Admin Console Shipping Order Picking & Packing Receiving Customer Portal Cycle Counting Kit Building Managing Users Barcode Scanner Import/Export Integrations Barcoding Wave Picking Bin Move Mobile Receiving and Picking Settings Popular Articles Reporting
  • Order Management
    Dashboard Orders Inventory Purchase Orders Shipments Customers Products Analytics Settings API API Integrations Accessing and Navigating Order Manager Error Messages Order Manager Popular Articles Accounting Integrations
  • Integration Management
    Getting Started with Integration Manager General Support Troubleshooting Extras & Addons API Documentation Popular Articles Order Sources Order Destinations
  • FAQs
  • Network Manager
    Getting Started Order Routing Management Technical Issues Shopping Carts Settings Settings, Products, and Orders
  • Billing Manager
    Getting Started Using Billing Manager
  • Release Notes
    Extensiv Sandbox Extensiv Extensiv Hub 3PL Warehouse Manager Integration Management Warehouse Management Order Management Billing Manager
  • Fulfillment Marketplace
    Getting Started
  • Sandbox
    Getting Started
+ More
  • Help Center
  • 3PL Warehouse Manager
  • Shipping Operations
  • Shipping Setups
  • Shipping Operations
    • Order Creation
        • Creating Orders
        • Importing Orders
        • Entering Order Contact Details
        • Entering Order Line Items
        • Entering Carrier and Routing Information
        • Entering Custom Order Info
        • Entering Order Charges
        • Cloning an Order
    • Order Management
        • Understanding Order Statuses
        • Navigating the Find Orders Page
        • Generating Order Documents
        • Batch Order Processing
        • Adjusting Order Charges
    • Shipping Setups
        • Understanding the Parcel API
        • Connecting Carriers to Providers
        • Understanding Carrier Account Logic
        • Configuring Zebra Browser Print
        • Configuring Small Parcel Settings
        • Using Address Validation
        • Connecting Multiple Accounts for the Same Carrier
        • Managing Carrier Accounts
        • Configuring Fulfillment Invoicing
        • Using a Flat File Carrier Integration
        • Managing Shipping Carriers
        • Configuring a Drop Ship Address
        • Managing Ship-to Contacts
        • Managing Retailers
        • Importing Ship-to Contacts
        • Managing Ship Method Mappings
        • Managing 3rd-Party-Billing Contacts
        • Shipping Hazardous Materials
    • Small Parcel Carriers
        • Shipping in Small Parcel Suite
        • Shipping with Amazon Buy
        • Shipping with APC
        • Shipping with Australia Post
        • Shipping with Canada Post
        • Shipping with Canpar
        • Shipping with DHL eCommerce
        • Shipping with DHL Express (AU)
        • Shipping with DHL Express (US)
        • Shipping with ePost Global
        • Shipping with FedEx
        • Shipping with FirstMile
        • Shipping With Flexport
        • Shipping with Globegistics
        • Shipping with Landmark
        • Shipping with OnTrac
        • Shipping with PARCLL
        • Shipping with Passport
        • Shipping with Pitney Bowes Cross-Border Delivery
        • Shipping with Pitney Bowes Standard
        • Shipping with Purolator
        • Shipping with RR Donnelley
        • Shipping with SEKO Ecommerce
        • Shipping with Sendle
        • Shipping with Stallion Express
        • Shipping with Tusk Logistics
        • Shipping with UPS
        • Shipping with USPS (BUKU Ship)
        • Shipping with USPS (Endicia)
        • Shipping with USPS (Stamps.com)
        • Shipping with UPS Mail Innovations®
        • Shipping with FedEx One Rate®
        • Shipping with USPS (Pitney Bowes Expedited)
        • Connecting Small Parcel to UPS
    • Packing Basics
        • Packing Orders
        • Managing Packing Materials
        • Configuring Scales for SmartPack
        • Creating Packing Slip Templates
        • Processing Packages
        • Understanding Automatic Package Generation
        • Consolidating Packages
        • Recalculating Packages
        • Using Packing Materials
        • Understanding Multi-Tier Packing in Process Packages
    • Order Processing
        • Navigating the Small Parcel Homepage
        • Packing in the Small Parcel Space
        • Shipping in the Small Parcel Space
        • Using High Volume Processing (HVP) with SmartParcel
        • Printing Return Labels
        • Printing Combo Labels
        • Voiding Shipping Labels
        • Troubleshooting Blank Shipping Labels
        • Creating End of Day Requests (Manifesting)
    • Billing Best Practices for Shipping
        • Common Transactional Shipping Charges
        • Flat Order Processing Fees
        • Item-Based Handling Fees
        • Freight Fees
    • International Shipping
        • Shipping Internationally with SmartParcel
        • Capturing Digital Assets for FedEx ETD
        • Tax Identifiers in Small Parcel Suite
        • Package Description for Mexico Shipments
      • Enabling Integrated Packing Slip

Configuring Fulfillment Invoicing

If your customer needs you to include an invoice with the package you're shipping, you can do so with our fulfillment invoicing functionality. This article reviews how to configure fulfillment invoicing and apply it to your e-commerce orders.

You must have Fulfillment Invoicing enabled for your account under Admin > Settings before you can proceed with configuration.


Step 1: Enable for each customer

The first step in configuring fulfillment invoicing is enabling the option in your customer settings.

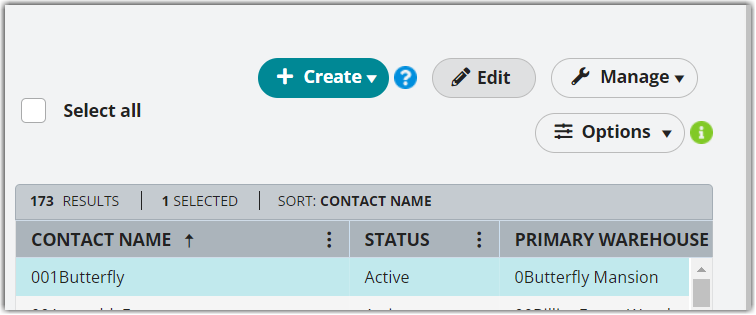
  1. Navigate to Customers > Manage Customers, select a relevant customer from the grid, then click Edit.
  2. Click the Orders configuration section, then select Fulfillment invoicing enabled.
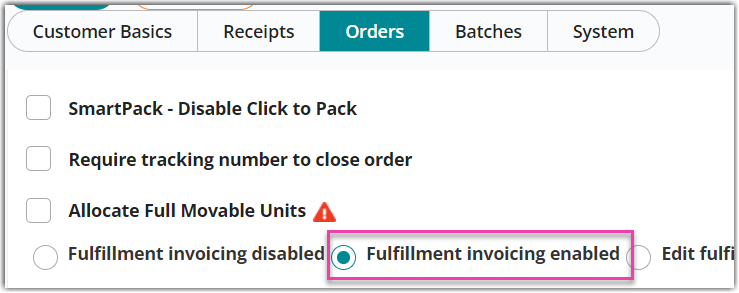
  3. Click Save.

Repeat these steps for each customer as needed.

Step 2: Set the price for each item

Once fulfillment invoicing is enabled for each relevant customer, you'll need to ensure the Sell Price is entered for each relevant item. You can do this via a batch item update or manual entry—each method is reviewed below.

Please note that pre-wired API integrations cannot pull the item's price from your customer's shopping cart, so you must have the accurate Sell Price defined in 3PL Warehouse Manager.


To get started, navigate to Items > Manage Items, then select the relevant customer from the drop-down menu. Continue with your preferred set of instructions below.

Update item prices one at a time

If you only have a few items that need updating, you may find it easiest to edit each item's record one at a time, rather than exporting the item data and importing the updates into the system.

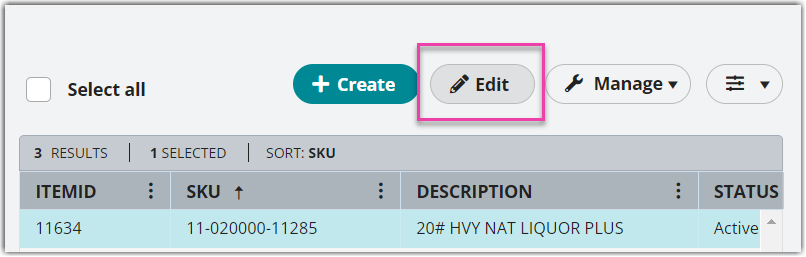
  • To update a single item's price, select a relevant item from the grid, then click Edit.
  • In the 'Description' section, adjust the 'Sell Price' as needed, then click Save.
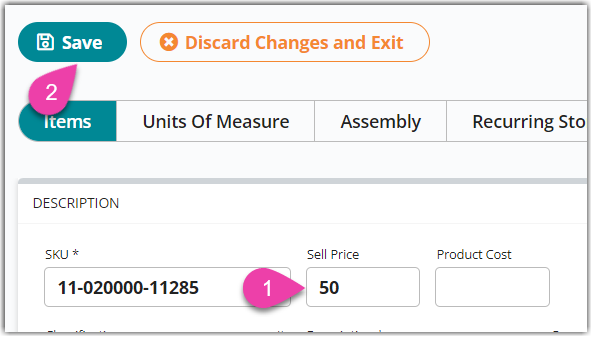
  • Repeat for each item as needed.

Update multiple item prices at one time

If you have many items that need updating or already have this information in a spreadsheet, we recommend using the batch-update option below.

  1. Export the item information.
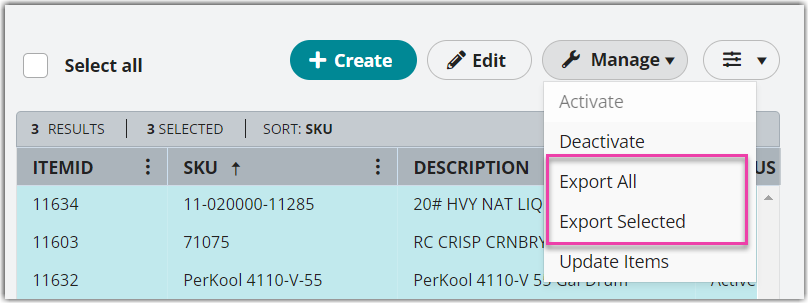
    • If most or all of the items in the grid need updating, select Manage > Export All to export all items.
    • If you'd rather export a specific set of items, select the items from the grid (using < Ctrl > or < Shift > to multi-select), then click Manage > Export Selected.
  2. Select whether you want to 'Include inactive items', then click Export to download the item information.

    Exporting from our system normally gives a 1-to-1 representation of the data from the grid. However, when numerical values contain leading zeroes or exceed 11 characters, those values automatically convert to scientific notation upon opening the file.

     
    One method of avoiding this in Excel is saving the file, converting it to a .txt file, then importing it into Excel. To do this, open a blank worksheet, select the Data tab, then specify to import 'From Text/CSV'. For further guidance on this, please refer to Microsoft's help article here.
  3. Once the exported file downloads, open the file and update the 'Price' (in Column BG) for each relevant item.
  4. Save the file in Text (Tab delimited) format.
  5. On the Manage Items page, select Manage > Update Items.
  6. Click Select Import File (txt), then double-click the file on your device.
  7. All changes populate in the Expected Data Changes container. Verify that these are accurate, then click Confirm to update your items and receive a confirmation message.

Step 3: Include item prices on your order

Once you've set up the cost for each item, the prices will transfer to the relevant orders. These orders are typically imported or populated via an API/EDI integration, and the prices will be displayed in the Order Line Items grid on the order.

For order imports, you or your customer must utilize our Flex Header Order Import Template, which has a specific section dedicated to Fulfillment Invoicing Fields and contains a separate worksheet for importing instructions. For further guidance, please see our articles on Importing Orders and Import Template FAQs.

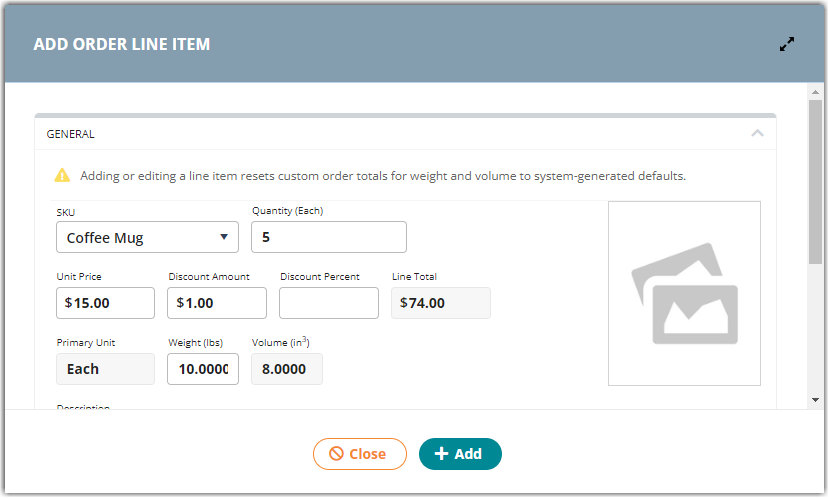
If you're manually adding a line item to an order, you'll notice the following fields:

  • Unit Price: the price per primary unit
  • Discount Amount: the flat discount applied to the units
  • Discount Percent: the discount percentage applied to the units
  • Line Total: the total price for all the units, minus any defined discounts

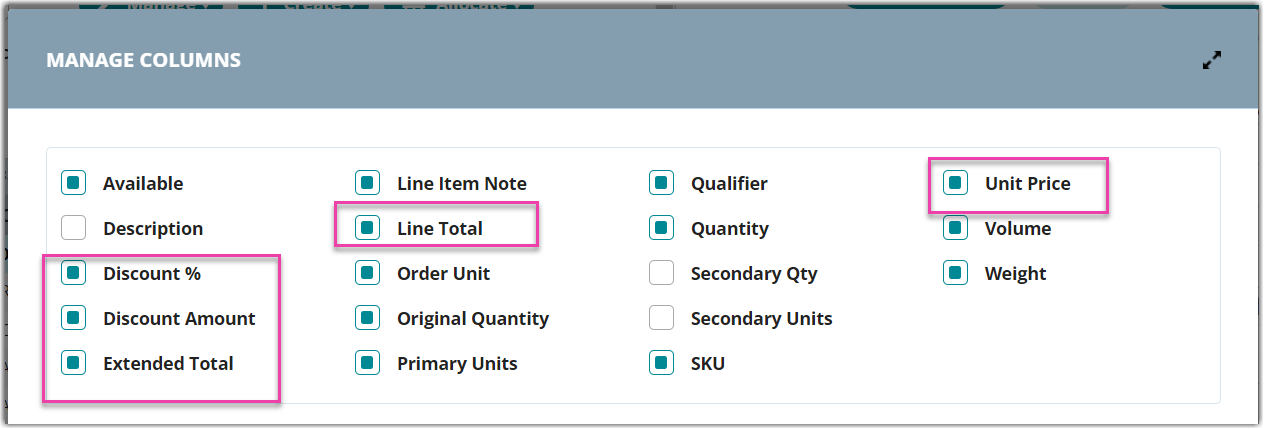
You can also include each of these fields as grid columns in the Order Line Items grid by clicking Options > Columns, and then selecting each relevant column. The 'Extended Total' column can also be applied, which indicates the total price of the line item without discounts.

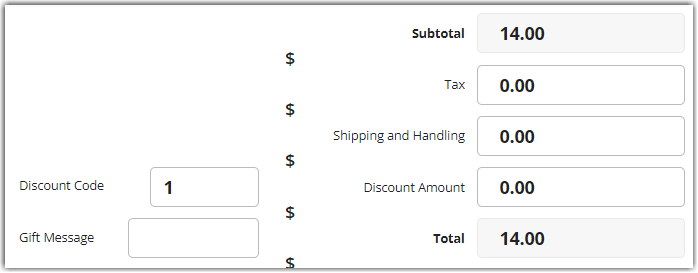
Please note that the fields outlined above are specific to the line items in the grid, which are included in the subtotal on the invoice. The bottom fields below the grid are additional discounts you can apply at the order level, which may be applied due to a Discount Code. If used, these amounts can be entered manually but are typically imported with the Flex Header Order Import Template, as mentioned above.

Step 4: Pack the order and generate a custom packing slip

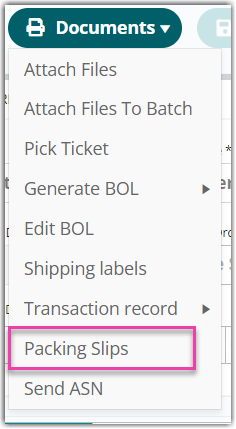
Once your order is ready to pack and prepare for shipment, you'll proceed with your normal packing process. When it comes time to print your packing slip, you'll select the order from the grid, then select Documents > Packing Slip from Find Orders or Manage > Create Packing Slips from the Small Parcel homepage.

For the first Packing Slip Version, select Fulfillment Invoice from the drop-down list.

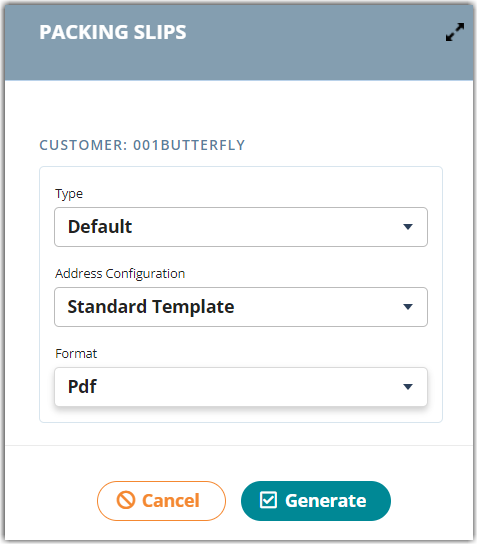
Select the appropriate Export type, then click Generate. A confirmation message will appear, and the packing slip will be generated in the selected format.

Once you include the packing slips in your package, the order is ready for shipment and you can close the order.


configure billing setup invoicing

Was this article helpful?

Yes
No
Share additional feedback about this article

Related Articles

  • Understanding Directed Putaway Logic
  • Entering Carrier and Routing Information
  • Picking a Single Order
  • Configuring a Drop Ship Address

Not finding the help you need?

Contact Support
Solutions
  • Solutions for Brands
  • Solutions for 3PLs
  • Solutions for 4PLs
  • Solutions for B2B
Products
  • Extensiv 3PL Warehouse Manager
  • Extensiv Warehouse Manager
  • Extensiv Order Manager
  • Extensiv Integration Manager
  • Extensiv Network Manager
Products
  • Customer Success
  • Implementation
  • Consulting
Ecosystem
  • Fulfillment Marketplace
  • Integrations
  • Partners
  • Become a Partner
Resources
  • Resource Library
  • Blog
  • Market Insights
  • What is a 3PL?
  • What is a 4PL?
  • What is a WMS?
  • Why a Cloud-based WMS?
  • Glossary
Help
  • Help Center
  • API Documentation
  • Extensiv Univerisity
  • Community
  • System Status
  • Extensiv Logo
  • 100 N Pacific Coast Hwy, Suite 1100, El Segundo, CA 90245
  • |
  • Contact Us:
  • 83-EXTENSIV 888.375.2368 (main)
  • |
  • 310.844.7570 (local)
  • Copyright © 2023 Extensiv
  • |
  • All rights reserved.
  • Privacy Policy
  • |
  • Terms of Service
  • Follow Us:
Expand