3PL Warehouse Manager

Updated on February 3rd, 2023

Contact Us

If you still have questions or prefer to get help directly from an agent, please submit a request.
We’ll get back to you as soon as possible.

Please fill out the contact form below and we will reply as soon as possible.

  • Extensiv Hub
    Getting Started Using Hub Technical Issues & FAQs
  • 3PL Warehouse Manager
    Receiving Operations Inventory Management Shipping Operations System Configuration Scanning Operations Integrations Content Best Practice Resources Release Notes
  • Warehouse Manager
    Getting Started Admin Console Shipping Order Picking & Packing Receiving Customer Portal Cycle Counting Kit Building Managing Users Barcode Scanner Import/Export Integrations Barcoding Wave Picking Bin Move Mobile Receiving and Picking Settings
  • Order Manager
    Dashboard Orders Inventory Purchase Orders Shipments Customers Products Analytics Settings API API Integrations Accessing and Navigating Order Manager Error Messages Order Manager
  • Integration Manager
    General Support Order Sources Order Destinations Troubleshooting API Documentation Extras & Addons
  • FAQs
  • Support
+ More
  • Help Center
  • 3PL Warehouse Manager
  • Shipping Operations
  • Order Creation
  • Shipping Operations
    • Order Creation
        • Creating Orders
        • Importing Orders
        • Entering Order Contact Details
        • Entering Order Line Items
        • Entering Carrier and Routing Information
        • Entering Custom Order Info
        • Entering Order Charges
    • Order Management
        • Understanding Order Statuses
        • Navigating the Find Orders Page
        • Generating Order Documents
        • Batch Order Processing
        • Adjusting Order Charges
    • Shipping Setups
        • Understanding the Parcel API
        • Connecting Carriers to Providers
        • Understanding Carrier Account Logic
        • Configuring Zebra Browser Print
        • Configuring Small Parcel Settings
        • Using Address Validation
        • Connecting Multiple Accounts for the Same Carrier
        • Managing Carrier Accounts
        • Shipping with UPS Mail Innovations®
        • Shipping with FedEx One Rate®
        • Shipping Internationally with SmartParcel
        • Capturing Digital Assets for International Shipping
        • Configuring Fulfillment Invoicing
        • Using a Flat File Carrier Integration
        • Managing Shipping Carriers
        • Configuring a Drop Ship Address
        • Managing Ship-to Contacts
        • Managing Retailers
        • Importing Ship-to Contacts
        • Managing Ship Method Mappings
        • Managing 3rd-Party-Billing Contacts
    • Small Parcel Carriers
        • Shipping in Small Parcel Suite
        • Shipping with Amazon Buy
        • Shipping with APC
        • Shipping with Australia Post
        • Shipping with Canada Post
        • Shipping with Canpar
        • Shipping with DHL eCommerce
        • Shipping with DHL Express (AU)
        • Shipping with DHL Express (US)
        • Shipping with FedEx
        • Shipping with FirstMile
        • Shipping with Globegistics
        • Shipping with Landmark
        • Shipping with OnTrac
        • Shipping with Purolator
        • Shipping with RR Donnelley
        • Shipping with SEKO Ecommerce
        • Shipping with UPS
        • Shipping with USPS (Endicia)
        • Shipping with USPS (Stamps.com)
        • Shipping with PARCLL
        • Shipping with ePost Global
    • Packing Basics
        • Packing Orders
        • Managing Packaging
        • Configuring Scales for SmartPack
        • Creating Packing Slip Templates
        • Processing Packages
        • Understanding Automatic Package Generation
        • Consolidating Packages
        • Recalculating Packages
    • Order Processing
        • Navigating the Small Parcel Homepage
        • Packing in the Small Parcel Space
        • Shipping in the Small Parcel Space
        • Using High-Volume Processing (HVP) with SmartParcel
        • Printing Return Labels
        • Printing Combo Labels
        • Creating End of Day Requests (Manifesting)
        • Voiding Shipping Labels
        • Troubleshooting Blank Shipping Labels
    • Billing Best Practices for Shipping
        • Common Transactional Shipping Charges
        • Flat Order Processing Fees
        • Item-Based Handling Fees
        • Freight Fees

Entering Custom Order Info

The Custom Order Info section allows you to input transactional custom fields on an order. If an order is created via EDI or REST API, these attributes are auto-populated based upon your predetermined connection settings and are often referred to as saved elements.

Custom fields can be created on an ad-hoc basis, which this article reviews. They can also be pre-configured under Customers > Custom Fields, in which they will automatically populate in this section. For more information on custom fields, please see Understanding Custom Fields.

This article reviews how to manually add ad-hoc custom fields to an order.

Please note that Custom Order Info is not required to complete an order unless you have custom fields configured as such. This functionality is only available if you have custom fields enabled for your database under Admin > Settings and the 'Enable custom fields' setting activated in your customer's setup options.

Order-level custom fields

To create an ad-hoc, order-level custom field, click Add New Custom Field, enter a Name and Value for the field, then click Save. The new custom field will populate in the grid.

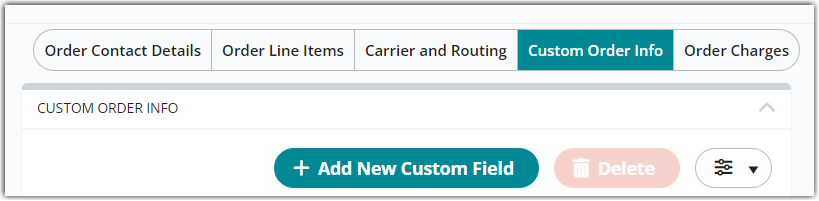
Once you manually create an order-level custom field, you can edit the value by selecting it within the grid, modifying the value, then selecting < Tab > on your keyboard to save the new value. To remove the custom field, select the custom field from the grid, then click Delete.


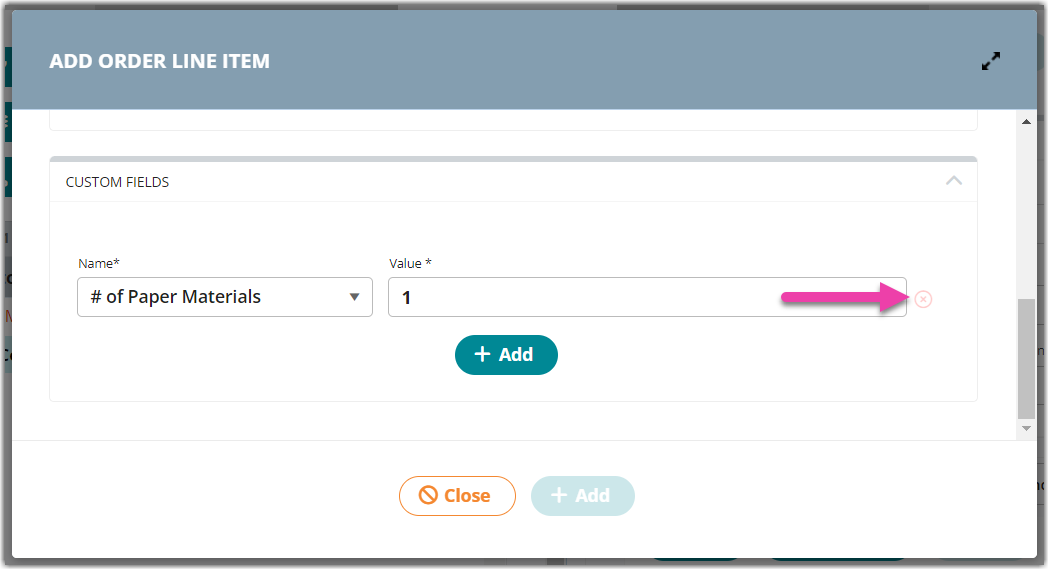
Line-item-level custom fields

Ad-hoc line item custom fields are added under the Order Line Items section on an order. To create a line-item-level custom field, add or edit a line item, then click Add in the Custom Fields section. Enter the 'Name' and 'Value', then click Add or Save at the bottom of the dialog.

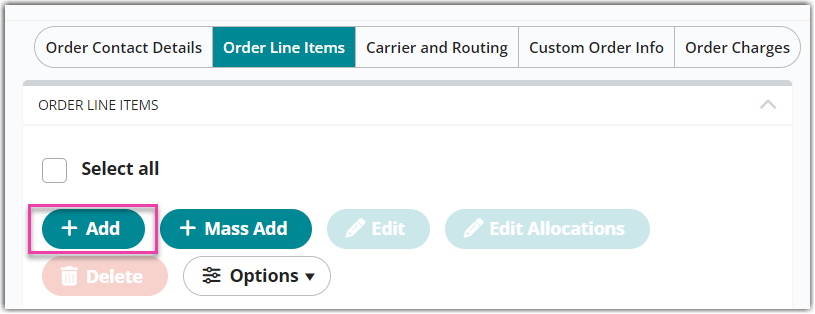
To remove a manually created line-item-level custom field, select the relevant line item from the grid, click Edit, click the Delete icon next to the custom field, then click Save.


Once you've entered custom fields, you can continue to the next order section—Order Charges. If you'd like to come back and edit the order at a later time, don't forget to click Save!

Was this article helpful?

Yes
No
Share additional feedback about this article

Related Articles

  • Configuring a Drop Ship Address
  • Navigating the Find Orders Page
  • Importing Orders
  • Creating End of Day Requests (Manifesting)

Not finding the help you need?

Contact Support
Solutions
  • Solutions for Brands
  • Solutions for 3PLs
  • Solutions for 4PLs
  • Solutions for B2B
Products
  • Extensiv 3PL Warehouse Manager
  • Extensiv Warehouse Manager
  • Extensiv Order Manager
  • Extensiv Integration Manager
  • Extensiv Network Manager
Products
  • Customer Success
  • Implementation
  • Consulting
Ecosystem
  • Fulfillment Marketplace
  • Integrations
  • Partners
  • Become a Partner
Resources
  • Resource Library
  • Blog
  • Market Insights
  • What is a 3PL?
  • What is a 4PL?
  • What is a WMS?
  • Why a Cloud-based WMS?
  • Glossary
Help
  • Help Center
  • API Documentation
  • Extensiv Univerisity
  • Community
  • System Status
  • Extensiv Logo
  • 100 N Pacific Coast Hwy, Suite 1100, El Segundo, CA 90245
  • |
  • Contact Us:
  • 83-EXTENSIV 888.375.2368 (main)
  • |
  • 310.844.7570 (local)
  • Copyright © 2023 Extensiv
  • |
  • All rights reserved.
  • Privacy Policy
  • |
  • Terms of Service
  • Follow Us:
Expand