3PL Warehouse Manager

Updated on October 24th, 2024

  • Extensiv Hub
    Popular Articles Getting Started Using Hub Technical Issues & FAQs Extensiv's Ideas Portal
  • 3PL Warehouse Manager
    Receiving Operations Inventory Management Shipping Operations System Configuration Scanning Operations Integrations Content Best Practice Resources Release Notes Popular Articles Troubleshooting Guides
  • Warehouse Management
    Getting Started Admin Console Shipping Order Picking & Packing Receiving Customer Portal Cycle Counting Kit Building Managing Users Barcode Scanner Import/Export Integrations Barcoding Wave Picking Bin Move Mobile Receiving and Picking Settings Popular Articles Reporting
  • Order Management
    Dashboard Orders Inventory Purchase Orders Shipments Customers Products Analytics Settings API API Integrations Accessing and Navigating Order Manager Error Messages Order Manager Popular Articles Accounting Integrations
  • Integration Management
    Getting Started with Integration Manager General Support Troubleshooting Extras & Addons API Documentation Popular Articles Order Sources Order Destinations
  • FAQs
  • Network Manager
    Getting Started Order Routing Management Technical Issues Shopping Carts Settings Settings, Products, and Orders
  • Billing Manager
    Getting Started Using Billing Manager
  • Release Notes
    Extensiv Sandbox Extensiv Extensiv Hub 3PL Warehouse Manager Integration Management Warehouse Management Order Management Billing Manager
  • Fulfillment Marketplace
    Getting Started
  • Sandbox
    Getting Started
+ More
  • Help Center
  • 3PL Warehouse Manager
  • Shipping Operations
  • International Shipping
  • Shipping Operations
    • Order Creation
        • Creating Orders
        • Importing Orders
        • Entering Order Contact Details
        • Entering Order Line Items
        • Entering Carrier and Routing Information
        • Entering Custom Order Info
        • Entering Order Charges
        • Cloning an Order
    • Order Management
        • Understanding Order Statuses
        • Navigating the Find Orders Page
        • Generating Order Documents
        • Batch Order Processing
        • Adjusting Order Charges
    • Shipping Setups
        • Understanding the Parcel API
        • Connecting Carriers to Providers
        • Understanding Carrier Account Logic
        • Configuring Zebra Browser Print
        • Configuring Small Parcel Settings
        • Using Address Validation
        • Connecting Multiple Accounts for the Same Carrier
        • Managing Carrier Accounts
        • Configuring Fulfillment Invoicing
        • Using a Flat File Carrier Integration
        • Managing Shipping Carriers
        • Configuring a Drop Ship Address
        • Managing Ship-to Contacts
        • Managing Retailers
        • Importing Ship-to Contacts
        • Managing Ship Method Mappings
        • Managing 3rd-Party-Billing Contacts
        • Shipping Hazardous Materials
    • Small Parcel Carriers
        • Shipping in Small Parcel Suite
        • Shipping with Amazon Buy
        • Shipping with APC
        • Shipping with Australia Post
        • Shipping with Canada Post
        • Shipping with Canpar
        • Shipping with DHL eCommerce
        • Shipping with DHL Express (AU)
        • Shipping with DHL Express (US)
        • Shipping with ePost Global
        • Shipping with FedEx
        • Shipping with FirstMile
        • Shipping With Flexport
        • Shipping with Globegistics
        • Shipping with Landmark
        • Shipping with OnTrac
        • Shipping with PARCLL
        • Shipping with Passport
        • Shipping with Pitney Bowes Cross-Border Delivery
        • Shipping with Pitney Bowes Standard
        • Shipping with Purolator
        • Shipping with RR Donnelley
        • Shipping with SEKO Ecommerce
        • Shipping with Sendle
        • Shipping with Stallion Express
        • Shipping with Tusk Logistics
        • Shipping with UPS
        • Shipping with USPS (BUKU Ship)
        • Shipping with USPS (Endicia)
        • Shipping with USPS (Stamps.com)
        • Shipping with UPS Mail Innovations®
        • Shipping with FedEx One Rate®
        • Shipping with USPS (Pitney Bowes Expedited)
        • Connecting Small Parcel to UPS
    • Packing Basics
        • Packing Orders
        • Managing Packing Materials
        • Configuring Scales for SmartPack
        • Creating Packing Slip Templates
        • Processing Packages
        • Understanding Automatic Package Generation
        • Consolidating Packages
        • Recalculating Packages
        • Using Packing Materials
        • Understanding Multi-Tier Packing in Process Packages
    • Order Processing
        • Navigating the Small Parcel Homepage
        • Packing in the Small Parcel Space
        • Shipping in the Small Parcel Space
        • Using High Volume Processing (HVP) with SmartParcel
        • Printing Return Labels
        • Printing Combo Labels
        • Voiding Shipping Labels
        • Troubleshooting Blank Shipping Labels
        • Creating End of Day Requests (Manifesting)
    • Billing Best Practices for Shipping
        • Common Transactional Shipping Charges
        • Flat Order Processing Fees
        • Item-Based Handling Fees
        • Freight Fees
    • International Shipping
        • Shipping Internationally with SmartParcel
        • Capturing Digital Assets for FedEx ETD
        • Tax Identifiers in Small Parcel Suite
        • Package Description for Mexico Shipments
      • Enabling Integrated Packing Slip

Capturing Digital Assets for FedEx ETD

If you're using SmartParcel to ship FedEx orders to the EU, you are required to provide Extensiv with electronic trade documents (EDT) including a digital signature and company letterhead. This information is required from both FedEx and Extensiv's label service provider ShipEngine, as FedEx uses these digital assets in API requests for international shipping labels and automated customs paperwork.

This article reviews how to capture these ETD digital assets and provide them to Extensiv to avoid potential disruptions when shipping FedEx packages to the EU.

Please note that Extensiv takes data privacy very seriously. Your digital signature and company letterhead will not be stored on our servers, and ShipEngine will encrypt the storage of these files and use them only for the purposes of the FedEx API.


Step 1: Create your digital signature

Digital signature files must be in PNG format and no larger than 240 x 25 pixels. Use the steps below to properly capture and format your digital signature in Microsoft Paint.

  1. To get started, sign your name on a blank piece of paper with a pen or marker that is easily readable.
  2. Use a scanner to capture your signature and save the file to your computer.
  3. Open the file in the Microsoft Paint application. If needed, rotate the image so that it is correctly oriented on the screen.
  4. To correctly size the image, click Select within the Home tab.
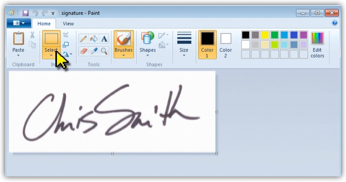
  5. Use your mouse to draw a rectangle around the image, leaving limited white space around the signature, then select Crop.
  6. Next, select Resize.
  7. Under Resize, select Pixels and verify that the 'Maintain aspect ratio' option is selected.
  8. For the 'Vertical' pixels, enter 25.
  9. Check the updated 'Horizontal' pixel number.
    • If it is under 240, continue to Step 10.
    • If the image is larger than 240 pixels wide, enter 240 in the 'Horizontal' field.
  10. Click OK to apply your changes.
  11. Select File > Save a copy (or Save as) to save the updated file in PNG format.

Step 2: Format your digital letterhead file

Letterhead image files must be in PNG format and no larger than 700 x 50 pixels. Here is an example letterhead image:

If your letterhead image is larger than 700 x 50 pixels, follow the steps below to format your letterhead image using Microsoft Paint.

  1. Open the file in the Microsoft Paint application. If needed, rotate the image so that it is correctly oriented on the screen.
  2. If you need to crop the image (e.g. if the letterhead is located at the top of a full page), click Select within the Home tab, use your mouse to draw a rectangle around the image, then select Crop.
  3. Next, click Resize.
  4. Under Resize, select Pixels and verify that the 'Maintain aspect ratio' option is selected.
  5. For the 'Vertical' pixels, enter 50.
  6. Check the updated 'Horizontal' pixel number.
    • If it is under 700, continue to Step 7.
    • If the image is larger than 700 pixels wide, enter 700 in the 'Horizontal' field.
  7. Click OK to apply your changes.
  8. Select File > Save a copy (or Save as) to save the updated file in PNG format.

Step 3: Send your digital assets to Extensiv

Once you have both of your files prepared, you can send them to support-3plwms@extensiv.com, and our Technical Support team will route the images to ShipEngine and connect the files to your FedEx account.

Please use one of the following methods to encrypt and send your files securely to our team:

  1. Option 1: Encrypt your email. You can easily encrypt emails sent through Microsoft Outlook. If you use Outlook as your email provider, reference their Encrypt email messages help article for instructions on how to send your digital files to support-3plwms@extensiv.com.
  2. Option 2: Upload your files to a secure cloud folder. Google Drive, Dropbox, and Microsoft SharePoint are among the most popular and secure cloud folders available for file sharing. Once uploaded to the cloud folder, generate a shareable link and forward it to  support-3plwms@extensiv.com.

Extensiv takes data privacy and security very seriously. We highly recommend that you send your digital files to our team in a secure manner. If you have any questions related to privacy concerns, please contact our Technical Support team for more information on how we are handling this process.


international shipping digital capture

Was this article helpful?

Yes
No
Share additional feedback about this article

Related Articles

  • March 23, 2020 – Minor Release Notes
  • Using the Customer Error Log
  • Navigating the Help Center
  • March 11, 2020 – Minor Release Notes

Not finding the help you need?

Contact Support
Solutions
  • Solutions for Brands
  • Solutions for 3PLs
  • Solutions for 4PLs
  • Solutions for B2B
Products
  • Extensiv 3PL Warehouse Manager
  • Extensiv Warehouse Manager
  • Extensiv Order Manager
  • Extensiv Integration Manager
  • Extensiv Network Manager
Products
  • Customer Success
  • Implementation
  • Consulting
Ecosystem
  • Fulfillment Marketplace
  • Integrations
  • Partners
  • Become a Partner
Resources
  • Resource Library
  • Blog
  • Market Insights
  • What is a 3PL?
  • What is a 4PL?
  • What is a WMS?
  • Why a Cloud-based WMS?
  • Glossary
Help
  • Help Center
  • API Documentation
  • Extensiv Univerisity
  • Community
  • System Status
  • Extensiv Logo
  • 100 N Pacific Coast Hwy, Suite 1100, El Segundo, CA 90245
  • |
  • Contact Us:
  • 83-EXTENSIV 888.375.2368 (main)
  • |
  • 310.844.7570 (local)
  • Copyright © 2023 Extensiv
  • |
  • All rights reserved.
  • Privacy Policy
  • |
  • Terms of Service
  • Follow Us:
Expand