Creating Packing Slip Templates
4.2 min read
|3PL Warehouse Manager allows you to create custom packing slip templates for use across each of your customers from the Customers module. Once created, you can authorize and brand your custom packing slips on the Manage Customers page. This article reviews how to create, authorize, and brand custom packing slip templates.
To create custom packing slip templates, you must be logged in as a warehouse user and have the following permission assigned to your user role: Customer Module > Packing Slip.
Step 1: Create packing slip template
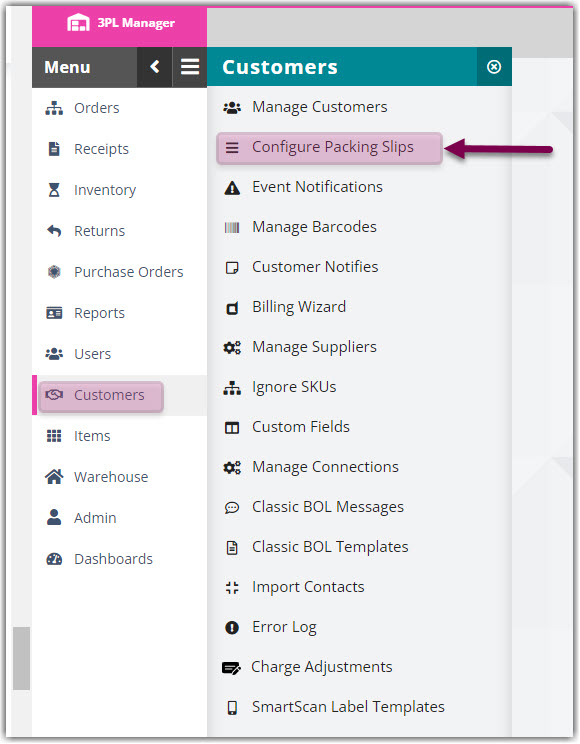
- Navigate to Customers > Configure Packing Slips in 3PL Warehouse Manager.
2. To create a new packing slip template, click Create.

3. Complete each field, then click Save. Each field is defined below.

- Description: Value that displays when selecting a packing slip version to generate
- Include carrier instructions: When checked, enables the Notes section, which populates Carrier Instructions entered on the order
-
Label: Field name that displays next to the specified source's information
- Ship To: Populates an order's ship-to contact information
- Bill to: Populates an order's bill-to contact information
- Sold to: Populates an order's sold-to contact information
- Customer Contact: Populates the customer's name and the warehouse's address
- Custom Fields: Populates the custom field values that are present in the Custom Order Info section of the order based on the field mappings you enter in the presented fields—please note that the values you enter in these fields must match the custom field names exactly
- Warehouse: Populates the warehouse's contact information
4. Repeat Steps 2 and 3 for each packing slip template needed, then continue to the next section to authorize the packing slip(s).
You can also edit and delete custom packing slip templates—select a template from the grid, then click Edit, and save your changes or click Delete.
Step 2: Authorize and brand packing slip template
Once you create a custom packing slip template via the Configure Packing Slips page, you must authorize its use for each customer. You can also use this page to upload images and brand your packing slip with your customer's logo.
If you'd like to add extra details to a packing slip template, such as text, this requires a custom report. To learn more about requesting a custom report, please see Customizing Reports. If you're not interested in a custom report, you could also capture this information as an image and insert the information as a footer image.
- Navigate to Customers > Manage Customers in 3PL Warehouse Manager, then select the appropriate customer and click Edit.
- Select the Orders tab, then scroll down to the Packing Slips section.
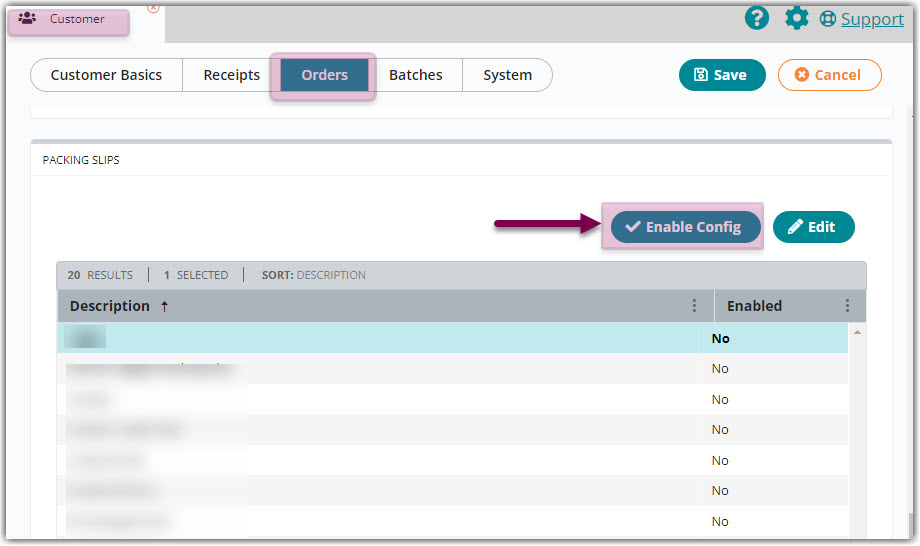
3. Select the relevant template from the grid, then click Enable Config. Note: If it is already authorized, the button will say "Disable Config" and no further action is needed to authorize.
4. If you also want to brand your packing slip template, you can do so from this page.
- If you want all packing slips for this customer to use the same header and footer image, locate the fields below the grid and continue to the next step.
- If you want custom header and footer images for this packing slip, select the template from the grid, then click Edit.
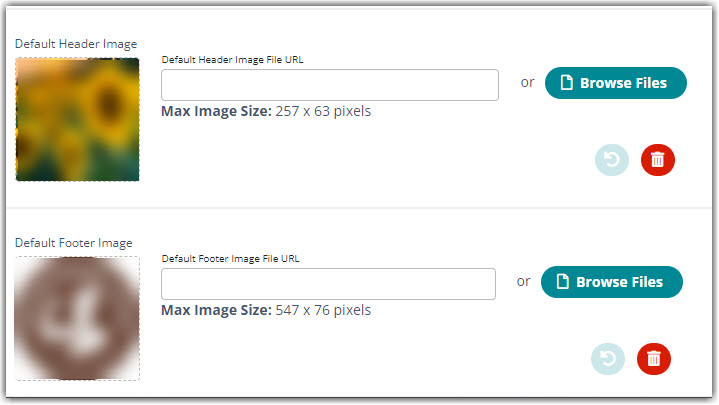
- Enter the image file URL, or select a file from Browse Files for both the header and footer images. If you do not have these files saved on your device and do not know how to retrieve the relevant image URL, continue to the next sections for detailed instructions on how to access and upload an image URL.
- Once your files are selected, click Save, then repeat these steps for each template and customer as needed.
The additional instructions below are based on retrieving your image URLs from your customer's website. If you uploaded your images via "Browse Files" in the previous steps, you can stop reading. If your customer does not have a website, you must instead use an image hosting site that maintains the image URL. Once you retrieve the URL, proceed to Step 2A > Step 4 below.
For optimum quality, please note that logo images must be sized to 257 x 63 pixels, and footer images must be 547 x 76 pixels.
Step 2A: Retrieve image URLs
If you need to retrieve an image URL, use the following steps:
- In a separate browser tab or window, navigate to your customer's website, right-click on their logo image, then click Inspect.
- Your browser's Inspect tool highlights the source code for the image link. Hover over the highlighted text to view the size of the image on the webpage.
If the image is larger than the supported size (257 x 63 pixels for logo images and 547 x 76 pixels for footer images), please skip ahead to Step 3C below to resize the images before continuing with the rest of Step 2A and 2B.
- Right-click the URL embedded in the highlighted text, then select Copy Link Address.
- Navigate back to your 3PL Warehouse Manager tab or window, then paste the link into the 'Header Image File URL' field.
- Repeat Steps 1–4 for your footer image, pasting the relevant link in the 'Footer Image File URL' field.
- Click Save.
Step 2B: Test the packing slip
Once you upload your images to the packing slip template, it is best to test your images before repeating Steps 1–7 for additional templates. Navigate to Orders > Find Orders, select an order for the relevant customer, then click Documents > Packing Slips.
Select the new template's description from the second 'Packing Slip Version' drop-down menu, then click Generate to open the packing slip in your specified format.
- If your images display as expected, you can go ahead and add these URLs to each packing slip template used for this customer. If you need to brand packing slips for multiple customers, we recommend generating the packing slip to test the images for each new URL before adding these images to additional templates.
- If one or more images do not display as expected, they likely need to be resized. Continue reading below for more information.
Step 2C: If needed, resize images
If your images are not sized correctly (257 x 63 pixels for logo images and 547 x 76 pixels for footer images), this means your customer has likely scaled the images to a lower size in their website editor.
To address this, please contact your customer and let them know that they must resize the image(s) on their website or send you the official image file if they want to brand their packing slips. Feel free to provide them with the following steps, but please note that we highly recommend the user completing these steps to have technical expertise.
If you upload your images via "Browse Files" in the Packing Slip Template Settings dialog, 3PL Warehouse Manager resizes your images by default.
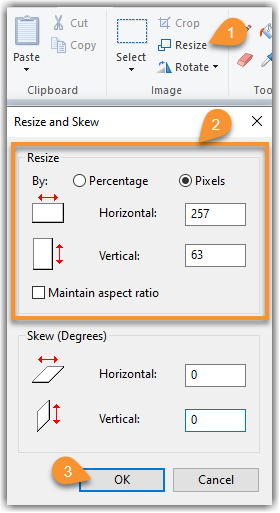
- Open the image in your computer's Paint application, then click Resize.
- Under Resize, select Pixels, disable the 'Maintain aspect ratio' option, then enter the new sizes:
- Logo Image: Horizontal – 257, Vertical – 63
- Footer Image: Horizontal – 547, Vertical – 76
- Click OK to apply your changes.
- Save the image, then replace the original image on your website with the newly resized image.
- Repeat Steps 1–4 for each image as needed.
Once your customer completes these steps, please repeat Steps 2A and 2B above.