3PL Warehouse Manager

Updated on June 11th, 2024

  • Extensiv Hub
    Popular Articles Getting Started Using Hub Technical Issues & FAQs Extensiv's Ideas Portal
  • 3PL Warehouse Manager
    Receiving Operations Inventory Management Shipping Operations System Configuration Scanning Operations Integrations Content Best Practice Resources Release Notes Popular Articles Troubleshooting Guides
  • Warehouse Management
    Getting Started Admin Console Shipping Order Picking & Packing Receiving Customer Portal Cycle Counting Kit Building Managing Users Barcode Scanner Import/Export Integrations Barcoding Wave Picking Bin Move Mobile Receiving and Picking Settings Popular Articles Reporting
  • Order Management
    Dashboard Orders Inventory Purchase Orders Shipments Customers Products Analytics Settings API API Integrations Accessing and Navigating Order Manager Error Messages Order Manager Popular Articles Accounting Integrations
  • Integration Management
    Getting Started with Integration Manager General Support Troubleshooting Extras & Addons API Documentation Popular Articles Order Sources Order Destinations
  • FAQs
  • Network Manager
    Getting Started Order Routing Management Technical Issues Shopping Carts Settings Settings, Products, and Orders
  • Billing Manager
    Getting Started Using Billing Manager
  • Release Notes
    Extensiv Sandbox Extensiv Extensiv Hub 3PL Warehouse Manager Integration Management Warehouse Management Order Management Billing Manager
  • Fulfillment Marketplace
    Getting Started
  • Sandbox
    Getting Started
+ More
  • Help Center
  • 3PL Warehouse Manager
  • Shipping Operations
  • Packing Basics
  • Shipping Operations
    • Order Creation
        • Creating Orders
        • Importing Orders
        • Entering Order Contact Details
        • Entering Order Line Items
        • Entering Carrier and Routing Information
        • Entering Custom Order Info
        • Entering Order Charges
        • Cloning an Order
    • Order Management
        • Understanding Order Statuses
        • Navigating the Find Orders Page
        • Generating Order Documents
        • Batch Order Processing
        • Adjusting Order Charges
    • Shipping Setups
        • Understanding the Parcel API
        • Connecting Carriers to Providers
        • Understanding Carrier Account Logic
        • Configuring Zebra Browser Print
        • Configuring Small Parcel Settings
        • Using Address Validation
        • Connecting Multiple Accounts for the Same Carrier
        • Managing Carrier Accounts
        • Configuring Fulfillment Invoicing
        • Using a Flat File Carrier Integration
        • Managing Shipping Carriers
        • Configuring a Drop Ship Address
        • Managing Ship-to Contacts
        • Managing Retailers
        • Importing Ship-to Contacts
        • Managing Ship Method Mappings
        • Managing 3rd-Party-Billing Contacts
        • Shipping Hazardous Materials
    • Small Parcel Carriers
        • Shipping in Small Parcel Suite
        • Shipping with Amazon Buy
        • Shipping with APC
        • Shipping with Australia Post
        • Shipping with Canada Post
        • Shipping with Canpar
        • Shipping with DHL eCommerce
        • Shipping with DHL Express (AU)
        • Shipping with DHL Express (US)
        • Shipping with ePost Global
        • Shipping with FedEx
        • Shipping with FirstMile
        • Shipping With Flexport
        • Shipping with Globegistics
        • Shipping with Landmark
        • Shipping with OnTrac
        • Shipping with PARCLL
        • Shipping with Passport
        • Shipping with Pitney Bowes Cross-Border Delivery
        • Shipping with Pitney Bowes Standard
        • Shipping with Purolator
        • Shipping with RR Donnelley
        • Shipping with SEKO Ecommerce
        • Shipping with Sendle
        • Shipping with Stallion Express
        • Shipping with Tusk Logistics
        • Shipping with UPS
        • Shipping with USPS (BUKU Ship)
        • Shipping with USPS (Endicia)
        • Shipping with USPS (Stamps.com)
        • Shipping with UPS Mail Innovations®
        • Shipping with FedEx One Rate®
        • Shipping with USPS (Pitney Bowes Expedited)
        • Connecting Small Parcel to UPS
    • Packing Basics
        • Packing Orders
        • Managing Packing Materials
        • Configuring Scales for SmartPack
        • Creating Packing Slip Templates
        • Processing Packages
        • Understanding Automatic Package Generation
        • Consolidating Packages
        • Recalculating Packages
        • Using Packing Materials
        • Understanding Multi-Tier Packing in Process Packages
    • Order Processing
        • Navigating the Small Parcel Homepage
        • Packing in the Small Parcel Space
        • Shipping in the Small Parcel Space
        • Using High Volume Processing (HVP) with SmartParcel
        • Printing Return Labels
        • Printing Combo Labels
        • Voiding Shipping Labels
        • Troubleshooting Blank Shipping Labels
        • Creating End of Day Requests (Manifesting)
    • Billing Best Practices for Shipping
        • Common Transactional Shipping Charges
        • Flat Order Processing Fees
        • Item-Based Handling Fees
        • Freight Fees
    • International Shipping
        • Shipping Internationally with SmartParcel
        • Capturing Digital Assets for FedEx ETD
        • Tax Identifiers in Small Parcel Suite
        • Package Description for Mexico Shipments
      • Enabling Integrated Packing Slip

Understanding Multi-Tier Packing in Process Packages

Multi-pier packing is not enabled by default. Please reach out to your CSM to have this feature turned on for your account if you are interested. See our Processing Packages article for information on how to navigate our default Process Packages page. 


The Process Packages page lets you manually indicate our package and pallet contents in 3PL Warehouse Manager for individual orders and print labels for them. 

If you need to view the package contents after you've processed packages for an order, you can do so through the View Transaction Report with the 'Show packages' option enabled.


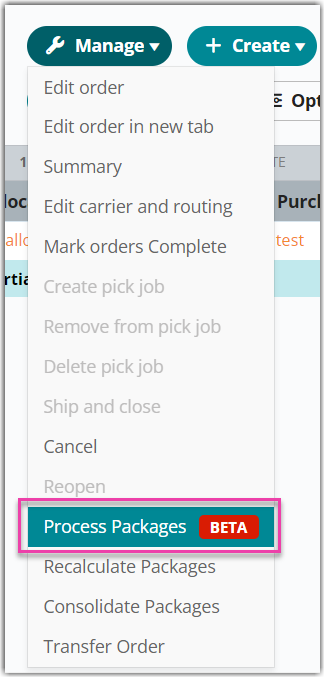
Access the Process Packages page by navigating the Find Orders grid from Orders > Find Orders in 3PL Warehouse Manager. Select the order you want to package then click Manage > Process Packages. 

The Process Packages page is divided into three sections: 

  • Order Details: shows the customer, transaction ID, and warehouse for the order.
  • Pallets: a grid showing pallets and their contents. This grid can be filtered by ID using the ‘Filter by’ drop-down menu.
  • Package List: a grid where you can create, edit, delete, consolidate packages, and create pallets from packages. This grid can be filtered by ID, or SKU using the ‘Filter by’ drop-down menu. This grid will also be populated by packages created using Small Parcel Suite. 

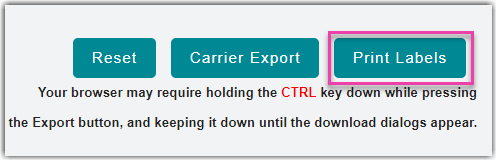
This page can be reset at any time by clicking the Reset button at the top of the screen. 

Creating a package

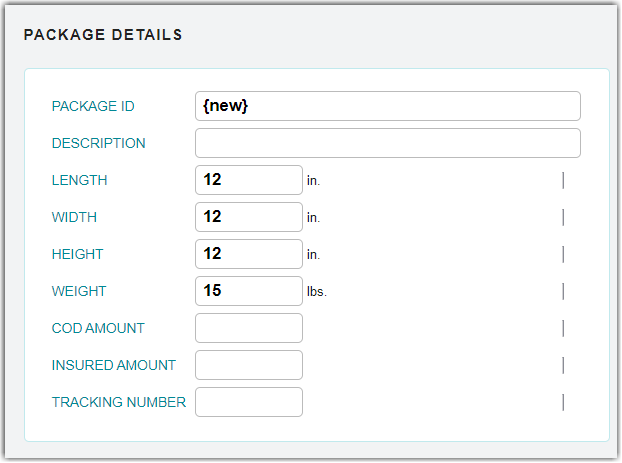
  1. Click the New Package button to begin creating a package. 
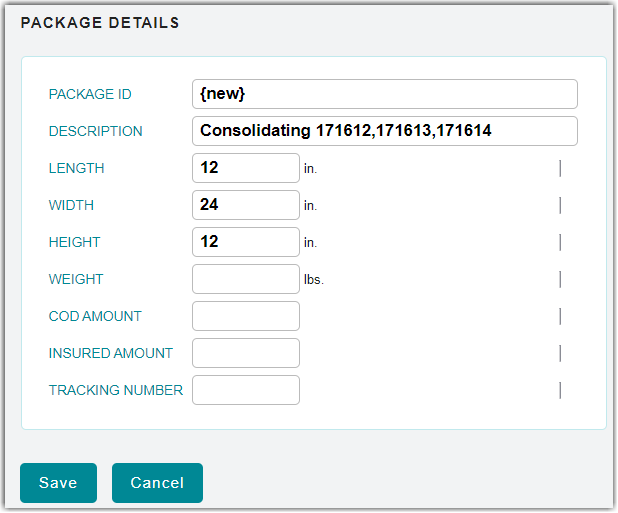
  2. Fill out the relevant fields in the Package window. 
    • PackageID: Represents a unique identifier that the system automatically populates once saved.
    • Description: Used to quickly reference the package details in the Process Packages grid.
    • Dimensions fields: Carriers require these fields to be complete and accurate for the system to reference when generating shipping labels.
    • COD Amount: Specifies payment amount for the carrier if using 'collect on delivery'.
    • Insured Amount: Specifies the dollar amount for which the package is covered by insurance.
    • Tracking Number: The tracking number associated with the individual package—this value is not tied to the Tracking Number field on the 'Carrier and Routing' section of an order.
  3. Select the appropriate SKU from the ‘SKU’ drop-down menu under the Contents grid and add the corresponding Quantity for the SKU. 
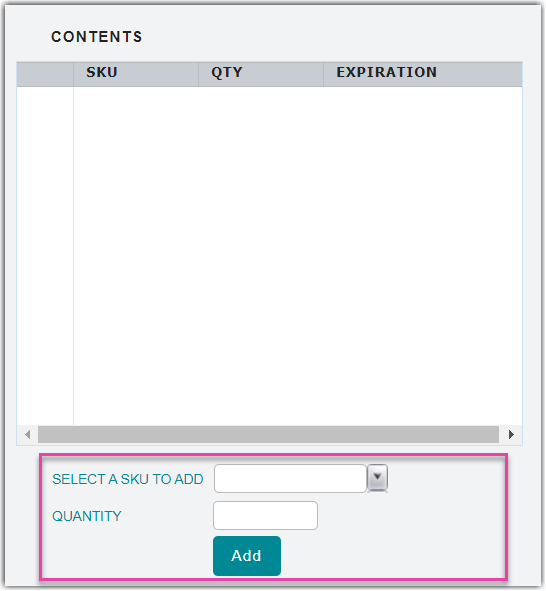
  4. Click Add. 
  5. Click Save to save your progress and return to the main Process Packages screen. 

Creating a pallet

  1. Select the packages you want to create a pallet with from the Package List grid. 
  2. Click Create a Pallet. 
  3. Manually enter the weight of the pallet. Note: The weight field isn’t necessary to create a pallet. 
  4. Click Save. 

The new pallet will show in the Pallets grid and the related packages will be given a Pallet ID in the Package List grid.

Consolidating packages

You can consolidate two or more processed packages into one packaging unit by using the Consolidate Packages feature.

  1. Use < Ctrl > or < Shift > on your keyboard to multi-select the relevant packages in the Package Detail grid.
  2. Click Consolidate Packages.
  3. Enter the new information in the Package window like when creating a new package based on the contents of the consolidated packages.
  4. Click Save. 

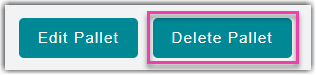
Deleting a package or pallet

You can delete a package or pallet by selecting a package or pallet from their respective grid and clicking Delete. If you delete a package, a note will be created at the bottom of the page reminding you that there are some items remaining to be packed. 
 

Printing labels

See our article on Printing UCC Labels to learn how to generate EDI labels and UCC-128 labels for your packages and pallets. 

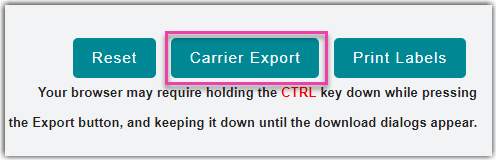
Generating files for a flat-file carrier integration

Click Carrier Export to generate files for a flat-file carrier integration. For more information, please see Using a Flat File Carrier Integration.


process packages tiered packing

Was this article helpful?

Yes
No
Share additional feedback about this article

Related Articles

  • Packing from Shelves
  • Packing Orders
  • Packing Orders with SmartScan

Not finding the help you need?

Contact Support
Solutions
  • Solutions for Brands
  • Solutions for 3PLs
  • Solutions for 4PLs
  • Solutions for B2B
Products
  • Extensiv 3PL Warehouse Manager
  • Extensiv Warehouse Manager
  • Extensiv Order Manager
  • Extensiv Integration Manager
  • Extensiv Network Manager
Products
  • Customer Success
  • Implementation
  • Consulting
Ecosystem
  • Fulfillment Marketplace
  • Integrations
  • Partners
  • Become a Partner
Resources
  • Resource Library
  • Blog
  • Market Insights
  • What is a 3PL?
  • What is a 4PL?
  • What is a WMS?
  • Why a Cloud-based WMS?
  • Glossary
Help
  • Help Center
  • API Documentation
  • Extensiv Univerisity
  • Community
  • System Status
  • Extensiv Logo
  • 100 N Pacific Coast Hwy, Suite 1100, El Segundo, CA 90245
  • |
  • Contact Us:
  • 83-EXTENSIV 888.375.2368 (main)
  • |
  • 310.844.7570 (local)
  • Copyright © 2023 Extensiv
  • |
  • All rights reserved.
  • Privacy Policy
  • |
  • Terms of Service
  • Follow Us:
Expand