
Creating Products through the UI
As Extensiv Order Manager understands your product types, we are able to calculate your inventory quantity, order information, analytics, etc. based on their available input.
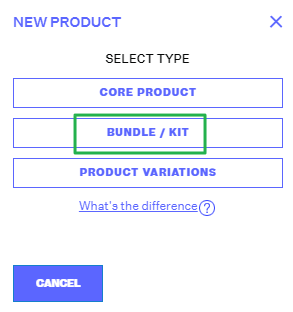
There are three types of products in Extensiv Order Manager: Core Products, Bundles/Kits, and Product Variations. When creating or editing products in Extensiv Order Manager, you can choose between two methods: manual creation in the UI or import via spreadsheet. To create a core product manually, follow the steps outlined below for the appropriate product type.
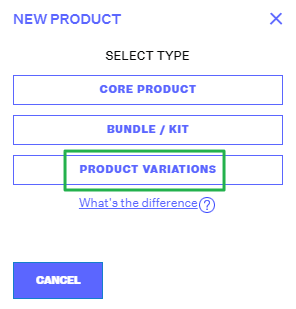
1.Navigate to the Products module, & click the New Product button.

2. Select the type of product you want to create from Core Product, Bundle/Kit, or Product Variations.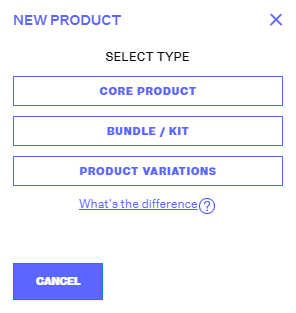
Core Products
A core product is a single unique product that may be added into a bundle or kit. If the answer to this question: "Does the product I am selling contain an item within it that I order individually from my supplier?" is "no", then you have a core product.
Basic info
When creating a Core Product, you’ll be taken to an edit window to fill out product info. There are three required fields here which must be entered before you can proceed:
- Master SKU
- Name
- Brand
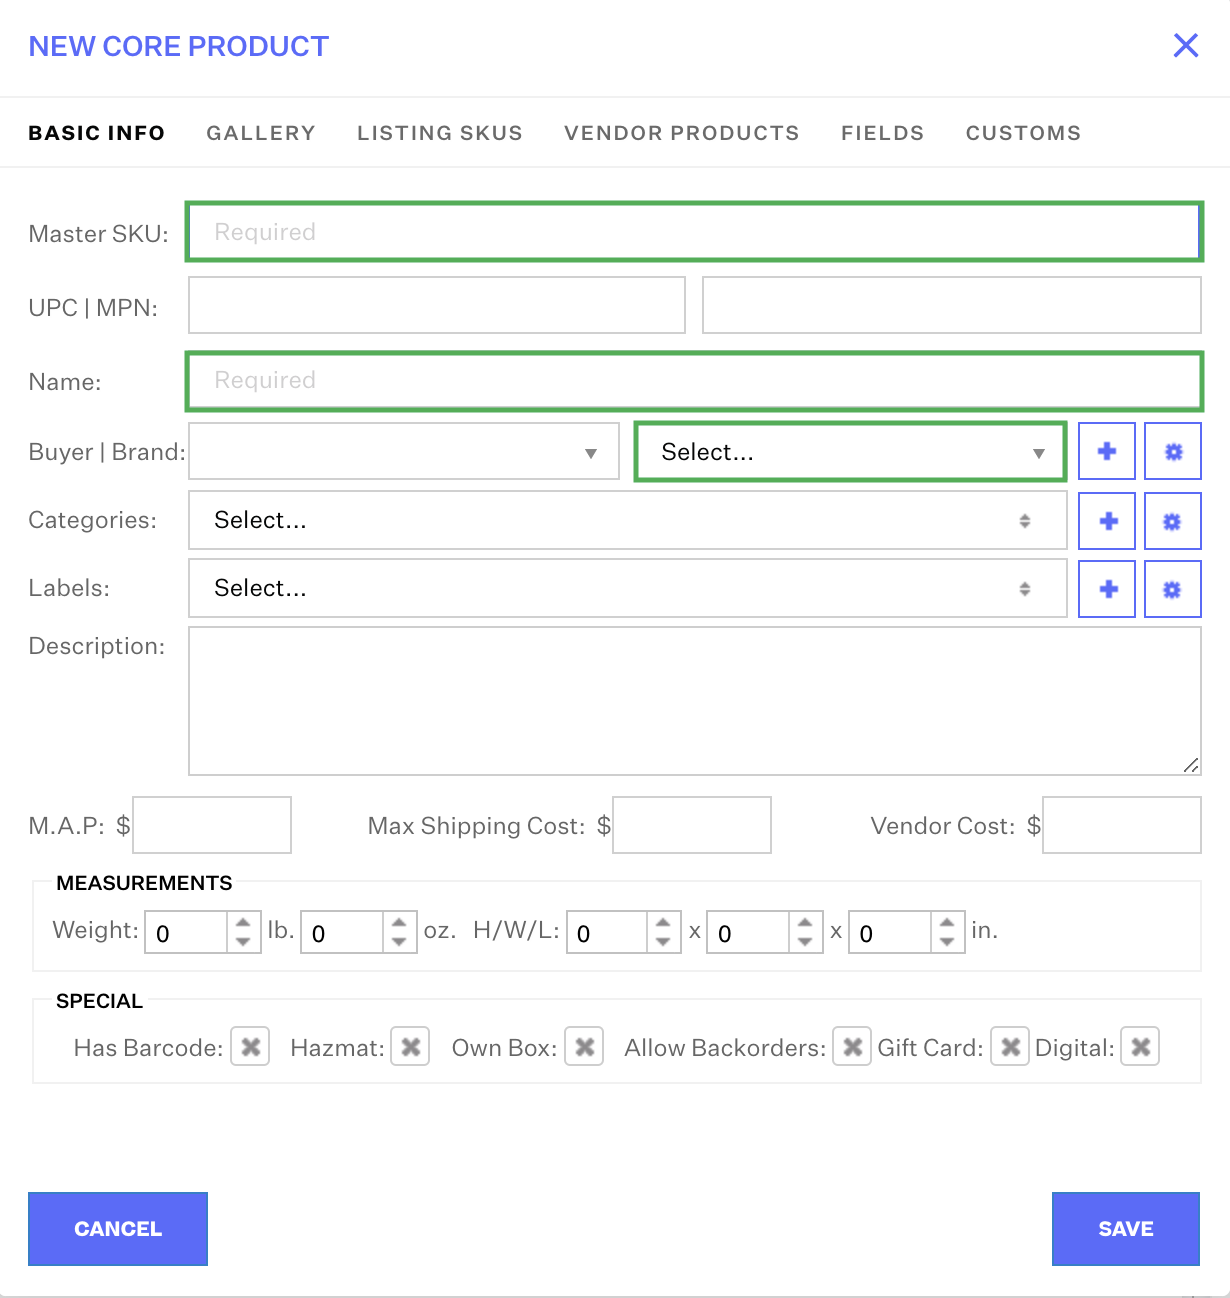
- You cannot create a Master SKUs that already exists, active or inactive
- Dropdown fields with a blue plus sign or gear icon button next to them are fields that can have a new option added or edited, respectively.
- The Special section at the bottom is for informational purposes only. No special function will occur if these boxes are checked or not, so you can choose to set them with a value or not.
Overview of all Product Fields:
| Field Name | Definition | Usage |
| Master SKU | The unique value used to identify the product in-house. Does not need to match the listing SKU | Used to identify the product in Extensiv Order Manager |
| UPC | Acronym for "Universal Product Code" | Barcode generation |
| Brand | Goods identified by name as the product of a supplier or manufacturer | A way to categorize and filter products you sell |
| Categories | class or division of products having shared characteristics | Additional way to categorize and filter products (ex. Hat, Socks, etc) |
| Labels | A tag placed on the item | Useful for Orderbot automation |
| Description | Characteristics of Product | Additional way to identify specific attributes between similar products |
| M.A.P. | Minimum Advertised Price | Informational |
| Max Shipping Cost | Highest dollar amount to ship a product | Informational |
| Vendor Cost | Cost of Goods Sold | Used to calculate your COGS for products without a vendor SKU |
| Weight | Weight of Each (lb, oz) | Used to calculate order Weight |
| H/W/L | Height / Width / Length (in) | Used to calculate order dimension |
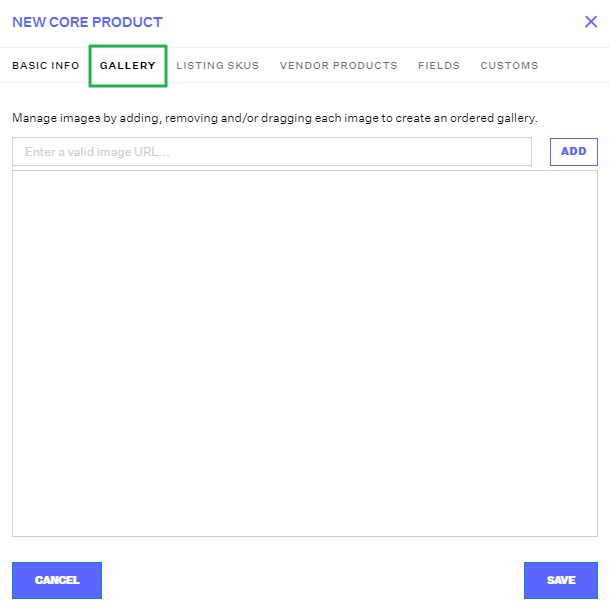
Gallery
Copy and paste the image URL into the designated text box and click Add. Once you add all desired product images, click Save.
We can only host live, public URLs. If the URL were to become dead, then we would no longer have an active image. If the URL links to a private page like a host site that requires a login to access it, no image will appear.
Listing SKUs
Associates the Sales Channel-specific SKUs back to the Master SKU within Extensiv Order Manager. This way, regardless of which channel you sell on, you calculate one comprehensive sales velocity based on the sell through of the Master SKU across all channels.
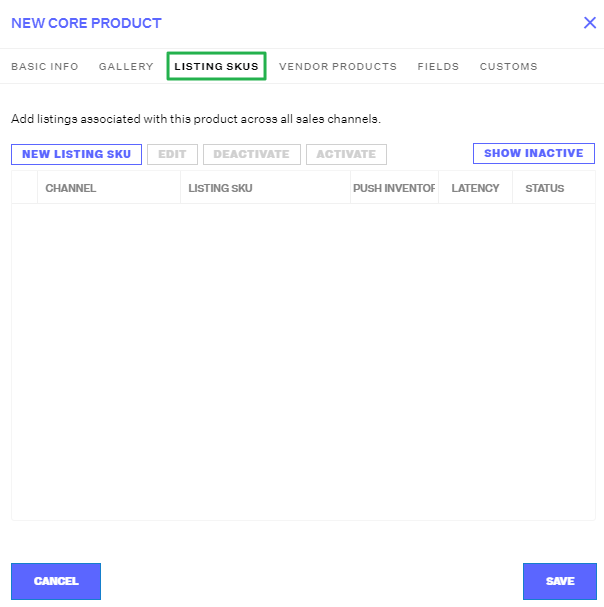
Click New Listing SKU, select the channel, and enter the appropriate Listing SKU.
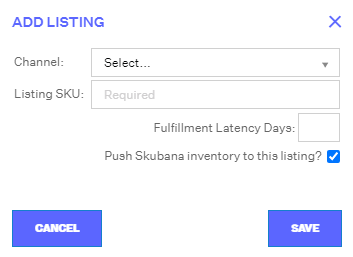
Fulfillment latency days is the lead time to ship out your orders. If left blank, it will be left at Amazon’s or Walmart’s default time period of 1-2 business days. However, if a specific integer value is entered, it will appear on Amazon with a message such as: "Processing takes an additional 4 to 5 days for orders from this seller.”
Push Extensiv Order Manager inventory to this listing is to specify if the listing SKU is FBA or FBM. This feature can also be utilized for SKUs you don’t want to push inventory to.
If the SKU is FBA, deselect the "Push Inventory" option. We do not need to push inventory to the listing as it could create ghost listings. If ghost listings occur, the listing will need to be toggled from FBA to FBM back to FBA. This can also be done in bulk using the inventory import. This must be done on Seller Central
Vendor Products
Adding vendor SKUs in Extensiv Order Manager is necessary especially because it will serve as the foundation for your profitability within analytics, although this is not the only way to calculate profitability. Your COGS within Extensiv Order Manager is calculated by either your vendor products or the UI. Purchase orders can only be created once Vendor SKUs have been added to their respective Master SKUs.
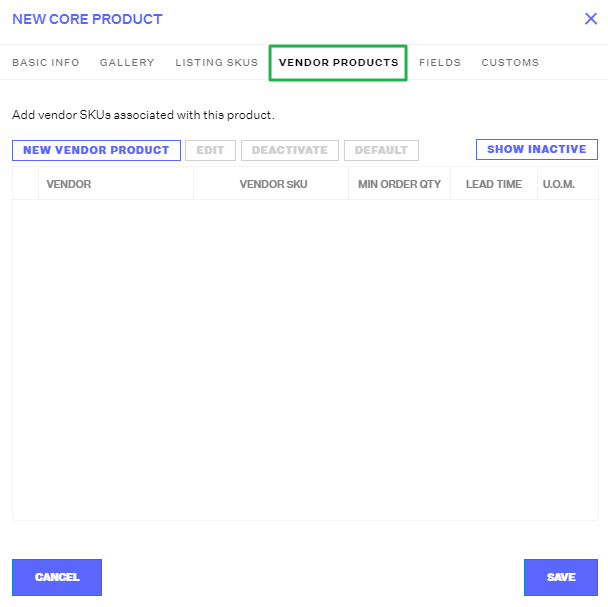
Add your vendor SKUs to your products. Before you can do so, you will need to have created vendors in the Settings Tab. Click New Vendor Product.
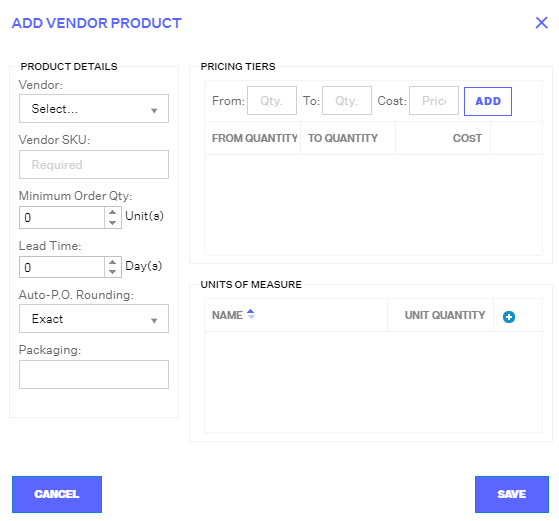
| Field Name | Description | Example |
| Vendor | Select the vendor that the Vendor SKU is associated to. | Vendor123 |
| Vendor SKU | Type the vendor SKU assigned to the master SKU. Remember that this SKU will appear on the purchase order | VNDR-SKU-123 |
| Minimum Order Qty | How many units need to be ordered in order to purchase this item from your vendor? | You cannot purchase 1 unit of chapstick, a minimum order of 100 is required |
| Lead Time | Time it takes from placing a purchase order to when you receive the unit(s) at your destination warehouse | 10 |
| Auto-P.O. Rounding | How Extensiv Order Manager should round the number of units for order in an Auto PO calculation. Round Up will round up to the next Unit of Measure quantity exactly, Round Properly will round to the nearest Unit of Measure quantity, whether that is up or down, and Exact will not round at all. | Say you have a product that can be ordered in Cases of 12 units, but Auto PO generates with a requested quantity of 50 Round Up: 5 Cases (60 units) Round Properly: 4 Cases (48 units) Exact: 4 Cases + 2 Eaches (50 units) |
| Packaging | If your products require special packaging, you can specify that here | Bubblewrap Cardboard Carton etc. |
| Pricing Tiers |
As you purchase higher volumes of product, the vendor may provide you with better rates. If a customer does not have pricing tiers, then simply add an arbitrarily high range (ex. 1 - 100,000 = 5.00) |
001 - 099 = $5.00 / unit 100 - 999 = $4.50 / unit etc. |
| Units of Measure (optional) | Only needed if your vendor allows you to order product in a UoM other than units/eaches, such as cases, cartons, pallets, etc. | Case = Qty 12 Carton = Qty 60 etc. |
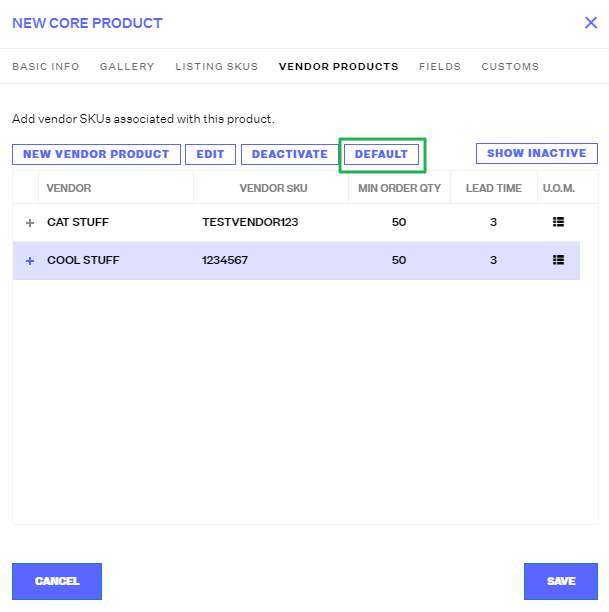
If you order the same product from more than one vendor, make sure to set up multiple Vendor Products and indicate one as the Default Vendor Product by selecting it and clicking the Default button. If you only have one Vendor Product for a Master SKU, it will automatically be set as the Default by Extensiv Order Manager.
NOTE
Extensiv Order Manager will only generate Auto POs for the Default Vendor Product.
Fields
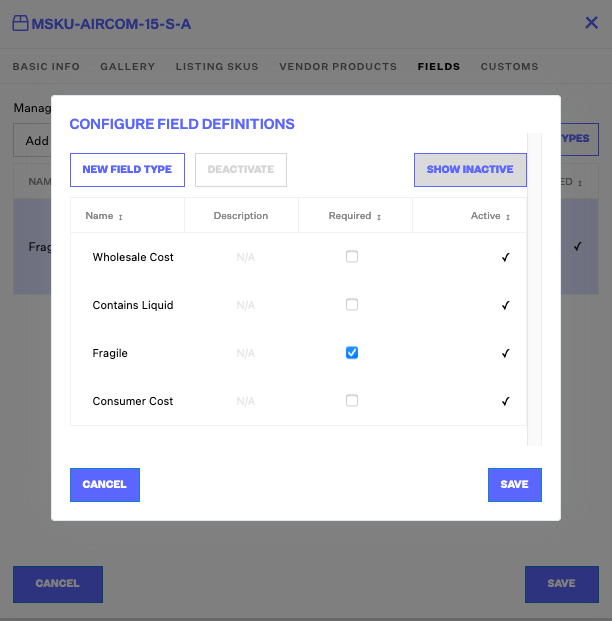
This feature allows you to add custom fields that are not in the Extensiv Order Manager Platform. Some examples of these could be "Fragile", "Wholesale Cost", etc. To add a new Custom field, go to Configure Field Types.
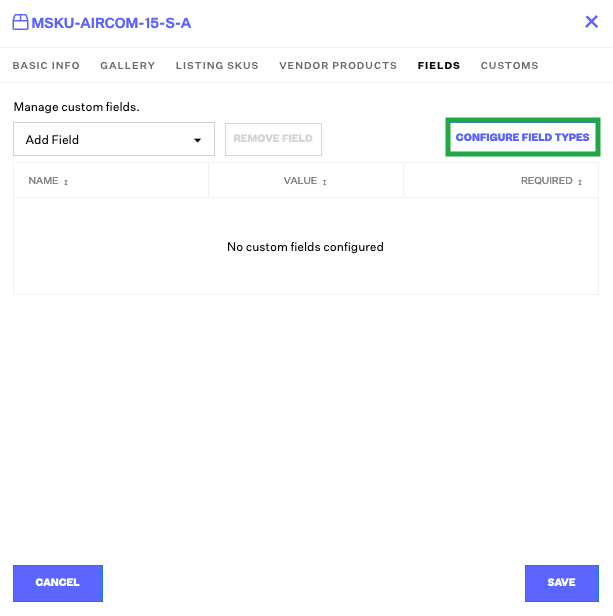
Then select New Field Type to enter a new custom field. You may also select the checkbox to indicate if you want to field to be required.
Customs
If you ship products overseas, your products will require customs information. If you would like Extensiv Order Manager to pre-populate customs declarations for international and APO/FPO customs forms for this product, please check the "Include Customs Declaration" check box below and enter the required declaration values.
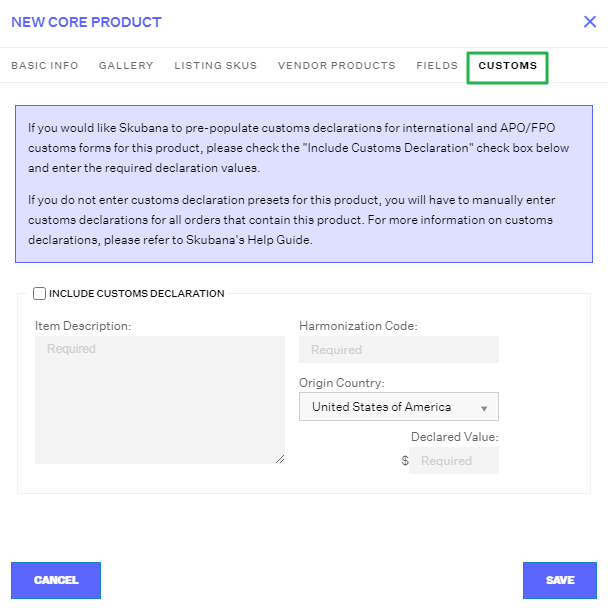
If you do not enter customs declaration presets for this product, you will have to manually enter customs declarations for all orders that contain this product.
| Field Name | Description | Example |
| Item Description | Brief explanation of product | Vacuum Filter |
| Harmonization Code | Universal System/code to determine how much duty is needed to pay on the item | https://hts.usitc.gov |
| Origin Country | The origin of the product. Require to determine how much duty is needed to pay on the item | China |
| Declared Value | Cost of the Item | $9.99 |
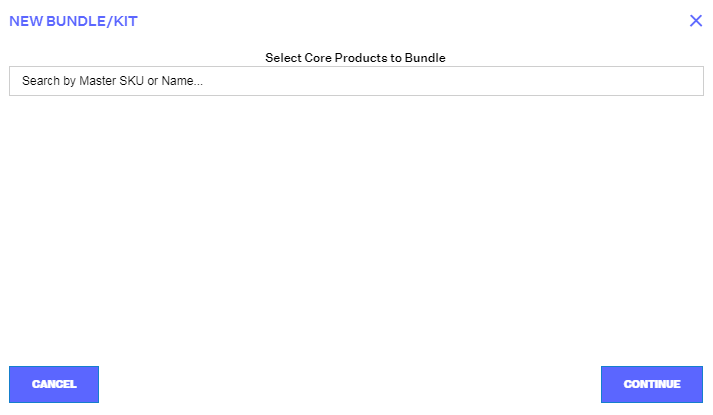
Bundles/Kits
To create a bundle/kit, click on the “Bundle / Kit” button.
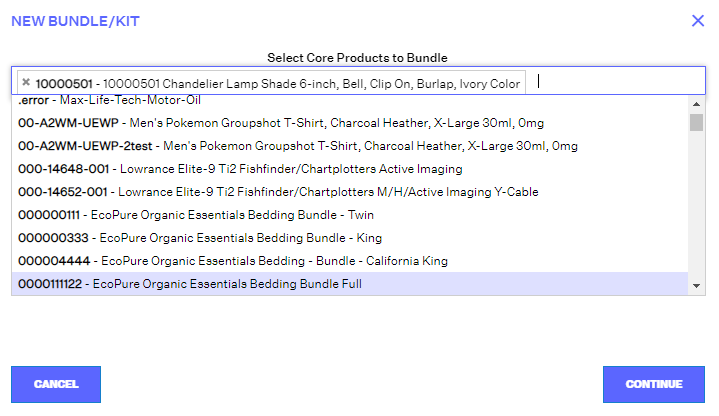
Next, a new pop-up window will show a field where you can search for the Master SKUs that you would like to bundle together.
You can search by the Master SKU or product name and click on it to begin creating your bundle. Enter the required products and when ready, click Continue.
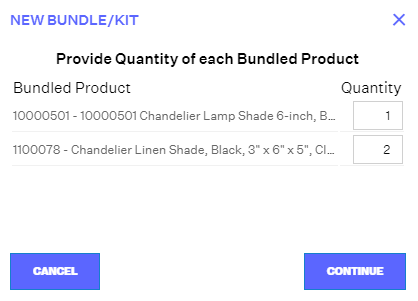
A new window will appear asking for the quantities per SKU that will make up the bundle/kit. Click Continue when done.
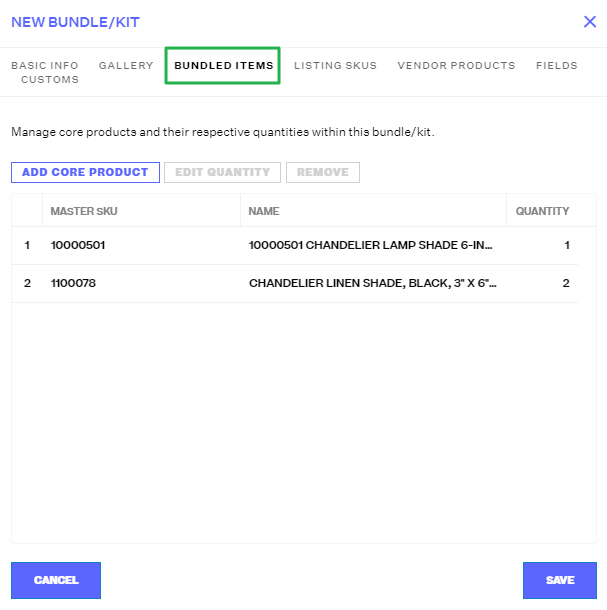
As you saw when you created a new core product through the UI, you will see the same window to create the new Bundle/Kit.

The required fields are the same as when you created a core product:
- Master SKU
- Name
- Brand
For information on Gallery, Listing SKUs, Vendor Products, or Customs, please refer to sections above under Core Products.
The one tab we did not go over is the “Bundled Items” tab (green box on image above). When you click on this tab, you will see the products that make up this bundle/kit. You can also add to the bundle by clicking on Add Core Product, which will allow you to search for another Master SKU or product name to add to this bundle/kit along with the quantity.
Variations
Creating variations in Extensiv Order Manager is very straight forward. To get started, click on the “Product Variations” button.
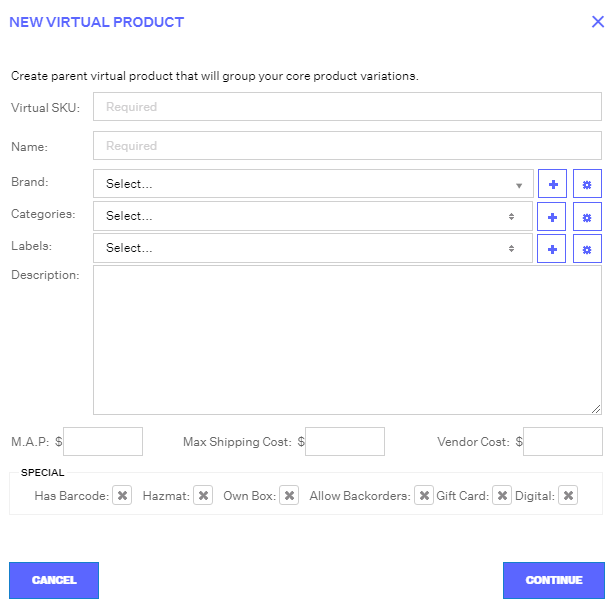
Once you do, you will see a new pop-up window where you can create the “Virtual SKU” or “Parent SKU” of the variation. You must also add the name for the variation grouping along with the brand. So, for a quick recap, these fields are required:
- Virtual SKU
- Name
- Brand
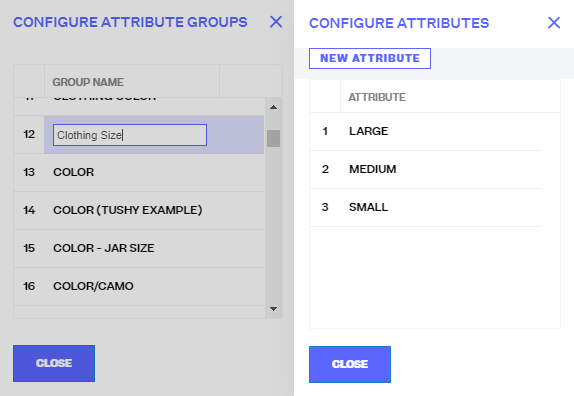
You can associate the virtual SKU with the Attribute Groups, which are the changing feature(s) of this product such as size, color, material, and etc.
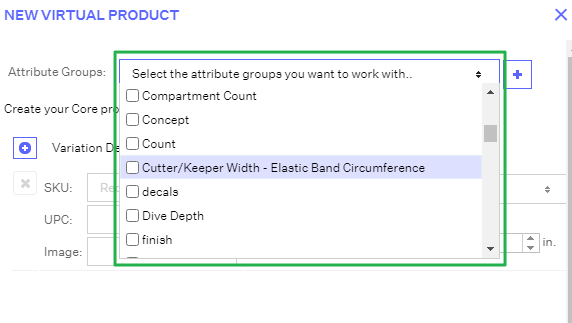
If the attribute(s) that you’re looking for does not exist, you can create one on the fly by click on the “+” button, type in the name and click Add, and lastly, Save.
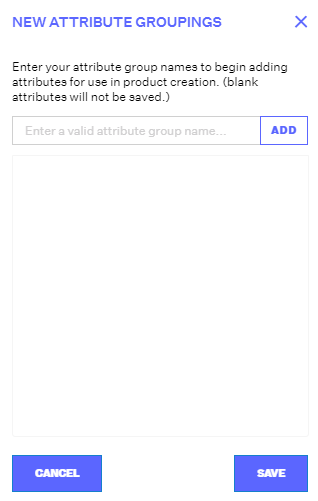
If you must edit an existing attribute group, click on the gear icon, write over the existing name and click on the wrench icon to configure the attributes that are associated with this attribute group.
Please be careful: Once you create an attribute, it cannot be deleted. If you decide not to use it, simply rename it until a time later on when you’re ready to use it.
Once you are ready, close out from these windows and go back to the New Virtual Product window. From here, you can now create the child SKUs that you will associate to the parent SKU and assign the necessary attributes along with the weights and dimensions.
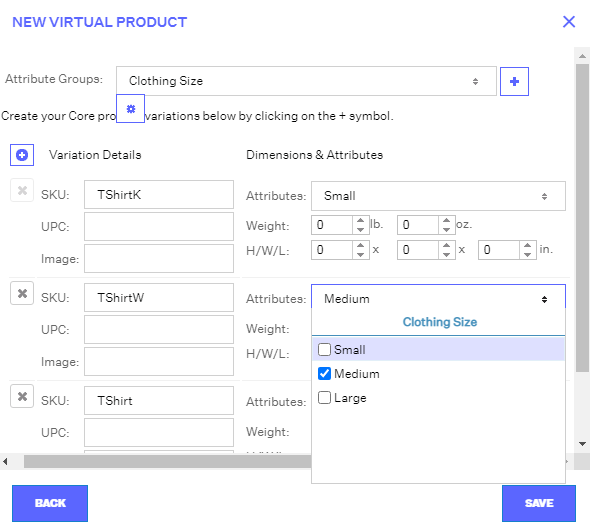
Once you are done, click Save, and you will have created your variation in Extensiv Order Manager.