• Help Center
  • Warehouse Management
  • Settings
  • Warehouse Management
    • Getting Started
        • Step 1: Setting Up a User
        • Step 2: Setting Up Your Business
        • Step 3: Setting Up Part Records
        • Step 4: Setting Up Your Inventory
    • Admin Console
      • Admin Console Basics
          • Warehouse Unlimited Admin Overview
          • Alpha / Beta
      • Managing Views
          • Navigating Menus
          • What Are Views?
          • Creating / Editing Views
          • Cloning Views
      • Other Topics
          • Print Jobs
          • Label Printing Admin
      • Tags
          • Tags Overview
          • Creating Tags
          • Applying Tags
    • Shipping
      • Shipping process
          • Shipping in Mobile
          • Creating a Sales Order in the Classic Admin Console
          • Creating a Sales Order in the Unlimited Console
    • Order Picking & Packing
      • Order Pick/Pack Information
          • Order Pick Overview
          • Guided Order Pick
          • Order Packing
          • Packing in Mobile
      • Picking with Device / Mobile
          • Step by Step - Guided Order pick on Device
      • Other Topics
          • Pick to Carton
          • Pick Item with Part Scan Settings
          • BackOrder Setting
          • Cross Docking
    • Receiving
      • Overview
          • Receiving Overview
          • Receiving Modes
      • Receiving on Device/Mobile
          • Creating a Purchase Order
          • Single Bin Receiving - Device
          • Single Bin Receiving - Mobile
          • Direct Put Away Receiving
          • Guided Put Away
      • Editing Receiving
          • Adjusting Quantities
          • Deleting Line Items Received
    • Customer Portal
      • Customer Portal Info
          • Customer Portal Overview
          • Customer Portal Options
      • Setting Up Customer Portal
          • Setting up Customer Portal User
          • Locking User into Location
          • Using Client Parts
          • Customer Portal Permissions
      • Using Customer Portal
          • Logging into Customer Portal
          • Customer Portal Customization
    • Cycle Counting
      • Cycle Counting with New Admin
          • Creating Cycle Count By Bin
          • Blind Count By Bin
          • Technical Count By Bin
          • Creating Cycle Count By Part
          • Blind Count By Part
          • Technical Count By Part
          • Committing Cycle Counts
      • Cycle Counting Classic
          • Cycle Counting Overview Classic
          • Cycle Count Reports Classic
          • Commit Cycle Count Values Classic
          • Blind Count Vs Technical Count Classic
          • Cycle Count on Device Classic
          • Cycle Count on Mobile Classic
    • Kit Building
        • Kit Building Overview
        • Creating Process Bins
        • Creating Kitted Parts
        • Kit Requests
        • Building Kits on Mobile
        • Breaking Kits On Mobile
        • Building Kits with Device
        • Breaking Kits With Device
        • Lot Numbers and Kit Building/Breaking
    • Managing Users
        • Editing Group Permissions
    • Barcode Scanner
      • System Requirements
          • Intro to Barcode Scanners
          • Compatible Devices
          • Network Requirements
      • Setup
          • Setting up WiFi / Network Connection
          • Downloading & Installing Extensiv Warehouse Manager
          • Configuring Extensiv Warehouse Manager
          • Recommended Settings for Datalogic Skorpio X3 and Falcon X3
          • Updating a Device
          • ScanSKU Setup
          • Installing Extensiv Warehouse Manager on a Data Logic DL-Axist
      • Troubleshooting
          • Performing a Cold Boot
          • Error Codes
          • Network Connection Troubleshooting
          • Barcode Will Not Read
          • Label Not Printing From Scan Gun
          • Application Closes
          • Device Update - Single Web Service
    • Import/Export
      • Introduction
          • Types of Import/Export
          • Data Types In Extensiv Warehouse Manager
          • .CSV Files
      • SNAP
          • Downloading and Installing SNAP
          • Creating Jobs
          • SNAP Export
          • SNAP Import
          • SNAP Delete
          • Label Printing in SNAP
          • SNAP FTP
          • Creating Job Groups
          • Scheduler
          • Generating SOAP API Credentials
      • Trouble Shooting SNAP
          • Errors in SNAP
          • Data Will Not Import
          • Matching .CSV Columns with Snap Import
          • SNAP Video
    • Integrations
      • Brightpearl
          • Brightpearl Integration Details
          • Brightpearl Integration Setup
          • Brightpearl Integration Settings
          • Brightpearl Standard Integration Run and Mappings
      • Shipstation
          • Shipstation Integrations
          • ShipStation Classic Integration
          • ShipStation Pick Pack Integration
      • Order Manager
          • Installing Warehouse Manager Order Manager Integration
          • Integrating Warehouse Manager and Order Manager
          • Understanding Order Sync in Warehouse Manager and Order Manager integration
          • Understanding the Inventory Sync between Warehouse Manager and Order Manager
      • ShippingEasy
          • Integration Details
          • Integration Installation ShippingEasy
        • Integration Manager
        • Warehouse Manager Premium Integration Package FAQs
    • Barcoding
      • Barcoding 101
          • What is a Barcode?
          • Barcode Types
      • Label Printing
          • Label Printer Hardware
          • Selecting Barcode Label Media
          • How to Configure Zebra WiFi Printer
          • Setting up your label printer
      • Printing Labels in Warehouse Manager
          • Label Templates
          • Printing In The Mobile App
          • Google Chrome Printing Addon
    • Wave Picking
      • Wave Pick Information
          • What is Wave Picking
          • Wave Pick Modes
          • Navigating Wave Picking
      • Creating Waves
          • Create Waves Section
          • Creating a Single Wave
          • Creating an Advanced wave
      • Other Wave Pick Functions
          • Pick Carts and Pick Totes
          • Wave Picking on Mobile
          • Wave Automation
          • WavePickScanTote Setting
    • Bin Move
        • Asset Move
        • Inventory Move
        • Child Bin Move
        • Mass Bin Move
    • Mobile Receiving and Picking
        • Receiving in Mobile
        • Picking in Mobile
        • Packing in Mobile
        • Shipping in Mobile
    • Settings
        • Overview
        • API Settings
        • Bin Types
        • Document Files
        • Document Templates
        • Event Actions
        • Label Config
        • Label Printers
        • Message Recipients
        • My Account
        • Order Settings
        • Pick Path
        • PO Payment Settings
        • Reason Codes
        • Shipping Accounts
        • Shipping Types
        • Tags
        • Transaction Codes
        • Users
        • Work Order Statuses
        • Work Order Types
    • Popular Articles
        • Step 1: Setting Up a User
        • How to Configure Zebra WiFi Printer
        • Inventory Move
        • Asset Move
        • Step 4: Setting Up Your Inventory
        • Label Templates
        • Network Connection Troubleshooting
        • Step 3: Setting Up Part Records
        • Label Printers
        • Barcode Types
    • Reporting
        • Reporting in Warehouse Manager
      • Submitting a Support Case
      • Document Printing
      • Un-Picking Sales Orders
      • Understanding Replenishments
      • Returns Management
      • Creating Vendors
      • Work Orders

Document Templates

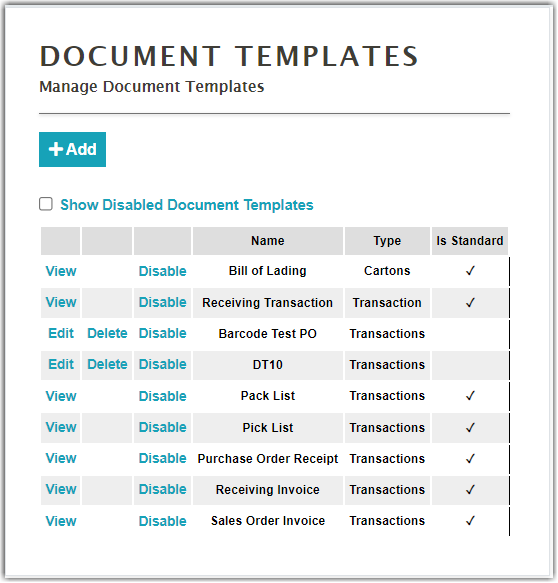
You can use Document Templates to display information about transactions or cartons. Multiple defaults are provided, but you are welcome to create your own or request a custom template from the support team for a fee. The Document Templates are HTML and in WYSIWYG (What You See Is What You Get) format.

By default, the following can be found in Document Templates:


Adding document templates

  1. Click Add to start creating a document template.
  2. Enter the name of the template.
  3. Select the document type:
    • Cartons – Used on Order details.
    • Transactions – Used in Shipping details.
  4. After you have selected a document type, the system will proceed into the template area where you can customize the following sections:
    • Sort By – The sorting method for the orders.
    • Page Styles – Provide the styles for the document template using CSS (Cascading Style Sheet). For more information about CSS, you can visit this article about CSS.
    • Header – The information displayed at the top of the page:
      • Content – The header information of the order. For example, Doc Number, Client, and Location.
      • Filter (optional) – Select a filter to not include orders unless they meet certain criteria.
    • Lines – Information related to products on an order.
      • Include – Click to check if you want to include the Lines section in the template.
      • Header – The Lines header row, provides the column headers. This must start with a table and must not have anything outside the table. For example, Part, Part Description, QTY.
      • Content – The Lines content row provides a table and must not have anything outside of the table. For example, Part, Part Description, QTY.
      • Filter (optional) – Select a filter to not include lines unless they meet a certain criterion.
    • Line Details – This section is used to include SN (Serial Number) or LN (Lot Number) and QTY information for each line (or if included, for each pre-line). This section is skipped if the part is either serialized not lotted or has neither been picked nor received.
      • Include – Click to check if you want to include the Footer section in the template.
      • Content – Provide the  content of the footer.
    • Click Show Advanced Options to show other document template options:
      • Disable the document.
      • Page size (default is letter) of the document.
      • Orientation (default is portrait)
      • Margin (default is 15) on the left side of the document.
      • Margin (Default is 15) on the top of the document.
      • Margin (Default is 15) on the right side of the document.
      • Margin (Default is 15) on the bottom of the document.
      • Fit content to page size.
  5. Once done with the new document template's settings, click Save.
templates documents

Was this article helpful?

Yes
No
Share additional feedback about this article

Related Articles

  • Overview
  • Bin Types
  • Document Files
  • API Settings

Not finding the help you need?

Contact Support
Solutions
  • Solutions for Brands
  • Solutions for 3PLs
  • Solutions for 4PLs
  • Solutions for B2B
Products
  • Extensiv 3PL Warehouse Manager
  • Extensiv Warehouse Manager
  • Extensiv Order Manager
  • Extensiv Integration Manager
  • Extensiv Network Manager
Products
  • Customer Success
  • Implementation
  • Consulting
Ecosystem
  • Fulfillment Marketplace
  • Integrations
  • Partners
  • Become a Partner
Resources
  • Resource Library
  • Blog
  • Market Insights
  • What is a 3PL?
  • What is a 4PL?
  • What is a WMS?
  • Why a Cloud-based WMS?
  • Glossary
Help
  • Help Center
  • API Documentation
  • Extensiv Univerisity
  • Community
  • System Status
  • Extensiv Logo
  • 100 N Pacific Coast Hwy, Suite 1100, El Segundo, CA 90245
  • |
  • Contact Us:
  • 83-EXTENSIV 888.375.2368 (main)
  • |
  • 310.844.7570 (local)
  • Copyright © 2023 Extensiv
  • |
  • All rights reserved.
  • Privacy Policy
  • |
  • Terms of Service
  • Follow Us:
Expand