Warehouse Management

Updated on June 26th, 2023

  • Extensiv Hub
    Popular Articles Getting Started Using Hub Technical Issues & FAQs Extensiv's Ideas Portal
  • 3PL Warehouse Manager
    Receiving Operations Inventory Management Shipping Operations System Configuration Scanning Operations Integrations Content Best Practice Resources Release Notes Popular Articles Troubleshooting Guides
  • Warehouse Management
    Getting Started Admin Console Shipping Order Picking & Packing Receiving Customer Portal Cycle Counting Kit Building Managing Users Barcode Scanner Import/Export Integrations Barcoding Wave Picking Bin Move Mobile Receiving and Picking Settings Popular Articles Reporting
  • Order Management
    Dashboard Orders Inventory Purchase Orders Shipments Customers Products Analytics Settings API API Integrations Accessing and Navigating Order Manager Error Messages Order Manager Popular Articles Accounting Integrations
  • Integration Management
    Getting Started with Integration Manager General Support Troubleshooting Extras & Addons API Documentation Popular Articles Order Sources Order Destinations
  • FAQs
  • Network Manager
    Getting Started Order Routing Management Technical Issues Shopping Carts Settings Settings, Products, and Orders
  • Billing Manager
    Getting Started Using Billing Manager
  • Release Notes
    Extensiv Sandbox Extensiv Extensiv Hub 3PL Warehouse Manager Integration Management Warehouse Management Order Management Billing Manager
  • Fulfillment Marketplace
    Getting Started
  • Sandbox
    Getting Started
+ More
  • Help Center
  • Warehouse Management
  • Getting Started
  • Warehouse Management
    • Getting Started
        • Step 1: Setting Up a User
        • Step 2: Setting Up Your Business
        • Step 3: Setting Up Part Records
        • Step 4: Setting Up Your Inventory
    • Admin Console
      • Admin Console Basics
          • Warehouse Unlimited Admin Overview
          • Alpha / Beta
      • Managing Views
          • Navigating Menus
          • What Are Views?
          • Creating / Editing Views
          • Cloning Views
      • Other Topics
          • Print Jobs
          • Label Printing Admin
      • Tags
          • Tags Overview
          • Creating Tags
          • Applying Tags
    • Shipping
      • Shipping process
          • Shipping in Mobile
          • Creating a Sales Order in the Classic Admin Console
          • Creating a Sales Order in the Unlimited Console
    • Order Picking & Packing
      • Order Pick/Pack Information
          • Order Pick Overview
          • Guided Order Pick
          • Order Packing
          • Packing in Mobile
      • Picking with Device / Mobile
          • Step by Step - Guided Order pick on Device
      • Other Topics
          • Pick to Carton
          • Pick Item with Part Scan Settings
          • BackOrder Setting
          • Cross Docking
    • Receiving
      • Overview
          • Receiving Overview
          • Receiving Modes
      • Receiving on Device/Mobile
          • Creating a Purchase Order
          • Single Bin Receiving - Device
          • Single Bin Receiving - Mobile
          • Direct Put Away Receiving
          • Guided Put Away
      • Editing Receiving
          • Adjusting Quantities
          • Deleting Line Items Received
    • Customer Portal
      • Customer Portal Info
          • Customer Portal Overview
          • Customer Portal Options
      • Setting Up Customer Portal
          • Setting up Customer Portal User
          • Locking User into Location
          • Using Client Parts
          • Customer Portal Permissions
      • Using Customer Portal
          • Logging into Customer Portal
          • Customer Portal Customization
    • Cycle Counting
      • Cycle Counting with New Admin
          • Creating Cycle Count By Bin
          • Blind Count By Bin
          • Technical Count By Bin
          • Creating Cycle Count By Part
          • Blind Count By Part
          • Technical Count By Part
          • Committing Cycle Counts
      • Cycle Counting Classic
          • Cycle Counting Overview Classic
          • Cycle Count Reports Classic
          • Commit Cycle Count Values Classic
          • Blind Count Vs Technical Count Classic
          • Cycle Count on Device Classic
          • Cycle Count on Mobile Classic
    • Kit Building
        • Kit Building Overview
        • Creating Process Bins
        • Creating Kitted Parts
        • Kit Requests
        • Building Kits on Mobile
        • Breaking Kits On Mobile
        • Building Kits with Device
        • Breaking Kits With Device
        • Lot Numbers and Kit Building/Breaking
    • Managing Users
        • Editing Group Permissions
    • Barcode Scanner
      • System Requirements
          • Intro to Barcode Scanners
          • Compatible Devices
          • Network Requirements
      • Setup
          • Setting up WiFi / Network Connection
          • Downloading & Installing Extensiv Warehouse Manager
          • Configuring Extensiv Warehouse Manager
          • Recommended Settings for Datalogic Skorpio X3 and Falcon X3
          • Updating a Device
          • ScanSKU Setup
          • Installing Extensiv Warehouse Manager on a Data Logic DL-Axist
      • Troubleshooting
          • Performing a Cold Boot
          • Error Codes
          • Network Connection Troubleshooting
          • Barcode Will Not Read
          • Label Not Printing From Scan Gun
          • Application Closes
          • Device Update - Single Web Service
    • Import/Export
      • Introduction
          • Types of Import/Export
          • Data Types In Extensiv Warehouse Manager
          • .CSV Files
      • SNAP
          • Downloading and Installing SNAP
          • Creating Jobs
          • SNAP Export
          • SNAP Import
          • SNAP Delete
          • Label Printing in SNAP
          • SNAP FTP
          • Creating Job Groups
          • Scheduler
          • Generating SOAP API Credentials
      • Trouble Shooting SNAP
          • Errors in SNAP
          • Data Will Not Import
          • Matching .CSV Columns with Snap Import
          • SNAP Video
    • Integrations
      • Brightpearl
          • Brightpearl Integration Details
          • Brightpearl Integration Setup
          • Brightpearl Integration Settings
          • Brightpearl Standard Integration Run and Mappings
      • Shipstation
          • Shipstation Integrations
          • ShipStation Classic Integration
          • ShipStation Pick Pack Integration
      • Order Manager
          • Installing Warehouse Manager Order Manager Integration
          • Integrating Warehouse Manager and Order Manager
          • Understanding Order Sync in Warehouse Manager and Order Manager integration
          • Understanding the Inventory Sync between Warehouse Manager and Order Manager
      • ShippingEasy
          • Integration Details
          • Integration Installation ShippingEasy
        • Integration Manager
        • Warehouse Manager Premium Integration Package FAQs
    • Barcoding
      • Barcoding 101
          • What is a Barcode?
          • Barcode Types
      • Label Printing
          • Label Printer Hardware
          • Selecting Barcode Label Media
          • How to Configure Zebra WiFi Printer
          • Setting up your label printer
      • Printing Labels in Warehouse Manager
          • Label Templates
          • Printing In The Mobile App
          • Google Chrome Printing Addon
    • Wave Picking
      • Wave Pick Information
          • What is Wave Picking
          • Wave Pick Modes
          • Navigating Wave Picking
      • Creating Waves
          • Create Waves Section
          • Creating a Single Wave
          • Creating an Advanced wave
      • Other Wave Pick Functions
          • Pick Carts and Pick Totes
          • Wave Picking on Mobile
          • Wave Automation
          • WavePickScanTote Setting
    • Bin Move
        • Asset Move
        • Inventory Move
        • Child Bin Move
        • Mass Bin Move
    • Mobile Receiving and Picking
        • Receiving in Mobile
        • Picking in Mobile
        • Packing in Mobile
        • Shipping in Mobile
    • Settings
        • Overview
        • API Settings
        • Bin Types
        • Document Files
        • Document Templates
        • Event Actions
        • Label Config
        • Label Printers
        • Message Recipients
        • My Account
        • Order Settings
        • Pick Path
        • PO Payment Settings
        • Reason Codes
        • Shipping Accounts
        • Shipping Types
        • Tags
        • Transaction Codes
        • Users
        • Work Order Statuses
        • Work Order Types
    • Popular Articles
        • Step 1: Setting Up a User
        • How to Configure Zebra WiFi Printer
        • Inventory Move
        • Asset Move
        • Step 4: Setting Up Your Inventory
        • Label Templates
        • Network Connection Troubleshooting
        • Step 3: Setting Up Part Records
        • Label Printers
        • Barcode Types
    • Reporting
        • Reporting in Warehouse Manager
      • Submitting a Support Case
      • Document Printing
      • Un-Picking Sales Orders
      • Understanding Replenishments
      • Returns Management
      • Creating Vendors
      • Work Orders

Step 3: Setting Up Part Records

Overview

Once you have set up your user account and set up your business, you can begin setting up parts records. There are three ways you can set up a part record—create a new part, import a part, or sync a part from an existing system.

There are three ways you can add a part record:

  • Manually creating a part through Warehouse Manager.
  • Syncing a part record from an existing integration.
  • Importing a part via SNAP.

This article reviews the process for manually creating a part in Extensiv Warehouse Manager.

Creating a new part

To manually create a part, go to Inventory > Parts, select a view, then click New.

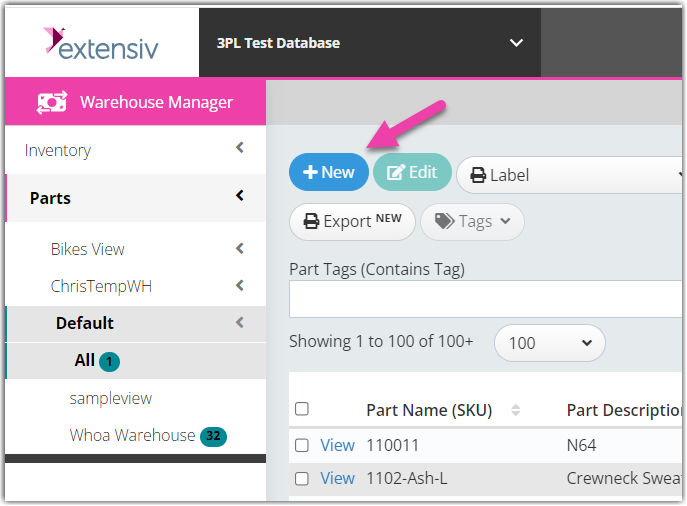
Once selected, the Create and Edit Parts page opens. This page is divided into the sections listed below.

Basic Information

The Basic Information section is where the essential details of the part are provided.

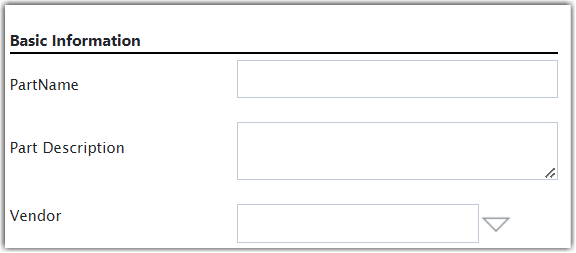
  • PartName: A required field and also often called the SKU of the product. This value is typically 19 characters or fewer for easy generation of barcodes. As a best practice, it is recommended to avoid spaces and instead use hyphens(-) or underscores(_) to separate words.
  • Part Description: It gives more detailed information about the part name.
  • Vendor: A required field where the product is purchased from. If you don't have vendors set up yet, go to Contacts > Vendors, then click New to add new vendor information, and lastly click Save.

Part Type

While the fields in the Part type section are optional when creating a part record, these values can provide better tracking of your inventory.

  • Require Serial Number: sed for any products that have a unique serial number that needs to be tracked. When checked, the Asset Information section appears:
    • Serial Format: Specific format needed for the serial number, preferably in regex (regular expression formula).
    • Remove Serial Prefix: Removes a prefix from the serial number of the product when it is scanned into the system.
    • Remove Serial Suffix: Removes a prefix from the serial number of the product when it is scanned into the system.
    • Enable Custom 1-4: Custom fields used to track dynamic data related to the product–can be set as required or optional.
  • Requires Lot: Used for any product that has a lot or batch number that needs to be tracked. When checked, the Lot Information section appears:
    • Lot Number Format: Specific format needed for the lot number, preferably in regex (regular expression formula).
    • Remove Lot Number Prefix: Removes a prefix from the lot number of the product when it is scanned into the system.
    • Remove Lot Number Suffix: Removes a suffix from the lot number of the product when it is scanned into the system.
    • Enable Custom 1-4: Custom fields used to track dynamic data related to the product–can be set as required or optional.
    • Perishable: Indicates if the product is a perishable good–if checked, it allocates inventory and requires you to pick using FEFO (First Expired, First Out) rules and should be confirmed if this overrides LIFO/FIFO (Last In, First Out / First In, First Out) rules.
    • Strict Kitting: Indicates if the product should be kitted–for more information, please visit our help article on Kit Building.
    • LIFO (Last In, First Out): Indicates the most recently received part will be required to ship first.
    • FIFO (First In, First Out): Indicated the oldest received part will be required to ship first.
  • Measurement Type: Select to specify if the part can be measured by Area, Length, Volume, or Weight.
  • Measurement Unit: Select to specify if the part can be measured by Area, Length, Volume, or Weight–once selected, enter a specific unit of measure for the Measurement Unit (for example–Acre for Area, Centimeter for Length, Meter for Volume, Kilograms for Weight, etc.).

Other Information

The fields in the Other Information section are optional when creating a part record:

  • ClientDescription: An external description that is often pulled from integrations.
  • Image URL: A public link that is used for internal reference and is not shown in other parts of the system.
  • Cost: The rate at which the part is purchased from the vendor.
  • Rate: The rate at which the part is sold to customers.
  • Shipping Weight: Weight of the part–in pounds by default.
  • Shipping Manufacturer Origin: The country of origin where the product was manufactured.
  • Custom1: Custom field that can be used to store any data your company requires–may vary by integration.
  • Custom2-4: Custom data that can be used for cross-referencing. For example, Universal Product Code (UPC) or Manufacturer Part Number MPN).
  • Custom5-9: Custom field that can be used to store any data your company requires–may vary by integration.

Once you complete these fields, click Save to populate additional sections.

Each of these sections is reviewed in detail below.

Put Away Bins

Putaway bins allow you to select a bin where it is referenced for guided putaway when receiving in mobile. To add a putaway bin, click Add Bin and provide the Client and Location, then click Add.

Kit Contents

This section allows you to group the products into kits (composed of multiple parts) or bundles (composed of multiples of products–for example, 2 pack or 5 pack) that will have their own SKU.

To add a part, click Add Kit Part, then select the Part from the drop-down menu and specify the Qty (quantity).

If you check Dynamic, you can set a range (min/max) to use as acceptable criteria when picking or building kit inventory.

Then click Add to include the part in the kit.

Units of Measure

A unit of measure can be added to each part to determine the different size types and multipliers that are used throughout the warehouse. 
It is measured in one (1) unit each by default, but you can add your own unit of measure by clicking Add in the Units of Measure section, then indicating the Unit of Measure and Multiplier. Click Add to include the set unit of measure.
You can assign the Unit of Measure that you have created for each of the following events:

  • Order Pick
  • Receiving
  • Bin Move
  • Add Inventory
  • Remove Inventory
  • Label Print
  • Kit Pick
  • Kit Build
  • Work Order

Reorder Points

This feature allows you to be notified when a part is running low, by creating reorder points which can be triggered when a certain quantity or set minimum threshold of that part is reached.
For example: If the reorder point qty is set to 10, the system can trigger either an email notification to inform you that the part has reached the minimum level. 

For the email action, you can edit the template at Classic Console > Admin > Message Templates and to edit recipients, go to Unlimited Console > Settings > Event Actions. 
To add a reorder point, click Add, complete the necessary fields in the section, then click Save.

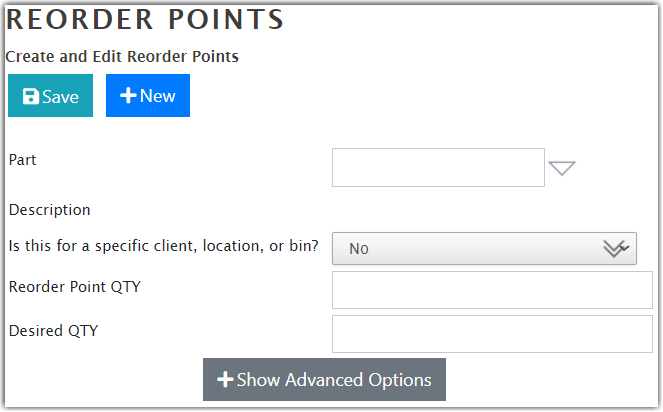
Note: If the customer has an integration that is built into Purchase Orders, the reorder action will not interact with the integration.


Importing a Part

If you would like to import a part into Extensiv Warehouse Manager, you first need to download SNAP, Warehouse Manager's import/export tool. See Downloading SNAP to get started.

Once you have installed SNAP, download the Parts Template to begin importing parts into Warehouse Manager.

Syncing a Part from an Existing System/Integration

It's possible to sync a part through the Warehouse Manager Integrations module, which can save you time and effort. To sync your part data, visit Warehouse Manager Integrations to find the specific integration you want to use and then follow the setup/configuration instructions. If you have any questions during this process, please contact the Scout support team.

Was this article helpful?

Yes
No
Share additional feedback about this article

Related Articles

  • Step 2: Setting Up Your Business
  • Step 1: Setting Up a User
  • Step 4: Setting Up Your Inventory

Not finding the help you need?

Contact Support
Solutions
  • Solutions for Brands
  • Solutions for 3PLs
  • Solutions for 4PLs
  • Solutions for B2B
Products
  • Extensiv 3PL Warehouse Manager
  • Extensiv Warehouse Manager
  • Extensiv Order Manager
  • Extensiv Integration Manager
  • Extensiv Network Manager
Products
  • Customer Success
  • Implementation
  • Consulting
Ecosystem
  • Fulfillment Marketplace
  • Integrations
  • Partners
  • Become a Partner
Resources
  • Resource Library
  • Blog
  • Market Insights
  • What is a 3PL?
  • What is a 4PL?
  • What is a WMS?
  • Why a Cloud-based WMS?
  • Glossary
Help
  • Help Center
  • API Documentation
  • Extensiv Univerisity
  • Community
  • System Status
  • Extensiv Logo
  • 100 N Pacific Coast Hwy, Suite 1100, El Segundo, CA 90245
  • |
  • Contact Us:
  • 83-EXTENSIV 888.375.2368 (main)
  • |
  • 310.844.7570 (local)
  • Copyright © 2023 Extensiv
  • |
  • All rights reserved.
  • Privacy Policy
  • |
  • Terms of Service
  • Follow Us:
Expand